skip to main |
skip to sidebar
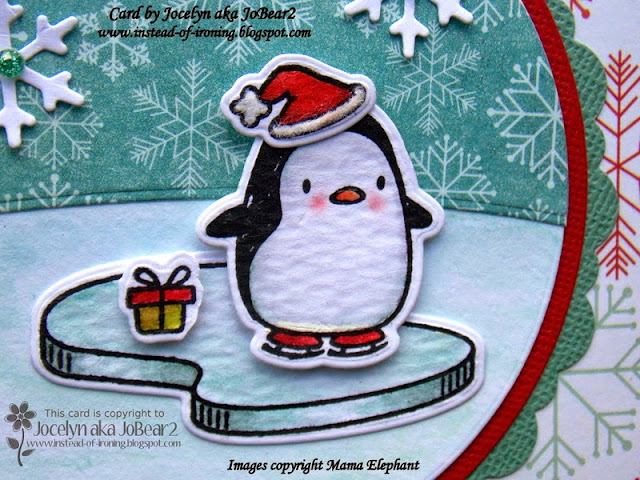
Hi blogging friends
I am still playing with my Mama Elephant Arctic Penguin stamp and die set and thought I would make another Christmas card - this time for my husband. I am so lucky that my husband doesn't mind cute images - he is such a great encourager for my cardmaking and I feel so blessed :-) This card is also my entry for the Crafty Catz Challenge #256 of Winter.
If you missed my last post using this stamp/die set, you can see it HERE. I decided to go with the same layout, twine, papers and dies to make the whole process quicker and will probably make a few more cards in similar fashion - although I always make a few little changes to make the cards a bit different. You know, I hadn't even thought about the fact that there are no penguins in the Arctic until my blogging friend Jackie pointed it out! Maybe the set should be renamed "Antarctic Penguins" instead!

I love how this stamp set has lots of little images (as well as lots of penguins in different poses) and the matching dies saves alot of time fussy-cutting.
To do the background, I used a Lifestyle Nesting Circle die to diecut the My Mind's Eye Winter Wonderland snowflake designer paper and Ranger watercolour cardstock - then used one of my WPlus9 Landscape border dies
(which comes in a set of 3) to cut the designer paper where I wanted
the edge of the horizon to be then adhered the designer paper to the
watercolour cardstock circle. I scribbled Evergreen Bough and Peacock Feathers Distress Markers on an acrylic block, added some water and painted the watercolour paper to look like the sea.
I stamped all the images using Ranger Archival Jet Black ink onto watercolour cardstock and coloured them with various Distress Markers and Tombow Pens, then diecut each piece.
I used a Red Wink of Stella glitter pen
on the red Santa hat, skates and berries on the mistletoe and Clear Wink of
Stella on the floating pieces of ice, leaves on the mistletoe and the green hat. I added
Stampendous Cotton White Fun Flock mixed with Crystalina glitter to the
pompom and cuff of both hats. I also added white dots to the green hat with a white gel pen and Glossy Accents to the nose on each penguin. I lightly chalked in the cheeks using pink I-Kandee Pearlescent chalk. Here is a little close-up so you can see the detail:

The floating pieces of ice were glued on using Tombow Mono Multi glue and the penguins and mistletoe were popped up on dimensionals.
The scalloped circle main image panel is a gorgeous die by Spellbinders from their Majestic Circles die set.
The snowflakes are dies from the Poppystamps Christmas Baubles die set. I glued down the centres then bent the arms up a little and added red and teal Fun
Fair Glitter Colours Adhesive Enamel dots to the centres. You probably can't
tell from the photo but these enamel dots are very glittery and are
absolutely gorgeous!
I was so annoyed with myself because I had coloured the hats and added the Fun Flock and put them aside to dry. I had already attached the penguins and decided to glue on the diecut snowflakes totally forgetting about the hats. When I went to glue on the Santa hat, I realised that it was covering part of the snowflake so tried to remove the snowflake but of course, it was stuck fast. If I had my time over, I would have moved the snowflake down a little so it wasn't partly hidden - oh well - just one of those little irritating things...... Here is an even closer view of the main image:

A few months ago, I decided to upgrade my Digital Camera and it takes fantastic close-up photos. It's a Nikon Coolpix L320 and takes 16.1 megapixel photos. My husband had bought a second-hand Nikon Coolpix L310 which was the previous model to this one so I tried it out and was really impressed with how easy it was to use and the quality of the photographs was much better compared to my old camera. So I bought the latest model and really love it and it didn't cost an arm and a leg which was great. I have found that I don't have to fiddle as much with my photo editing programs to get the colours true to real life compared to my old camera - and most of the time, I don't need to do very much at all. With my old camera, I would often spend quite a bit of time editing and but sometimes, no matter how much I fiddled, I couldn't get my photo to look like my card did in real-life which would frustrate me no end! By the way, I use a mix of Google Picasa and GIMP for photo editing - both free programs. I am no expert on cameras and I am sure there are more amazing ones around but thought I would share my experience in case it is helpful to someone. Anyway, I am digressing.......back to my card......
The twine and designer paper on the card base are by My Mind's Eye Winter Wonderland which was released in 2012. The sentiment was also trimmed from one of the designer paper sheets; I layered it onto teal cardstock and trimmed it to 1/16" using my Perfect Layers Tools then popped it up on dimensionals.
The teal cardstock base and burgundy cardstock layers were trimmed to 1/8" and 1/16" respectively using my Perfect Layers Tools.
As always, I added Fray stop to the cut ends of the twine to stop them from fraying and unravelling.
As I type this, I am at the hospital in the City with my loved one waiting for an appointment - just routine. We have just been to one appointment but there is a 3 hour gap between appointments so we are hanging around. We are coming back in again tomorrow for another 2 appointments - again just routine - and then another one early next week - but fingers-crossed, that will be the last of the hospital appointments in the City for the year. I am using the hospital computer and the colours look super-bright compared to my home laptop - in fact, my card colours look too bright and the sea looks like there are brown patches in amongst the teal! Gee, I hope it doesn't look like that for all of my blog readers and that it is just this computer (?!). Thanks for visiting my blog today - hope to see you again very soon!
Jocelyn
Card Recipe:
Stamps: Mama Elephant Arctic Penguins set
Ink: Ranger Archival Jet Black
Designer Paper: My Mind's Eye (MME) Winter Wonderland (2012) 6" x 6" pad
Dies:
Lifestyle Nesting Circles, Spellbinders Majestic Circles, Mama Elephant
Arctic Penguins, Poppystamps Christmas Baubles (snowflakes), WPlus9
Landscape Borders die set
Accessories:
Big Shot, Ranger Watercolour cardstock, Stampendous Cotton White Fun
Flock mixed with fine Crystalina glitter, dimensionals, Tombow Mono
Multi glue, doublesided tape, Fun Fair Glitter Colours Adhesive Enamel
Dots (by Helz Cuppleditch), Twine from MME Winter Wonderland twine
set WW1068, Perfect Layers Tools, Glossy Accents, Distress Markers -
Evergreen Bough + Peacock Feathers + Festive Berries, Tombow Pens, #2
round paintbrush, Cardstock - burgundy and teal, Wink of Stella glitter
pens - red and clear, I-Kandee Pearlescent chalk, Ranger Inkssentials white gel pen
Hi blogging friends
When Mama Elephant released their Arctic Penguin stamp set recently, I couldn't help myself and just HAD to get the set - those little penguins had captured my heart! I love how the set has alot of penguins in different poses PLUS it has tons of little extras like the Santa hat, winter hat, present, cup, mistletoe, 2 sizes of floating ice and a few other little images. Cute, cute, CUTE LOL! I also bought the matching die set which makes putting together a little scene nice and quick. And here is my card:

To do the background, I used a Lifestyle Nesting Circle die to diecut the My Mind's Eye Winter Wonderland snowflake designer paper and Ranger watercolour cardstock - then used one of my WPlus9 Landscape border dies (which comes in a set of 3) to cut the designer paper where I wanted the edge of the horizon to be then adhered the designer paper to the watercolour cardstock circle (I hope that makes sense!). I scribbled Evergreen Bough and Peacock Feathers Distress Markers on an acrylic block, added some water and painted the watercolour paper to look like the sea.
I stamped all the images using Ranger Archival Jet Black ink onto watercolour cardstock and coloured them with various Distress Markers and Tombow Pens, then diecut each piece.
I used a Red Wink of Stella glitter pen on the Santa hat, skates and top of the present and Clear Wink of Stella on the floating ice and green part of the present. I added Stampendous Cotton White Fun Flock mixed with Crystalina glitter to the pompom and cuff of the hat. I added Glossy Accents to the penguin's nose. Here is a little close-up so you can see the detail a bit better - the photo is a little dull as it is very stormy here today and I had try and take photos inbetween squalls:
The floating ice was glued on using Tombow Mono Multi glue and the penguin and present were popped up on dimensionals.
The scalloped circle main image panel is a gorgeous die by Spellbinders from their Majestic Circles die set.
The snowflakes are dies from the Poppystamps Christmas Baubles die set. I glued down the centres then bent the arms up a little and added red and teal Fun Fair Glitter Colours Adhesive Enamel dots to the centres which I bought 2 weeks ago at Scrappy Hollow in Croydon, Victoria. You probably can't tell from the photo but these enamel dots are very glittery and are absolutely gorgeous! There are quite a few colours and sizes in the set which makes it good value for money.
The twine, chipboard sentiment and large brad plus the designer paper on the card base are all by My Mind's Eye Winter Wonderland which was released in 2012. Here is a close-up of that gorgeous brad:

Gosh, I love the colours in the My Mind's Eye Winter Wonderland set - right up my alley and so perfect for cool, winter/Christmas scenes. Yes, I know it is summer at Christmas where I live but I am just crazy for snowmen, snowflakes and snowy scenes. I have never felt very attracted to images of Santa on a surfboard or Santa wearing shorts for Christmas cards - they just don't appeal to me - and I am blissfully singing "Winter Wonderland" or "I'm Dreaming of a White Christmas" no matter how hot it is! I just bought some more of this MME range online from Scrap Therapy in Queensland, Australia as I was getting a bit low - they have great customer service - prompt and the goods are really well-packaged for the postal service (I have no connection to the company other than being a regular customer).
The teal card base and burgundy cardstock layers were trimmed to 1/8" and 1/16" respectively using my Perfect Layers Tools.
As always, I added Fray stop to the cut ends of the twine to stop them from fraying and unravelling.
Challenges:
I am entering my card in the following Challenges:
Splitcoaststampers - Free for All Friday F4A248 - Grab and Go - grab the most recent thing you have purchased and haven't used and use it.
Crafty Hazelnut's Christmas Challenge Extra - November - Anything Goes
Thanks for visiting my blog today!
Jocelyn
Card Recipe:
Stamps: Mama Elephant Arctic Penguins set
Ink: Ranger Archival Jet Black
Designer Paper: My Mind's Eye (MME) Winter Wonderland (2012) 6" x 6" pad
Dies: Lifestyle Nesting Circles, Spellbinders Majestic Circles, Mama Elephant Arctic Penguins, Poppystamps Christmas Baubles (snowflakes), WPlus9 Landscape Borders die set
Accessories: Big Shot, Ranger Watercolour cardstock, Stampendous Cotton White Fun Flock mixed with fine Crystalina glitter, dimensionals, Tombow Mono Multi glue, doublesided tape, Fun Fair Glitter Colours Adhesive Enamel Dots (by Helz Cuppleditch), Brad from MME Winter Wonderland Decorative Brads set WW1063, Chipboard sentiment from MME Winter Wonderland Decorative Buttons set WW1064, Twine from MME Winter Wonderland twine set WW1068, Perfect Layers Tools, Glossy Accents, Distress Markers - Evergreen Bough + Peacock Feathers + Festive Berries, Tombow Pens, #2 round paintbrush, Cardstock - burgundy and teal, Wink of Stella glitter pens - red and clear
Hi blogging friends
Today I am sharing some Clean and Simple Christmas cards using my favourite snowflake die: Kate's Snowflake by Simon Says Stamp and a new embossing folder I picked up at a Craft Show in October.
These cards are also my entry for the following challenges:
Crafty Hazelnut's Christmas Challenge Extra - November - Anything Goes
Crafty Catz Challenge #255 - Christmas is coming
The embossing folder is by Nellie Snellen - Christmas Round and was just the right size for the snowflake die to fit inside - yay!
On Jennifer Maguire's blog, I had seen Jennifer diecut things then heat-emboss them and thought I would give it a try - and it worked really, really well.
For the gold snowflake: I smooched the diecut snowflake very thoroughly with Versamark Watermark ink and poured on Ranger fine detail Gold embossing powder and picked it up very carefully with my closed-point tweezers and heat-set it. As soon as the powder melted I poured on a 2nd coat of embossing powder and heat-set it. You really do need two coats of the embossing powder to get really smooth coverage - one just doesn't look as good:

For the silver snowflake: I used the same ink and did two coats of Ranger fine detail Silver embossing powder:
For the teal snowflake: I inked the diecut with Colorbox Sapphire Silk pigment ink and did two coats of Polysparkle clear embossing powder:

I adhered the snowflakes to my white cardstock using Tombow Mono Multi glue which gave me a little bit of time to line up the points perfectly. I cleaned up any stray bits of glue using my Xyron adhesive eraser.
I have also seen on Jennifer Maguire's blog how Jennifer had made matching embossed edges to her embossed diecuts so I did this same technique for the bottom matching borders. All you have to do is take a scrap of white cardstock and apply the same ink that you use for your diecuts to one edge and heat-set with two coats of embossing powder then trimmed it to size. Simple and quick! I attached mine to the card base using doublesided tape.
I tied on the twine/ribbon and added Fray Stop to the cut ends to stop them from fraying. I glued the tails down with Tombow Mono Multi glue to hold them in place because they kept blowing in the wind when I was trying to photograph them!
Lastly, I added rhinestones to the snowflake centres. The gold gem came on a sheet of different coloured rhinestones from Bellbird Paper Arts which cost about $2.50 (Bellbird Paper Arts are located in Blackburn, Victoria). The silver and teal rhinestones are by Kaisercraft. I couldn't figure out where to put a sentiment so left it off.
Please note it is REALLY hard to photograph silver and gold so the snowflakes look a bit brighter in real life.
Thanks for stopping by!
Jocelyn
Card Recipe:
Teal Snowflake -
Stamps: None
Ink: Colorbox Sapphire Silk pigment
Dies: Simon Says Stamp Kate's Snowflake SSSD111309
Accessories: Big Shot, Nellie Snellen Christmas Round-1 EFE003 embossing folder, Tombow Mono Multi glue, doublesided tape, Polysparkle embossing powder, heat-gun, Fray Stop, blue sparkle ribbon, Kaisercraft Ice Blue rhinestone (SB774) white cardstock
Gold Snowflake -
Stamps: None
Ink: Versamark Watermark
Dies: Simon Says Stamp Kate's Snowflake SSSD111309
Accessories: Big Shot, Nellie Snellen Christmas Round-1 EFE003 embossing folder, Tombow Mono Multi glue, doublesided tape, Fray Stop, gold cord, Gold gem (Bellbird Paper Arts), heat-gun, Ranger fine detail Gold embossing powder, white cardstock
Silver Snowflake -
Stamps: None
Ink: Versamark Watermark
Dies: Simon Says Stamp Kate's Snowflake SSSD111309
Accessories: Big Shot, Nellie Snellen Christmas Round-1 EFE003 embossing folder, Tombow Mono Multi glue, doublesided tape, Fray Stop, silver cord, Kaisercraft Silver rhinestone, heat-gun, Ranger fine detail Silver embossing powder, white cardstock
Hi blogging friends
I am finally getting back into the groove of making cards on a regular basis. Funny how when you have hardly made any cards for a while, it seems difficult to get everything flowing again. I haven't coloured anything much for ages and it was almost like I had forgotten how: I felt so rusty! But with Christmas fast-approaching, I need to get my skates on as I haven't made very many Christmas cards this year - and today I am sharing a card using a super-cute little penguin from Lawn Fawn which is my entry for the following challenges:
Papertake Weekly Challenge - Anything Goes
Christmas Stampin' All Year Long - Challenge 36 - Anything Goes

I dry-embossed a piece of Ranger Distress watercolour cardstock using my Big Shot and Ultimate Crafts Snowflake Frame embossing folder (which was a recent purchase at a Craft Show in October and is a 2014 release). I really love how this folder has a blank section in the middle for your image.
To do the background, I drew a wavy line with my pencil as a guide for where I wanted my skyline then used an old paintbrush to drop in dots of Masking Fluid where I wanted the snow to be. Once this was dry, I wet the cardstock with clear water using a flat paintbrush and dropped in some watered-down Winsor and Newton watercolour paints in blues, purple and a little bit of grey and just let them mingle together. I left it to dry and then used my finger to rub off the Masking Fluid which left white dots for snow. I also painted the area to the left of the penguin with watered-down Ultramarine watercolour paint. The sky looks quite a bit paler in the photo than in real life and you can see the detail a bit better in the close-up photo a bit further down.
I was a bit clumsy when I painted the sky and some colour leaked into the dry-embossed frame (next time I will mask off that section!) and it didn't look very good so I tried to sponge the colour out but just made it worse! I was getting very cheesed off and almost tossed the jolly thing out - but then came up with the idea of adding a diecut frame over the embossed frame to hide the mess and was lucky to find one that was almost the right size and figured it was near-enough so ran with it. I glued it on using Tombow Mono Multi glue. Phew! And you know, I actually preferred having a frame over the centre compared to no frame.
I stamped the penguin onto Distress watercolour cardstock using
Ranger Jet Black archival ink and coloured him with Festive Berries and
Peacock Feathers Distress Markers and Black Soot Distress ink. I added
some white dots on the scarf using a white gel pen then diecut the
penguin using the matching Lawn Fawn die.
The sentiment is also from the Winter Penguin stamp set and was stamped with RangerJet Black ink and Ancient Page Cardinal dye ink.
I drew in the black skating line using a Zig black pen then glued on the 3 x pale teal snowflakes around the image. The snowflakes are the leftover punchies from using a Martha Stewart Snow Flurry edge punch: I love these punchies because the snowflakes are so tiny and perfect for adding as little embellishments. I added silver rhinestones to the centres.
Here is a close-up of the main panel:

The white snowflakes are by My Favorite Things - and I used the smallest and 2nd smallest dies. I popped them up on dimensionals and added red rhinestones.
I layered the main panel onto red cardstock and trimmed the edges to 1/16" using my Perfect Layers Tools.
Lastly, I used a Clear Wink of Stella glitter pen to add some sparkle to the scarf, skates and the pale teal snowflakes and some Glossy Accents to the penguin's beak.
Before I go, I forgot to share on my last post the Halloween card that my daughter gave me:

Pretty cool, don't you think?!
And just a snippet of happy news: my Halloween card (see THIS blogpost) was picked as one of the favourites for the week on Splitcoaststampers - yay me! And my card was also showcased as one of the top 4 picks over at Diecutting Divas (you can see the details HERE - just scroll down till you see my card!) Oh my gosh, I can hardly believe it!!
Thanks for visiting my blog today.
Jocelyn
Card Recipe:
Stamps: Lawn Fawn Winter Penguin set
Ink: Ranger Jet Black Archival, Ancient Page Cardinal dye, Black Soot Distress Ink
Dies: Lawn Fawn Winter Penguin, My Favorite Things Die-namics Snowflakes Trio, Lifestyle Nesting Card Templates (rectangles)
Accessories: Big Shot, Ultimate Crafts Snowflake Frame embossing folder (from 2014 Feliz Navidad Collection), Perfect Layers Tools, dimensionals, Tombow Mono Multi glue, doublesided tape, Distress Markers - Peacock Feathers and Festive Berries, white gel pen, Zig black .03 pen, Winsor and Newton watercolour paints, 1/2" flat paintbrush, #2 round paintbrush, old round paintbrush, Masking Fluid, Papermania silver rhinestones PMA351103, Kaisercraft SB711 red rhinestones, Wink of Stella clear glitter pen, Glossy Accents, cardstock - red, pale teal, Ranger Distress watercolour
Punches: Martha Stewart Snow Flurry edge


.jpg)


