Showing posts with label Father's Day. Show all posts

Sunday, September 13, 2026

Stamp-It Australia Windward Nautical Masculine Card

 
Hi everyone,

I am still making my Nautical Cards in-between other projects that I am working on.  I just love making nautical themed cards for men and really enjoy the process so much - and here is what I made:


Challenges

This is also my card for the following challenges - click on the underlined link to take you to the challenge:
  • Splitcoaststampers - USEIT2026 - Use something old or neglected from your stash
  • Crafty Catz - #719 - Anything Goes
  • Little Red Wagon - #875 - Use a Stamp
The main image is a very old Stamp-It Australia stamp called Windward which dates back to 1998.  I really miss Stamp-It Australia as they had such a large and diverse range of stamps.  They are still in business but no longer make stamps for cardmaking.

I stamped the ship using Versafine Vintage Sepia Ink onto Ranger Watercolour Cardstock.  The ship was coloured using a variety of mediums - Derwent Inktense Pencils, Lyra Watercolour Pencils and Zig Clean Color Real Brush Markers.  

I extended the sea further down because it looked weird when I diecut it to have a blank area.  I added whitecaps to the ocean using a White Gel Pen and smeared it a little with my finger to help it blend in.

I went over some of the brown lines using a Brown Copic Multiliner - mostly on the body of the ship and the mast to darken up the wood and give it a little more definition.

I layered the main image onto American Crafts Kraft Cardstock then Kaisercraft Shadow Cardstock, then ink blended around the panel using Hero Arts Soft Sand Shadow Ink - as are all the layers on my card.

The designer papers are by Kaisercraft Sandy Toes which was first released in 2014 so are old.

The Navy Blue Grosgrain Ribbon I saved from an old gift bag that was being thrown out.  It was added in 2 separate elements because it is easier for me that way so that it sits nicely on the card.  I added some Fray Stop to the cut ends to stop them from fraying.

The sentiment is from the back of the Sandy Toes Paper Pad and was popped up on scraps of white cardstock.

The red hearts were diecut from Red Cardstock using an Impression Obsession Heart of Hearts Die which I've had for many years.  I love it because it diecuts lots of different hearts:


I added some Uniquely Creative Clear Sparkle Brush to the hearts plus the red flags on the ship as well as the whitecaps on the ocean.

Once I had finished my card front, I glued it to a Kaisercraft White Card Base using Tombow Mono Multi Glue.

Finished size is 5-1/2" x 5-1/2" or 140mm x 140mm.

I think you could use this card for a Birthday or a Wedding Anniversary or Father's Day.

Thanks for visiting my blog today.

Jocelyn


Card Recipe:

Stamps:  Stamp-It Australia Windward 1073G Self-Cling Rubber Stamp (1998 & retired)

Ink:  Versafine Vintage Sepia, Hero Arts Soft Sand Shadow

Designer Paper:  Kaisercraft Sandy Toes PP957 6-1/2" x 6-1/2" Pad (2014)

Accessories:  Big Shot, Zig Clean Color Real Brush Markers, Derwent Inktense + Lyra Watercolour Pencils, #2 & #4 Round Paintbrushes, Copic Brown .005 Multiliner, Uniquely Creative Clear Sparkle Brush, White Gel Pen, Tombow Mono Multi Glue, Navy Blue Grosgrain Ribbon, Fray Stop, Ink Blending Tool with Domed Pad, Cardstock - Kaisercraft Shadow + American Crafts Kraft + Scraps of White & Red, Ranger Watercolour Cardstock, Kaisercraft White Card Base

Dies:  Impression Obsession Heart of Hearts DIE052-I (retired), Lifestyle Nesting Circles (retired)


Wednesday, August 6, 2025

Pion Design Mister Tom's Treasures Vintage Car Cards

 
Hi blogging friends 😄

I continue to be very busy in my Craft Room whipping up masculine cards for all those birthdays our family has in August plus one for Father's Day in September.  This time, I pulled out my Pion Design Mister Tom's Treasures Designer Papers which I bought on clearance not too long ago.  They are from 2016 and I really love them because they are just a classic design.  None of the men in our family are into fishing, play sport, gaming or drinking so I am always after designer papers that aren't any of those things.  

Pion Design closed at the end of 2023 and I really, really miss them.  Their vintage-inspired papers were so unique and it really left a hole in the market.

Anyhow, onto the first of my 3 cards:


This card is also for the following Challenges - click on the underlined link to take you to the Challenge:
  • A Perfect Time to Craft - August - Challenge #8 - Anything Goes
This card is for my husband for Father's Day which is in September here in Australia.  The vintage car was trimmed from one of the Pion Design Mister Tom's Treasures designer papers then layered onto Kaisercraft Shadow Cardstock.  I ink-blended around the edges using Ranger Antique Linen Distress Ink and my Ink Blending Tool which was fitted with a Domed Pad.

On a whim, I decided to stamped around the edges of this main panel using Antique Linen Distress Ink and two stamps:  Uniquely Creative Longhand and Kaisercraft Vintage Clocks.  You can see a close-up of the stamping here:


I really like how that simple bit of stamping just added something to the whole vintage-vibe that I was trying to create.

The centre panel was dry embossed using my Big Shot and a free Mini Embossing Folder that came with a UK Papercraft Magazine.  I also ink-blended the panel with Antique Linen Distress Ink.

Both the top and bottom designer paper are by Authentique - Manly - which is from 2020.  

The sentiment was also trimmed from the same Pion papers, ink blended with Antique Linen Distress Ink then popped up on scraps of white cardstock.  I added some Inque Boutique Brads to each corner.  This pack of brads has a variety of tarnished metal colours and suited the vintage theme really well.  Lastly, I glued my card front to a Cream Card Base using Tombow Mono Multi Glue.

And here is a pic of the inside:


Both the sentiment and vintage car are by Stampin' Up from a retired set called Guy Greetings.  I stamped them using Stampin' Up Night of Navy Ink and used a Stamp Positioner so I could stamp the images several times.

Here is my 2nd card:


The vintage car is again from the Pion Design Mister Tom's Treasures Designer Paper.  I layered the car onto some Pion Design Brown Designer Paper then onto Kaisercraft Grey Cardstock which has brown tones in it and matched really well.  I stamped around the Vintage Car using the same stamps and ink as my first card.

The centre strip of designer paper and the sentiment is from Mister Tom's Treasures - Borders.  The top designer paper is Pion Design and the bottom is by Authentique - Manly.  I again added Antique Linen Distress Ink to all the edges.  I added the Inque Boutique Brads to each corner which are a lovely burnished copper colour and matched the car perfectly.  I glued the card front to a Cream Card Base using Tombow Mono Multi Glue.

Here is a pic of the inside:


I used the same Stampin' Up set as Card #1 but used Ranger Archival Potting Soil for the stamping.

And now for Card #3:


Everything was done pretty much the same as the previous two cards.  The Dark Brown Cardstock is from my stash.  The top and bottom designer paper is by Authentique - Manly.  The centre strip of designer paper is by Pion Design.

I forgot to add the brads before I glued the card front to my Cream Card Base - oh well......

Here is a pic of the inside:


I used Stampin' Up Early Espresso ink for the stamping.

It was really good to do three cards using the same layout and mostly the same supplies so I could get them done as soon as I could as I have a few more masculine cards to do yet.

Finished size of all three cards is 5-3/4" x 3-15/16" or 146mm x 100mm.

Thanks for visiting my blog today.

Jocelyn


Card Recipe:

Card #1:

Stamps:  Stampin' Up Guy Greetings #137178 (retired) - card inside, Uniquely Creative Longhand UC1832, Kaisercraft Vintage Clocks DD904

Ink:  Ranger Antique Linen Distress, Stampin' Up Night of Navy (card inside)

Designer Paper:  Pion Design Mister Tom's Treasures (2016), Authentique Manly #MAN010 6" x 6" (2020)

Accessories:  Big Shot, Embossing Folder - free with magazine, Ranger Ink Blending Tool + Domed Foam Pad, Inque Boutique Brads, Cardstock - Kaisercraft Shadow + Scraps of White + Cream Card Base, Tombow Mono Multi Glue, Stamp Positioning Tool

Card #2:

Stamps:  Stampin' Up Guy Greetings #137178 (retired) - card inside, Uniquely Creative Longhand UC1832, Kaisercraft Vintage Clocks DD904

Ink:  Ranger Antique Linen Distress, Ranger Archival Potting Soil

Designer Paper:  Pion Design Mister Tom's Treasures (2016), Authentique Manly #MAN010 6" x 6" (2020)

Accessories:  Ranger Ink Blending Tool + Domed Foam Pad, Inque Boutique Brads, Cardstock - Kaisercraft Grey + Scraps of White + Cream Card Base, Tombow Mono Multi Glue, Stamp Positioning Tool

Card #3:

Stamps:  Stampin' Up Guy Greetings #137178 (retired) - card inside, Uniquely Creative Longhand UC1832, Kaisercraft Vintage Clocks DD904

Ink:  Ranger Antique Linen Distress, Stampin' Up Early Espresso

Accessories:  Ranger Ink Blending Tool + Domed Foam Pad, Cardstock - Dark Brown + Scraps of White + Cream Card Base, Tombow Mono Multi Glue, Stamp Positioning Tool


Friday, September 8, 2023

Uniquely Creative Drive and Fly Father's Day Card

 
Hi everyone 😀

Today I am sharing a Father's Day Card that I made for my husband using the fabulous Uniquely Creative Drive and Fly Collection which was released back in August 2021:


In Australia, we celebrate Father's Day on the 1st Sunday in September so it was last Sunday.  We had a lovely and quiet day just enjoying the time together as a family.  Both our fathers passed away a very long time ago - so it is also a day of reflection for us.  I cooked a fruit cake (my husband LOVES fruit cake) and also had a roast for dinner which all went down a treat!

For my card, I followed the sample by Joanne Herbert in the Drive and Fly Creative Kit Club magazine and just added some Stampin' Up Rustic Metallic dots which matched the colour of the plane.

I really love this Uniquely Creative Drive and Fly range and it has been perfect for making masculine cards.  So glad that I picked up extras of the range as it is really hard to get now.

Before I go, I thought I would share a photo of our rescue cat Freya who is now a little over a year old:


Freya is the most ADORABLE cat and super-cuddly and affectionate.  She continues to gobble her food down like she still doesn't realise that she WILL absolutely get fed twice a day - so we do wonder what her circumstances were when she was rescued by the RSPCA when she was 7-1/2 months old - and the lady at the Cat Protection Society told me the other day that that behaviour may stay with her and would have stemmed from not knowing where her next meal was coming from and needing to eat quickly before another animal ate it.  

Other than that, Freya is just the sweetest little thing and has such a gentle personality and I am so glad that we adopted her.   Our home seemed so empty after Ruby passed away - and your heart just aches to give another unwanted cat a furever home.  Freya was wonderful company for me back in January when I got COVID and barely moved off the bed for 6 weeks.  When I was in isolation from the rest of the household for nearly 2 weeks, it was so comforting to have a cat to cuddle and sleep with me.  I am still recovering from COVID and have ongoing exhaustion/fatigue and trouble thinking/remembering so it has been more than a little frustrating!  Hopefully, I will improve soon!

Thanks for stopping by my blog today.

Jocelyn


Card Recipe:

Stamps and Ink:  None

Designer paper:  Uniquely Creative Drive and Fly 12" x 12" + Creative Cuts

Accessories:  Anko kraft card base (K-Mart), dimensionals, Tombow Mono Multi glue, Uniquely Creative corrugated card, Stampin' Up Rustic Metallic adhesive-backed Dots


Tuesday, September 6, 2022

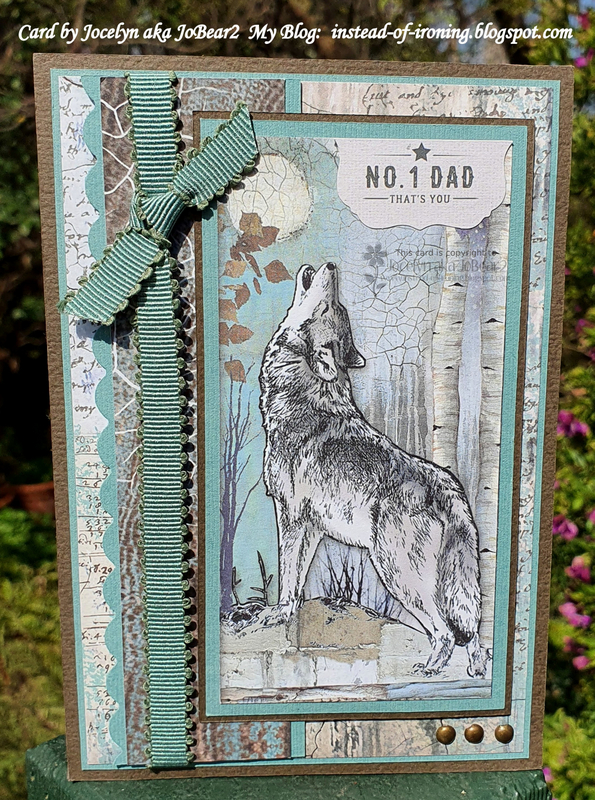
Stamperia Cosmos - Father's Day Card

 
Hi everyone 😀

We celebrate Father's Day here in Australia on the first Sunday in September - so Father's Day was last Sunday - and this is the card that I made for my husband who is a great Dad to our daughter:


This is also my entry for the following Challenge:

    Just Add Ink #619 - Masculine

As I still had the gorgeous Stamperia Cosmos papers on my desk from all the masculine birthday cards that I have made of late, I thought I would use them again.  I just adore these papers and they are so perfect for guy's cards IMHO 😀

The main image was trimmed from one of the sheets and was layered onto teal and sepia cardstock and trimmed to 1/18" and 1/16" respectively using my Perfect Layers Tools.

The side panel was punched using a Fiskars Scallop border punch.  The ribbon is from my stash.  Both the side panel and main panel were popped up on dimensionals.

The 3 small brads are by Inque Boutique.

The sentiment is by Kaisercraft - Everyday Hero - from their 6-1/2" x 6-1/2" pad and was cut in half.  The top half of the sentiment had some tools on it so didn't fit with the wolf image.  Everyday Hero is a recent release and I really love it.   Kaisercraft recently opened a store in my suburb so it's been wonderful to spend time in there.  I have no other scrapbooking stores near me so it is such a feast for the eyes to look at papers etc. in person which I haven't done for ages. 

Lastly, I added some Wink of Stella Clear Glitter brush to the moon so it sparkles but you can't tell in the photo.

Once I had finished my card front, I glued it to a Kaisercraft kraft card base.

It's a simple card - but I don't like too much fuss for my masculine cards.  I find that if I fuss too much, I overthink it and it takes me waaaaay longer to make than it should - plus I was making it on Saturday night so not alot of time!

Thanks for stopping by!

Jocelyn


Card Recipe:

Stamps and Ink:  None

Designer Paper:  Stamperia Cosmos 12" x 12" pad, Kaisercraft Everyday Hero 6-1/2" x 6-1/2" pad

Accessories:  Perfect Layers Tools, ribbon - stash, brads - Inque Boutique, paper piercer, dimensionals, Wink of Stella clear glitter brush, Tombow Mono Multi glue, cardstock - teal, sepia, Kaisercraft kraft card base

Punches:  Fiskars Scallop border


Saturday, August 13, 2022

Lili of the Valley Biplane Birthday Card

 
Hi everyone😀

Today I am sharing a birthday card that I made for my husband:


This is also my entry for the following Challenge:

Craftyhazelnut's Patterned Paper - August - any project that uses patterned paper.  If you click on the underlined link, it will take you to the Challenge.

The main image is by Lili of the Valley (UK) and is a pre-coloured digital image which I bought from their Etsy Store and is called:  Simply Print Biplane.  I love that when you buy one of their Simply Print images, it comes as a PDF and has several pages of different sizes so you choose what you need for your card or project.   

I layered the image onto some kraft cardstock then onto some blue designer paper from a Kaisercraft Workshop pad.  I trimmed the edges with my Perfect Layers Tools to 1/16" and 1/8" respectively then popped the image panel up on dimensionals.

The background designer paper is also from the same paper pad.  The punched kraft cardstock border is my old favourite - Fiskars Threading Water punch.  I added the small strip of designer paper above the border just to add some definition between the beige paper and the punched border as I thought it just needed something.

The sentiment is also from the same paper pad.  I added a copper brad on each side which is by Inque Boutique.  I have had these brads for years.  I don't see alot of cards with brads these days so I am guessing they are not in vogue - but I still love them and use them alot especially on masculine cards.

Once I had finished the card front, I glued it to a kraft card base.

Here is a photo of the card inside:


The sentiment is also from the Kaisercraft Workshop pad.  I added a 1/8" strip of the blue designer paper top and bottom.  

I think this card would be suitable for a variety of occasions and not just a birthday.

It's a very simple card but I like unfussy cards for guys.  Plus it is very quick and easy when you have to make a ton of cards for a gazillion birthdays all in the same month 😉

Thanks for stopping by!

Jocelyn


Card Recipe:

Stamps and Ink:  None

Designer Paper:  Kaisercraft Workshop 6-1/2" x 6-1/2" pad (2019)

Accessories:  Perfect Layers Tools, Digital Image - LOTV Simple Print Biplane, computer and printer, dimensionals, copper brads - Inque Boutique, paper piercer, Tombow Mono Multi glue, cardstock - kraft, kraft card base


Sunday, September 5, 2021

Stamperia Forest - Father's Day Card

 
Hi everyone 😊

Today I am sharing the Father's Day card that I made yesterday for my husband.  He is a fantastic Dad to our daughter and the most gentle and kindest man you could ever know.  


This is also my card for the following Challenges.  Please click on the underlined links to take you to the Challenge.

The Male Room - September - Challenge #154 - Nature's Bounty.  I thought the beautiful eagle and nature theme of the papers fitted the Challenge perfectly.


Splitcoaststampers - Ways to Use It Challenge WT830 - Brads

In the past few months, I stumbled across some Stamperia designer papers and fell in love.  They are beautiful quality and the artwork is stunning.  I bought their Forest pad with a view to making some masculine cards as the images are just perfect for them.

The main image and the papers are from the 8" x 8" pad.   I went around them with Ranger Antique Linen and Walnut Stain Distress inks using my Ranger blending tool.  It was amazing the difference that it made.

The side panel was punched using my old favourite - Fiskars Scallop Border punch.  Both the light teal and brown cardstock were trimmed to 1/16" and 1/8" respectively using my Perfect Layers Tools.  The stitched grosgrain ribbon is old and is by My Memories - from their FaLaLa range - which came in a pack of 6 trims.  Technically the pack is for Christmas to match their range of designer papers but the pack just happened to be sitting on my desk for another project and it matched perfectly.  I added Fray Stop to the cut ends to stop them from fraying.

The bottom 3 copper brads are by Inque Boutique.  Brads have gone out of fashion but I still love to use them especially for masculine cards.  Although I somewhat follow the trends for cardmaking, I just love to use what I have even if they are old and retired.  I found it harder when I was on a Design Team because I had to use products that were still readily available (which was fair enough) - but I just love the freedom of using all my old stuff and find I am more creative that way.

The sentiment panel is a diecut from the Stamperia Forest Diecuts pack.  I didn't have a Father's Day wooden sentiment so just went with a 'Best Wishes' one instead - and this is by Crafts4U - Words.  I glued on some Darice twine and the wooden stars are from my stash. 

Once I had completed my card front, I glued it to a kraft card base using Helmar 450 Quick Dry adhesive.  I buy all my kraft card bases from KMart (Australia) as they are really nice quality and very sturdy.   Finished size is 6" x 6" or 15cm x 15cm.

I think you could use this card for a birthday or to say thank you - lots of occasions.

Thank you for visiting my blog - I really appreciate it 😃 

Jocelyn


Card Recipe:

Stamps:  None

Ink:  Ranger Antique Linen and Walnut Stain Distress

Designer Paper:  Stamperia Forest 8" x 8" pad and Diecuts #DFLDC02

Accessories:  Ranger Ink Blending Tool, Crafts4U Wooden Sentiments - Words - #10226, wooden stars (stash), Fray Stop, twine - stash, My Memories - FaLaLa #30823 - brown stitched grosgrain ribbon, Perfect Layers Tools, Inque Boutique copper brads, Helmar 450 Quick Dry adhesive, Cardstock - brown, light teal, Kraft Card Base - Anko - KMart

Punches:  Fiskars Scallop Border


Thursday, August 26, 2021

Decorer - By the Sea - another nautical card

 
Hi everyone😀

Today I am sharing another nautical card (see my last post for 3 other nautical cards).  This one is just for my stash and thought that whilst I had all my nautical papers out, I may as well make some more cards until I tire of the theme.

This is also another card for the following Challenge Blogs.  Please click on the underlined link to take you straight to the Challenge.

Cute Card Thursday - Challenge #691 - Anything Goes with the optional extra of bright colours.

The Male Room - Challenge #153 - Our 8th Birthday Challenge - a masculine-themed birthday something


I am still using the Decorer M26 'By the Sea' pack of images which I love so much.  The blue woodgrain designer paper is by Kaisercraft from their Sail Away 6-1/2" x 6-1/2" pad.  The beige arrow designer paper on the bottom panel is also by Kaisercraft from their Sandy Toes 6-1/2" x 6-1/2" pad.

The bottom red panel was punched using a Martha Stewart Arch Lattice edge punch.  The red cardstock was trimmed to 1/16" using my Perfect Layers Tools; the kraft cardstock to 1/8".  The red cardstock and the red stripe on the image panel are more of a burgundy colour and not as bright as you see in the photo.  Red is notoriously difficult to photograph unfortunately.

The wooden stars are from my stash.  The 'Best Wishes' wooden sentiment is by Crafts4U - Wooden Embellishments - Words.  The brass anchor charm is also from my stash - and both it and the wooden elements were glued on using Helmar 450 Quick Dry adhesive.

The rope twine I saved from a price label on a pair of jeans thinking that it was too good to throw away - and it reminded me of the rope they have on old sailing ships so I thought it was perfect for my card. 

Once I finished my card front, I glued it to a kraft cardstock base which I bought from KMart.

I think you could use this card for Father's Day as well as a birthday card.

Thanks for visiting my blog today 😃

Jocelyn


Card Recipe:

Stamps and Ink:  None

Designer Paper:  Blue woodgrain - Kaisercraft 'Sail Away' and beige arrow - Kaisercraft 'Sandy Toes' - both 6-1/2" x 6-1/2" pads

Accessories:  Decorer 'By the Sea' M26 image, Perfect Layers Tools, rope twine - stash, wooden stars - stash, brass anchor charm - stash, Best Wishes - Crafts4U #10226 Wooden Embellishments - Words, Helmar, 450 Quick Dry adhesive, tape runner, Tombow Mono Multi glue, Cardstock - dark red, American Crafts kraft, Anko kraft card base - KMart

Punches:  Martha Stewart Arch Lattice edge


Sunday, September 6, 2020

Wellington Bear With Love Father's Day Card


Hi everyone,

Today is Father's Day in Australia - and this is the card that I made for my husband who is a great Dad to our daughter.


The card uses the Wellington Bear range brought out by Docrafts years ago. I loved this range so much when I saw it that I stocked up because the images are so perfect for guys.

All the designer papers are from this same range and were trimmed to 1/8" using my Perfect Layers Tools. The main image is diecut decoupage which makes it very easy to pop out the pieces and layer them together with dimensionals.   The sentiment is also from this range.

I punched some hearts using my Carl CP-8 Heart duo punch and added a wee bit of sparkle using my Wink of Stella clear glitter brush - alas not captured by my camera.

Here is a close-up so you can see the layers:


Lastly, I added some Darice kraft twine which has a sparkly dark chocolate thread running through it which looks gorgeous in real life.  From memory, I bought this twine from Riot Art and Craft.

We are having a quiet day for Father's Day as we are still in a Stage 4 Lockdown here in Victoria - but the weather is beautiful and sunny which is very cheerful and perfect for going for a walk.  It is so nice to see our Spring bulbs out in flower and to see new leaves on the trees.  

I have made heaps of cards in the past 2 weeks including starting my Christmas cards which is the earliest I have ever started - but I have finished all the birthdays for the year so I figured I may as well start.  

Thanks for visiting my blog today!

Jocelyn


Card Recipe:

Stamps and Ink:  None

Designer Papers:  Docraft Wellington Bear set (retired)

Accessories:  Perfect Layers Tools, Tombow Mono Multi glue, dimensionals, Wink of Stella clear glitter brush, Darice twine, kraft card base, Image and Sentiment - Docrafts Wellington Bear diecut decoupage and sentiment set (retired)

Punches:  Carl CP-8 Heart duo

Sunday, September 1, 2019

Wellington Bear - Take it Easy on Father's Day


Hi blogging friends,

Today I am sharing a card I made for my husband for Father's Day which is today in Australia.  I actually made the card this afternoon so it was a bit of a last-minute thing as I have had a very busy and stressful few weeks and I had no brain cells left to be creative!

This is also my card for the following Challenges:

Craftyhazelnut's Patterned Paper Challenge - September - Anything Goes
The idea behind this Challenge is to use up that 'stash' of papers that we all seem to accumulate.  The papers that I used on my card are really old and are from 2008.  So why not play along and use up some of your stash too! 

Through the Craft Room Door Anything Goes Challenge Blog  This is a new Challenge to me and there is a limit of two entries per Challenge.


ETA:  I  JUST FOUND OUT THAT I WON THE CHALLENGE OVER AT THE 'THROUGH THE CRAFT ROOM DOOR CHALLENGE' - WOO HOO!  THANK YOU FOR PICKING ME!


The image is by Docrafts - Wellington Bear - from their diecut decoupage pack which is long-retired.  I bought a whole heap of this range when it came out as it is so perfect for masculine cards.  Before adding the decoupage layers, I attached the base image to dark brown then teal cardstock and trimmed the layers to 1/8" and 1/16" respectively using my Perfect Layers Tools.  I rounded the corners using my We R Memory Keepers Corner Chomper.   I popped out the layers then put them together using 0.5mm dimensionals so the image wouldn't have too much height.

All the designer papers are by Kaisercraft - Reminiscing 'Hold Dear' which I bought on clearance at one of their outlet stores.

I used an EK Success Scalloped Scallops border punch on the dark brown cardstock on the side panel and trimmed the other side to 1/16".  Tied on some brown and white twine then popped this panel up on 1mm dimensionals.

The sentiment is also from the same decoupage pack and was popped up on dimensionals.

Once I finished the card front, I attached it to a white card base using Tombow Mono Multi glue which gives me a bit of wriggle time to get the panel in the right spot.

I felt like the card needed something so I punched a red heart from a scrap of cardstock with a Carl CP-8 Heart duo punch and glued it to the mug using Tombow Mono Aqua glue.  It added a nice pop of colour to the otherwise muted tones.

Finished size is 5-3/4" x 4".

Thanks for visiting my blog today!

Jocelyn


Card Recipe:

Stamps and Ink:  None

Designer Paper:  Kaisercraft Reminiscing P203 'Hold Dear' 12" x 12" (2008-retired)

Accessories:  Docrafts Wellington Bear Diecut Decoupage pack (retired), dimensionals, Tombow Mono Multi and Mono Aqua glue, Kokuyo tape runner, brown/white twine, Perfect Layers Tools, We R Memory Keepers Corner Chomper, cardstock - dark brown + teal + red + white card base

Punches:  EK Success Scalloped Scallops EKPL8003 border, Carl CP-8 Heart Duo


Wednesday, October 11, 2017

Wellington Bear - Just for you!


Hi everyoneSmiley from Millan.Net 

Thought I would stop in and share a card that I made for my husband:


The adorable teddy bear driving the vintage car is a Topper by Docrafts from their Wellington Bear collection which was released a few years ago.  I have always loved this range for masculine cards and used the range many, many times over the last couple of years.

The designer papers are really old.  I picked them up from my local Kaisercraft Clearance Centre a few years ago and they matched the image perfectly:  love it when that happens :-)  

This card is also my entry for the CraftyHazelnut's Patterned Paper Challenge for October.  The challenge is all about using patterned papers that we have been "saving" and you can enter any creation on which patterned paper/card has been used.  The challenge is open worldwide :-)  Please see this link for more details on the challenge.

All the layers were trimmed to 1/16" using my Perfect Layers Tools.

The grey-brown cardstock on the side panel was dry embossed using my Big Shot and Cuttlebug (Provocraft) Argyle embossing folder which I thought tied in nicely with the design on the ribbon.  I used my old favourite Fiskars Threading Water punch to punch the blue cardstock then tied on the ribbon which came from Riot Art and Craft.  I added Fray Stop to the cut ends of the ribbon because it frays terribly even if you handle it carefully.  The panel was popped up on dimensionals.  The main image panel was also popped up on dimensionals.

The sentiment is also from the Wellington Bear collection and I added two tiny hearts by using my EK Success Arrows border punch (the leftover punchies look like tiny hearts) with some papers in the collection.

I added 3 blue buttons using Crafter's Pick Incredibly Tacky glue after first sewing some matching thread through the buttons (I don't like 'naked' buttons on my cards!).  Lastly, I glued down the card front to a white card base using Tombow Mono Multi glue.

The finished size is 8-1/4" x 3-7/8" or 210mm x 98mm and fits into a standard (Australian) sized business envelope.  It was nice to make a different sized card to the norm.

Thanks for visiting my blog today.

Jocelyn


Card Recipe:

Stamps and Ink:  None

Designer Paper:  Kaisercraft Pets Paradise 12" x 12" (retired)

Accessories:  Docrafts Wellington Bear Topper and Sentiment (retired), Docrafts Mini Buttons - Blueberry Pie x 3, blue sewing thread, Multicraft Imports SR108J blue ribbon (Riot Art and Craft), Fray Stop, dimensionals, Crafter's Pick Incredibly Tacky blue, Tombow Mono Multi glue, Big Shot, Cuttlebug (Provocraft) Argyle embossing folder, Perfect Layers Tools, cardstock: grey-brown, mid-blue, white card base

Punches:  Fiskars Threading Water border, EK Success Arrows border

Sunday, September 4, 2016

Wellington Bear Father's Day card


Hi everyoneSmiley from Millan.Net

Today is Father's Day in Australia and this is the card that I made for my husband who is a fantastic Dad to our daughter:


This is also my card for the Craftyhazelnut's Patterned Paper Challenge for September.  The idea of the challenge is to use up your stash of patterned paper because, let's face it, many of us have heaps!  The paper I used on my card is from 2013 but I have plenty that is older than that LOL!  The Challenge is open to anyone no matter where you live in the world, so why not play along?  It is always 'Anything Goes' so that makes it easy. 

The main image is a topper from Docrafts - Wellington Bear.  The kraft and navy blue cardstock layers were trimmed to 1/16" and 1/8" respectively using my Perfect Layers Tools.

The designer papers are from a 6" x 6" paper pad - Authentique - Season's: Winter.  The colours in the pad matched the image to perfection so I don't think it matters that the pad is meant for Winter.

You can't tell from the photo but I ran the designer paper on the panel underneath the main image through my Big Shot using a Cuttlebug Argyle embossing folder.  Just wanted to add some texture for interest.  I punched the navy blue cardstock using a Fiskars Scallop border punch then added the ribbon.  I added Fray Stop to the cut ends to stop them from fraying.

I glued on a navy blue heart button from my stash using Crafter's Pick Incredibly Tacky glue.  I sewed some navy blue thread through the button holes as I don't like 'naked' buttons on my cards - they don't look finished to me :-)

Once I finished my card front, I glued it to a white cardstock base using Tombow Mono Multi glue as it gives you some time to make sure everything is straight before it sticks.  Finished size is 5-1/2" x 5-1/2" or 14cm x 14cm and it is a top-opening card.

We have just had a lovely and quiet day at home to celebrate Father's Day.  The weather has been dreary this afternoon so we lit the fire, made a vanilla butter cake for afternoon tea and are having a roast for dinner.  Perfect!

Thanks for stopping by!

Jocelyn


Card Recipe:

Stamps and Ink:  None

Designer Paper:  Authentique Seasons - Winter #SEA017 (from 2013)

Accessories:  Docrafts © Hallmark Wellington Bear topper, Perfect Layers Tools, Stampin' Up Fuse Fast adhesive, Crafter's Pick Incredibly Tacky glue, Tombow Mono Multi glue, navy blue heart button (stash), navy blue sewing thread, Big Shot, Cuttlebug Argyle embossing folder, cardstock - kraft, navy blue, white card base

Punches:  Fiskars Scallop border