Showing posts with label Stamperia. Show all posts
Saturday, February 7, 2026
Stamperia Hortensia Birthday Card
Hi everyone,
Today I am sharing a Birthday Card that I made for my sister-in-law:
I used some gorgeous Stamperia Hortensia Designer Papers for my card. These papers were released in 2020. On one of the 12" x 12" sheets, there are four 6" x 6" individual card fronts and I simply trimmed one of them out but did cut it down a bit so that I could have some cardstock layers and then pop it onto a white card base. I needed the finished card to be able to fit in my square envelope.
I used Versamark Watermark Ink to stamp the sentiment which is from the Stampin' Up Layering Leaves Stamp Set, then heat-set it using Ranger Detail Gold Embossing Powder. I went around the edge of the designer paper using a Versamark Watermark Pen fairly roughly so that when I heat-set it with the Gold Embossing Powder, it looked a little distressed.
I layered the image panel onto Pale Pink then Rose Pink Cardstock. I watered down some Jo Sonja Pale Gold Acrylic Paint then used my Fan Brush to splatter the panel. It looks so gorgeous in real life.
The Pink Organza Ribbon was attached in two separate elements, and the bow itself was made using my Bow Easy. I glued the bow on using Helmar's Fabric Glue. I added Fray Stop to the cut ends to stop them from fraying.
The pink butterfly above the sentiment is by Mintay - Lilac Garden - from their paper diecuts. I glued down just the centre so I could bend the wings up a little. The colours on the diecut matched the pinks in the designer papers so perfectly, it was just meant-to-be. I added some Uniquely Creative Clear Sparkle Pen to the pink butterfly, the white butterfly and a little on the hydrangeas.
I glued the panel onto a White Card Base.
As a finishing touch, I added 3 x Kaisercraft Rose Pearls but added a dot of Art Glitter Glue underneath so they didn't slip down like they seem to over time (for me anyway).
Finished size is 5-11/16" x 5-11/16" or 143mm x 143mm.
Thanks for stopping by!
Jocelyn
Card Recipe:
Stamps: Stampin' Up Layering Leaves #161277 (retired)
Ink: Versamark Watermark Ink Pad + Pen
Designer Paper: Stamperia Hortensia 12" x 12", Mintay Lilac Garden Paper Diecuts MT-LIL-LSC
Accessories: Heat-gun, Powder Tool, Fan Brush, Jo Sonja Pale Gold Acrylic Paint, Bow Easy, Pink Organza Ribbon 3/8" / 9mm wide, Fray Stop, Tombow Mono Multi Glue, Art Glitter Glue, Helmar's Fabric Glue, Kaisercraft Rose Pearl SB786, Uniquely Creative Clear Sparkle Pen, White Card Base, Cardstock - Pale Pink + Rose Pink
Labels:
Birthday,
Feminine,
Mintay,
Stamperia,
Stampin' Up,
Stampin' Up Stamps
Tuesday, November 18, 2025
Stamperia The Owl's House Christmas Card
Hi everyone,
Today I am sharing a Christmas Card that I made using some gorgeous papers by Stamperia - The Owl's House:
Challenges:
This is also my card for the following Challenge -
- Allsorts - #836 - Christmas or Anything Goes
No stamping on this card - just layering papers and some diecutting.
The main image was trimmed from the 8" x 8" paper pad then layered onto White Cardstock.
The snowflake side border as well as the woodgrain paper on the card base are also from The Owl's House collection.
The Snowflakes were diecut from Silver Glitter Cardstock using my Big Shot and Impression Obsession Small Snowflake Set. This is another set that I have had for years and one of my favourites. I glued down the centres so I could bend up the snowflake arms for a bit of dimension, then added a Kaisercraft Silver Rhinestone to the centres.
The Silver and White Twine is from KMart (Australia) and came in a set but is no longer on their website.
Finishing touches were adding Wink of Stella Clear Glitter Brush to lots of areas on the card including the flames in the fireplace. Shame it isn't visible in the photo - but it looks so pretty in real life.
Finished size is 4-15/16" x 4-15/16" or 125mm x 125mm.
Thanks for visiting my blog today.
Jocelyn
Card Recipe:
Stamps: None
Designer Paper: Stamperia The Owl's House 8" x 8" pad (2025 release)
Accessories: Big Shot, Kaisercraft Trimmer, Silver and White Twine (KMart), Wink of Stella Clear Glitter Brush, Tombow Mono Multi Glue, Art Glitter Glue, Kaisercraft Silver Rhinestones, Silver Glitter Cardstock, White Cardstock, Kaisercraft White Card Base
Dies: Impression Obsession Small Snowflake Set DIE 100-F (retired)
Labels:
Big Shot,
Christmas,
Impression Obsession,
Stamperia
Wednesday, July 30, 2025
Stamperia Sea Land Masculine Birthday Card
Hi everyone 😄
I have loads of masculine birthdays coming up in August so I have been very busy in my Craft Room. I had some very old stripey Wendy Irving Designer Paper in my stash which I pulled out to make a card and was thinking that I would colour up a Penny Black Dog Stamp to match it. I just happened to pull out a Stamperia Sea Land 12" x 12" Paper Pad when I was looking for some other masculine papers and popped the paper pad on top of the stripey paper - and then realised they matched so perfectly that I thought I was absolutely meant to use them together for a card. And here is what I created:
This is also my card for the following Challenges - click on the underlined link to take you to the Challenge:
- Love those Pretty Papers - July - Anything Goes with Optional Theme of Birthday. Note that they want to see LOTS of your paper and not just a tiny scrap
- Crafty Catz - #699 - Anything Goes
The Wendy Irving Designer Paper is called Relax and is from their Urban Dude Collection and dates back to 2007. You can't get this paper anymore from my search on the internet. All I know is that it is Australian. I layered the paper onto Brown Cardstock and went around the edges with Antique Linen Distress Ink.
I really wanted to do a Carrick Bend Knot with the twine on the bottom panel. The Carrick Bend Knot is a sailor's knot and I thought it fitted the whole theme of the card. I used two strands of the twine instead of one because it looked better. The designer paper on this panel is by Kaisercraft - High Tide - and if you look closely at the paper, the rope on it looks very similar to the Carrick Bend Knot. I went around all the edges with Antique Linen Distress Ink. I glued my twine on using Helmar's 450 Quick Dry Adhesive and just trimmed the ends of the twine flush with the panel as it was far easier than tucking them underneath and having so much bulk.
I layered the bottom panel onto Brown Cardstock and punched the bottom with a Fiskars Threading Water Border Punch - then popped the panel up on scraps of white cardstock. If you are no stranger to my blog, you will know that I use this border punch ALOT for masculine cards.
The sentiment is from the High Tide Designer Paper. Kaisercraft always have lots of sentiments in the back of their small pads which comes in very handy when you want a matching sentiment. I again went around the edges with Antique Linen Distress Ink then popped the panel up on scraps of cardstock.
As a finishing touch, I added some Stampin' Up Adhesive-Backed Swirl Dots which I thought matched really well.
Once I had finished my card front, I glued it to a White Card Base using Tombow Mono Multi Glue.
Finished size is 6" x 6" or 150mm x 150mm.
This card will be going to my brother-in-law who retired to Tasmania and his house overlooks the sea.
Thanks for stopping by!
Jocelyn
Card Recipe:
Stamps: None
Ink: Ranger Distress Antique Linen
Designer Paper: Wendy Irving Relax J5111.01 12" x 12" (from Urban Dude Collection - 2007), Kaisercraft High Tide 6-1/2" x 6-1/2", Stamperia Sea Land 12" x 12"
Accessories: Helmar's 450 Quick Dry Adhesive, Tombow Mono Multi Glue, Ink Blending Tool + Domed Pad, Stampin' Up Adhesive-Backed Swirl Dots #163464, Twine (stash), Square White Card Base, Cardstock - Brown + Scraps of White
Punches: Fiskars Threading Water Border
Labels:
Birthday,
Kaisercraft,
Masculine,
Stamperia
Sunday, July 7, 2024
Stamperia Brocante Antiques Birthday Card
Hi everyone 😊
Today I am sharing a Birthday Card that I made for my daughter's birthday:
I am popping this card into the following Challenges:
Splitcoaststampers - Free for All Friday F4A727 - Feature something that begins with the letter B (mine is the Bear of course)!
Crafty Catz - Challenge #675 - Anything Goes with Optional Twist of Embellishments (I used the flower and heart sparklets)
I LOVED making this card! The images in the Stamperia Brocante Antiques release are just sooooo beautiful and when Stamperia recently released this range, I couldn't WAIT to get my hands on it. I especially love all the teddy bear images because I knitted a teddy bear for my daughter's birthday and it just seemed like a match made in heaven.
The main image was diecut from one of the 12" x 12" papers using a Lifestyle Nesting Circle die and my Big Shot. I layered the image onto pink and teal designer paper from the same Stamperia range. The teal paper was diecut using a Lifestyle Nesting Scalloped Circle die.
I punched the bottom designer paper panel using a Martha Stewart Doily Lace Edge Punch then embossed the entire panel with a Cuttlebug Jamara embossing folder which added some lovely texture to the card. I added the seam binding in two separate elements; the bow itself was made with my Bow Easy. I added some Fray Stop to the edges of the ribbon because it frays so easily. I glued on a flower from my stash using Helmar 450 Quick Dry Adhesive then brushed on some Wink of Stella Clear Glitter for some sparkle.
I ink blended every panel on the card with Antique Linen Distress Ink and my ink blending tool. I recently purchased some domed foam pads for ink blending and I have found them easier to ink blend than the flat circle pads. I don't get any harsh lines like I used to.
Note that I added scraps of white cardstock underneath the layers on my card for dimension instead of using dimensionals or self-adhesive foam pads.
The sentiment is from a retired Kaisercraft Miss Betty paper pad which was originally released in February 2018 and is one of my all-time favourite releases. All Kaisercraft pads have sentiments at the back of their pads which come in very handy. I layered the sentiment onto some designer paper then added some Wink of Stella to the button.
Kaisercraft don't have anywhere near the amount of releases or even the range of cardmaking/scrapbooking products like they used to. I miss their Workshop Magazine, their blog, Design Team samples, co-ordinating products and Beyond the Page. I used to love going to my nearest Kaisercraft store and immersing myself in the experience. I knew the Manager and she personally did loads of samples and put together kits - it was wonderful because you felt really inspired and you wanted to buy their products. I can't understand why they don't at least promote their scrapbooking/cardmaking products to encourage creativity which would generate sales. It's like it's a forgotten part of their business whilst they are busy promoting handbags, soap and baby toys. Makes me sad 😢😢 Anyway, I am digressing.......
The hearts on the top RHS are by Kaisercraft (another retired product line) which matched the card perfectly (LOVE it when that happens!). I glued them on using Helmar 450 glue.
Once I had finished the card front, I glued it onto a brown cardstock base.
I decorated the card inside:
The sentiment is by Stampin' Up from their Sweet Ice Cream set and was stamped using Versafine Vintage Sepia ink onto cream cardstock then diecut with my Lifestyle Nesting Circle and Scalloped Circle dies. I added some tiny hearts which are the leftover punchies from my EK Success Arrows Border Punch (if you are a regular visitor to my blog, you know that I have been using these tiny leftover punchies as hearts for a VERY long time!)
All the panels were ink-blended with Antique Linen Distress Ink and all the layers on the card front and inside were trimmed to 1/8" using my We R Memory Keepers Layer Guides.
The '21' was diecut from rose gold metallic cardstock and Lawn Fawn Finley's 123 dies which I have had forever but are still available from Lawn Fawn. I know the 21 looks a little dark but it is definitely rose gold metallic cardstock.
I made a tag as well:
I handcut a tag from the Stamperia Brocante Antiques designer paper then layered it onto some designer paper then handcut it and ink-blended the tag with Antique Linen Distress Ink.
On the back of the tag, I added a rub-on using the Stamperia Brocante Antiques Rub On set then ink-blended the tag with Antique Linen Distress Ink:
I punched a hole using a 1/4" hole punch then added some fibres from the yarn I used for the hand-knitted teddy bear that I made which you can see here:
The teddy bear is a pattern from a Family Circle Magazine dated June 2021. I knitted the bear using King Cole Truffle DK yarn in the colour 'Cookie Dough'. It was the hardest thing I have ever knitted but I am so pleased with how it turned it. I knitted a scarf in Fisherman's Rib using Moda Vera Starlight 8 ply yarn which I bought from Spotlight.
I really struggled with trying to do the nose with black yarn. I got it crooked and uneven twice and had to keep pulling it out and was worried I was going to damage the muzzle and maybe put a hole in it - and then I had a brainwave and diecut black felt with a Spellbinders Oval Nestabilities die and glued it on using Helmars Fabric Glue. I was ever-so-pleased with how it looked. I just love that you can use dies for more than just cardstock and paper!
Popped in two 8mm Black Safety Eyes and stuffed the bear with Polyester Fibrefill.
We had a lovely birthday celebration and went to a cafe for lunch and to a local RSL for the evening meal then a homemade chocolate cake with chocolate frosting at home.
Phew! That was a long blog post! Thanks for stopping by!
Jocelyn
Card Recipe - Front:
Stamps: None
Ink: Ranger Antique Linen Distress Ink
Designer Paper: Stamperia Brocante Antiques 12" x 12" pad + Backgrounds 8" x 8" pad, Kaisercraft Miss Betty 6-1/2" x 6-1/2" pad (retired)
Accessories: Big Shot, Cuttlebug Jamara Embossing Folder (retired), Ink Blending Tool and Domed Foam Pads, Paper Flower, Wink of Stella Clear Glitter Brush, Light Teal Seam Binding, Fray Stop, Bow Easy, WRMK Layer Guides, Kaisercraft Trimmer, Kaisercraft Sparklets - Hearts RS420 (retired), Helmar 450 Quick Dry Adhesive + Fabric Glue, Tombow Mono Multi Glue, Cardstock: scraps of white, brown card base
Dies: Lifestyle Nesting Circles + Nesting Scalloped Circles
Punches: Martha Stewart Doily Lace Edge
Card Recipe - Inside:
Stamps: Stampin' Up! Sweet Ice Cream #154456
Ink: Versafine Vintage Sepia, Ranger Antique Linen Distress Ink
Designer Paper: Stamperia Brocante Antiques 12" x 12" pad + Backgrounds 8" x 8" pad
Accessories: Big Shot, Ink Blending Tool and Domed Foam Pads, WRMK Layer Guides, Cardstock - cream, rose gold metallic
Dies: Lifestyle Nesting Circles + Nesting Scalloped Circles, Lawn Fawn Finley's 123s #LF770
Punches: EK Success Arrows Border
Tag Recipe:
Stamps: None
Ink: Ranger Antique Linen Distress Ink
Designer Paper: Stamperia Brocante Antiques 12" x 12" pad
Accessories: Tombow Mono Multi Glue, Ink Blending Tool and Domed Foam Pads, 1/4" Hole Punch, Fibres from Knitted Bear, Stamperia Brocante Antiques Rub-On DFLRB76, Cardstock - Cream
Knitted Bear:
Pattern: Family Circle Magazine - June 2021
Yarn: King Cole Truffle DK - Cookie Dough, Cleckheaton 5 ply - black (for embroidery), Moda Vera Starlight 8 ply
Needles: 4mm
Accessories: Sewing up needle, Polyester Fiberfill Stuffing, 8mm Black Safety Eyes, Big Shot, Black Felt
Dies: Spellbinder Oval Nestabilities
Labels:
21st Birthday,
Big Shot,
Birthday,
Cuttlebug Embossing Folders,
Feminine,
Knitting,
Lawn Fawn dies,
Lifestyle Dies,
Spellbinders,
Stamperia,
Stampin' Up,
Tags,
Vintage
Tuesday, September 6, 2022
Stamperia Cosmos - Father's Day Card
Hi everyone 😀
We celebrate Father's Day here in Australia on the first Sunday in September - so Father's Day was last Sunday - and this is the card that I made for my husband who is a great Dad to our daughter:
This is also my entry for the following Challenge:
Just Add Ink #619 - Masculine
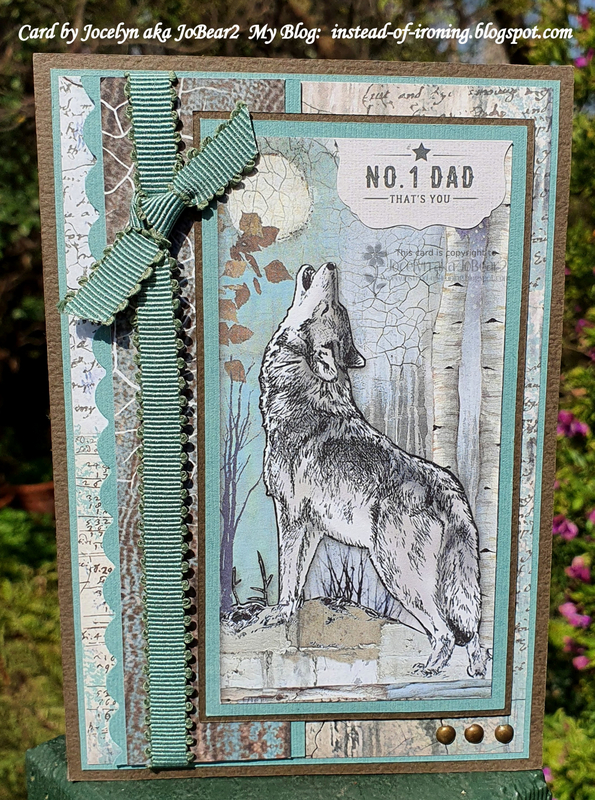
As I still had the gorgeous Stamperia Cosmos papers on my desk from all the masculine birthday cards that I have made of late, I thought I would use them again. I just adore these papers and they are so perfect for guy's cards IMHO 😀
The main image was trimmed from one of the sheets and was layered onto teal and sepia cardstock and trimmed to 1/18" and 1/16" respectively using my Perfect Layers Tools.
The side panel was punched using a Fiskars Scallop border punch. The ribbon is from my stash. Both the side panel and main panel were popped up on dimensionals.
The 3 small brads are by Inque Boutique.
The sentiment is by Kaisercraft - Everyday Hero - from their 6-1/2" x 6-1/2" pad and was cut in half. The top half of the sentiment had some tools on it so didn't fit with the wolf image. Everyday Hero is a recent release and I really love it. Kaisercraft recently opened a store in my suburb so it's been wonderful to spend time in there. I have no other scrapbooking stores near me so it is such a feast for the eyes to look at papers etc. in person which I haven't done for ages.
Lastly, I added some Wink of Stella Clear Glitter brush to the moon so it sparkles but you can't tell in the photo.
Once I had finished my card front, I glued it to a Kaisercraft kraft card base.
It's a simple card - but I don't like too much fuss for my masculine cards. I find that if I fuss too much, I overthink it and it takes me waaaaay longer to make than it should - plus I was making it on Saturday night so not alot of time!
Thanks for stopping by!
Jocelyn
Card Recipe:
Stamps and Ink: None
Designer Paper: Stamperia Cosmos 12" x 12" pad, Kaisercraft Everyday Hero 6-1/2" x 6-1/2" pad
Accessories: Perfect Layers Tools, ribbon - stash, brads - Inque Boutique, paper piercer, dimensionals, Wink of Stella clear glitter brush, Tombow Mono Multi glue, cardstock - teal, sepia, Kaisercraft kraft card base
Punches: Fiskars Scallop border
Monday, August 15, 2022
Stamperia Cosmos - Another Birthday Card
Hi everyone 😀
I am sharing yet another masculine Birthday Card for one of my family members using the beautiful Stamperia Cosmos papers:
This is also my 2nd entry for each of the following Challenge Blogs:
Seize the Birthday - #244 - No Stamping
Craftyhazelnut's Patterned Paper - August
The main image is also from the same Stamperia pad and was popped up on dimensionals. Isn't that image gorgeous?!!
All the layers were trimmed to 1/16" using my Perfect Layers Tools. I added some Inque Boutique copper brads to the other panels which I thought matched the papers really well. The moon has some sparkle from a Wink of Stella Clear Glitter brush but you can't tell in the photo.
The sentiment is from a Kaisercraft Workshop paper pad and was popped up on dimensionals.
Once I had finished my card front, I glued it to a white card base using Tombow Mono Multi glue.
This is a larger card - 4-3/4" x 6-3/4" or 121mm x 171mm so I could accommodate the large main image.
Thanks for visiting my blog today.
Jocelyn
Card Recipe:
Stamps and Ink: None
Designer Paper: Stamperia Cosmos 12" x 12" pad, Kaisercraft Workshop 6-1/2" x 6-1/2"
Accessories: Perfect Layers Tools, Inque Boutique copper brads, paper piercer, Perfect Layers Tools, cardstock - light teal and dark brown, white card base, dimensionals, Tombow Mono Multi glue, Wink of Stella Clear Glitter brush
Labels:
Birthday,
Masculine,
Masculine card making ideas,
Stamperia
Saturday, August 13, 2022
Stamperia Forest Birthday Card
Hi everyone 😀
Today I am sharing another Masculine Birthday Card that I made for my brother-in-law:
I would love to say it is my design but it isn't. It is from a Card Kit designed by Lisa Dick from Bev Cross Crafts in Tasmania. The kit is no longer available unfortunately so I can't link it.
I can tell you that the main image is by Stamperia from their Forest paper pad which is still readily available. The pine cone is also from the papers and was fussy-cut. The sentiment is by Craft Creations.
The designer paper on the cream card base is also by Stamperia - House of Roses.
I did change quite a few things from the kit by adding the ribbon and twine to the tag as it just looked too blank to not have something in the tag hole. I do not know the name of the tag die. I also added the cream star stickers which I bought from our local newsagent.
The leaf is a die but I don't know what brand - but honestly, their are tons of dies available so you would be sure to find a similar one.
Thanks for visiting my blog today.
Jocelyn
Card Recipe:
Stamps and Ink: None
Designer Papers: Stamperia Forest 12" x 12" pad and House of Roses 12" x 12" pad
Accessories: Craft Creations Happy Birthday sentiments, cream star stickers, brown twine and ribbon (stash), dimensionals, Tombow Mono Multi glue, cardstock - cream and dark brown + cream card base
Dies: Leaves and Tag (unknown brand)
Labels:
Birthday,
Masculine,
Masculine card making ideas,
Stamperia
Friday, August 5, 2022
Stamperia Cosmos Moon Birthday Card
Hi everyone 😀
I am sharing another masculine birthday card that I made using the gorgeous Stamperia Cosmos designer papers:
This is also my card for the following Challenge. If you click on the underlined link, it will take you to the Challenge Blog:
Seize the Birthday - #244 - No Stamping
The wooden Happy Birthday is by Crafts4U - Happy Birthday Wooden Embellishments which come in a pack of 20. I glued it on using Helmars 450 Quick Dry adhesive. The wooden star came in a pack of assorted stars which I bought from a Craft Show and has no brand name on them.
The bottom three faux brads are by Craftwork Cards - Card Candi from their Prince Charming pack. I have had these in my Craft Room for years and rediscovered them recently when looking for something else. They are cardboard domed embellishments that you attach to your project using dimensionals.
Once I had finished my card front, I glued it to a kraft card base using Tombow Mono Multi glue.
Finished size is 5-1/2" x 5-1/2".
Thanks for visiting my blog today 😃
Jocelyn
Card Recipe:
Stamps and Ink: None
Designer Papers: Stamperia Cosmos 12" x 12" pad
Accessories: Tombow Mono Multi glue, Helmar 450 Quick Dry adhesive, dimensionals, Craftwork Cards Card Candi - Prince Charming, ribbon (stash), Crafts4U Wooden Embellishments Happy Birthday #70074, wooden star (unknown brand), cardstock - navy blue, kraft cardstock base
Punches: Fiskars Threading Water border
Thursday, April 14, 2022
Stamperia Cosmos Get Well Card
Hi everyone 😃
My brother is sick with COVID and this is the card that I made for him:
This is also my card for the following Challenges. Please click on the underlined links to take you to the Challenge.
Crafty Catz - #590 - Anything Goes
Dream Valley Challenges - Challenge #267 - Anything Goes
Splitcoaststampers - Free for All Friday - F4A622 - It's a Guy Thing
Incy Wincy Designs - April 2022 - Easter +/- Animals
I will be posting him a Care Package with the card and some goodies to make him smile.
The owl image is from the Stamperia Cosmos 12" x 12" pad - as are all the designer papers. I adore this collection as it has great images for masculine cards.
I didn't have a 'Get Well' wooden embellishment so used a 'Hello' one instead. It never ceases to amaze me how you can have a gazillion things in your stash and still not have what you need 😏 I attached the sentiment using Helmar 450 adhesive which is an excellent glue for these types of embellishments.
All the layers were trimmed to either 1/16" or 1/8" using my Perfect Layers Tools. The ribbon is from my stash and I added Fray Stop to the cut ends to stop them from fraying. The side panel was punched using an EK Success Open Scallop border punch.
The kraft cardstock is from KMart and the navy blue cardstock is from my stash.
The bottom three faux brads are Craftwork Cards - Card Candi from their Prince Charming pack. I have had these in Craft Room for years and rediscovered them recently when looking for something else. They are domed embellishments that you attach to your project using dimensionals.
Once I had finished the card front, I attached it to a Uniquely Creative white card base. Finished size is 13.5 cm x 13.5 cm.
I think this card could be used for lots of different occasions just by changing the sentiment.
Thanks for visiting my blog today and for any comments you care to leave - they are appreciated.
Jocelyn
Card Recipe:
Stamps and Ink: None
Designer Paper: Stamperia Cosmos 12" x 12" pad
Accessories: Dimensionals, ribbon - stash, Fray Stop, Hello sentiment - Kaisercraft Lucky Dip Wooden Flourish pack - Bloom FL597, Perfect Layers Tools, Helmar 450 adhesive, Tombow Mono Multi glue, Craftwork Cards Card Candi - Prince Charming, Cardstock - kraft (KMart), navy blue and Uniquely Creative white card base
Punches: EK Success Open Scallop border 54-40035
Labels:
Birthday,
Get Well Cards,
Hello card,
Masculine,
Stamperia
Thursday, April 7, 2022
Stamperia Forest Anniversary Card
Hi everyone 😀
My husband and I will be celebrating our 33rd Wedding Anniversary shortly and this is the card that I made for him:
Our anniversaries are always very low-key as neither of us like a fuss - so we have never exchanged presents or celebrated it with other people. Our daughter will be making us a lovely dinner at home so it will be just be the 3 of us.
The main image is by Stamperia - Forest - and was popped up on dimensionals. I adore this Stamperia range as it is fantastic for making masculine cards. The leaf paper is by Maja Design - Vintage Autumn Basics No. XVIII - and the bottom designer paper is by Stamperia - House of Roses. All are matted on cream and dark brown cardstock.
The punched border is an edge punch by Martha Stewart - Arch Lattice - and I added a strip of dark brown cardstock underneath.
The Star button is by Jesse James - Dress it Up - Lone Stars - and I tied some string through the holes and glued it on using Helmar 450 adhesive. The ribbon came from KMart (Australia) and I added Fray Stop to the ends to stop them from fraying. All the layers were ink-blended using Hero Arts Soft Sand ink just to tie in the cardstock with the muted tones of the image and papers.
The tiny burgundy hearts above the foxes are the leftover diecuts from a Sizzix Drifting Hearts die which was a recent purchase from Spotlight. I love how this die has so many different sized hearts and I can see that I will get a lot of use out of it. I added some Glossy Accents to the hearts.
I couldn't figure out where to add a sentiment as everything I tried looked weird and threw out the balance of the card - so in the end, I didn't worry about it as I think my husband will be able to tell what the card is for anyway.
Thanks for stopping by! Hope to see you again soon!
Jocelyn
Card Recipe:
Stamps: None
Ink: Hero Arts Soft Sand
Designer Paper: Stamperia Forest and House of Roses, Maja Design Vintage Autumn Basics No. XVIII
Accessories: Star button - Jesse James Dress it Up - Lone Stars #215, ribbon and twine (KMart), Fray Stop, Ranger Ink Blending Tool, Perfect Layers Tools, dimensionals, Helmar 450 adhesive, Tombow Mono Multi glue, Glossy Accents, Big Shot, cardstock - dark brown, cream and burgundy
Dies: Sizzix Drifting Hearts #663451
Punches: Martha Stewart Arch Lattice edge
Labels:
Anniversary,
Love,
Masculine,
Stamperia,
Wedding Anniversary
Sunday, September 5, 2021
Stamperia Forest - Father's Day Card
Hi everyone 😊
Today I am sharing the Father's Day card that I made yesterday for my husband. He is a fantastic Dad to our daughter and the most gentle and kindest man you could ever know.
This is also my card for the following Challenges. Please click on the underlined links to take you to the Challenge.
The Male Room - September - Challenge #154 - Nature's Bounty. I thought the beautiful eagle and nature theme of the papers fitted the Challenge perfectly.
Splitcoaststampers - Ways to Use It Challenge WT830 - Brads
In the past few months, I stumbled across some Stamperia designer papers and fell in love. They are beautiful quality and the artwork is stunning. I bought their Forest pad with a view to making some masculine cards as the images are just perfect for them.
The main image and the papers are from the 8" x 8" pad. I went around them with Ranger Antique Linen and Walnut Stain Distress inks using my Ranger blending tool. It was amazing the difference that it made.
The side panel was punched using my old favourite - Fiskars Scallop Border punch. Both the light teal and brown cardstock were trimmed to 1/16" and 1/8" respectively using my Perfect Layers Tools. The stitched grosgrain ribbon is old and is by My Memories - from their FaLaLa range - which came in a pack of 6 trims. Technically the pack is for Christmas to match their range of designer papers but the pack just happened to be sitting on my desk for another project and it matched perfectly. I added Fray Stop to the cut ends to stop them from fraying.
The bottom 3 copper brads are by Inque Boutique. Brads have gone out of fashion but I still love to use them especially for masculine cards. Although I somewhat follow the trends for cardmaking, I just love to use what I have even if they are old and retired. I found it harder when I was on a Design Team because I had to use products that were still readily available (which was fair enough) - but I just love the freedom of using all my old stuff and find I am more creative that way.
The sentiment panel is a diecut from the Stamperia Forest Diecuts pack. I didn't have a Father's Day wooden sentiment so just went with a 'Best Wishes' one instead - and this is by Crafts4U - Words. I glued on some Darice twine and the wooden stars are from my stash.
Once I had completed my card front, I glued it to a kraft card base using Helmar 450 Quick Dry adhesive. I buy all my kraft card bases from KMart (Australia) as they are really nice quality and very sturdy. Finished size is 6" x 6" or 15cm x 15cm.
I think you could use this card for a birthday or to say thank you - lots of occasions.
Thank you for visiting my blog - I really appreciate it 😃
Jocelyn
Card Recipe:
Stamps: None
Ink: Ranger Antique Linen and Walnut Stain Distress
Designer Paper: Stamperia Forest 8" x 8" pad and Diecuts #DFLDC02
Accessories: Ranger Ink Blending Tool, Crafts4U Wooden Sentiments - Words - #10226, wooden stars (stash), Fray Stop, twine - stash, My Memories - FaLaLa #30823 - brown stitched grosgrain ribbon, Perfect Layers Tools, Inque Boutique copper brads, Helmar 450 Quick Dry adhesive, Cardstock - brown, light teal, Kraft Card Base - Anko - KMart
Punches: Fiskars Scallop Border
Subscribe to:
Posts (Atom)