Showing posts with label Spellbinder. Show all posts

Friday, August 28, 2026

Craft Creations Goldfinch in Cherry Diecut Decoupage Birthday Stepper Card

 
Hi everyone,

My cousin is turning 70 next month so I thought I would make her an extra-special card for her birthday:


Challenges

I am popping my card into the following challenges (click on the underlined link to take you to the challenge):
  • Splitcoaststampers - Use it 2026 - Using old supplies to make a card
  • Splitcoaststampers - Free for All Friday F4A862 - Hobbies.  Mine is birds.  I have been very passionate about birds since I was a little girl & my drawing books were filled with birds.  We have many birds that visit our Australian garden and I spend alot of time with them.  Some even hop on my knee or let me sit beside them and we hang out together.  I am known as:   "The Bird Whisperer".
The main image plus the sentiment is by Craft Creations - Goldfinch in Cherry - and is diecut decoupage.  I ADORE using diecut decoupage images for my cards.  It is one of my most-favourite styles of card to make and I have made many over the years.  There is something magical about bringing a flat image to life and I just enjoy the process so much.

I popped the images out of the sheet and cleaned up the edges because you always get this white bit which really stands out if you don't trim it off.

I put the layers together using both 0.5 and 1 mm Doublesided Adhesive Foam Squares but I added a dot of Tombow Mono Multi Glue to give me a little bit of wiggle room to make sure I have the elements exactly where I want them.  This is something I learned to do a little while ago because if you just use the foam squares alone without the glue and stick it in the wrong spot, it can be problematic trying to get it up again without tearing it or leaving some of the foam square behind which can ruin the entire thing.

All the designer papers are by Graphic 45 - Botanical Tea - 8" x 8" pad which was first released in 2014.  Graphic 45 re-released a Keepsake Edition of Botanical Tea in August 2025 so if you are after these papers, you can still get them (yay!) but the Keepsake Edition has 12" x 12" papers not the 8" x 8".  I absolutely adore this collection - the colours make me very happy.  It really was just pure coincidence that they matched the main image so perfectly.

Once I had finished putting the picture together, I layered it onto pink then blue designer paper with 1/16" and 1/8" borders respectively.  These were trimmed using my We R Memory Keepers Perfect Layers Guides.

The Stepper Card was diecut from White Cardstock using my Big Shot with an Extended Platform and an old die from 2013 by Cheery Lynn Designs - Step Card #1.  I picked this die up at a Craft Show many years ago here in Australia when it was half price.  It was unique at the time but since then, a number of companies have released Stepper Card Dies - and of course, you can always just trim one out yourself without having a die.  Personally, I suck at measuring so a die just saves me the frustration and hassle of trying to do it myself.  This Cheery Lynn Die also comes with other dies to do the borders plus the card inside so it really is quick and easy to put the card together.

Here is a photo at an angle so you can see the layers on the main image:


Here is a photo of the card inside:


Sorry, it's not a great photo.  It is so hard to take a photo of white with the designer paper because if I brighten the white, the designer paper looks all washed out and nothing like what it really looks like in real life.  

The Green Cardstock was diecut using one of the dies from the Stepper Card Die Set and I just trimmed up the designer paper to fit.

The white sentiment panel was diecut using a Spellbinders Labels 1 Small Nestabilities Die.  The sentiment is from the diecut decoupage set and was popped up on 1mm Doublesided Adhesive Foam Squares.  I wrote on the inside:  "A little bird told me you were having a special birthday" which I thought was fitting given that I had a bird on the front 😊

Finished size is 5-5/16" x 5-7/8" or 119mm x 105mm.

I decided not to put 70 on the card so it didn't shout at my cousin, HEY - YOU'RE 70.  Not everyone necessarily wants a number on their card (I certainly don't!) - well, unless your a kid of course, then it is mandatory to show your age!  

This card will be winging its way over to Western Australia - so the other side of the country to where I live.  I am allowing at least two weeks for it to get there as it goes by truck - a journey of just around 3500 kilometres/2170 miles - and whilst they say 4-7 days, you never can be 100% sure - and I want to make sure my cousin definitely gets my card in time for her birthday and not a week too late!

Thanks for visiting my blog today.

Jocelyn


Card Recipe:

Stamps and Ink:  None

Designer Paper:  Graphic 45 Botanical Tea 8" x 8" Pad

Accessories:  Big Shot with Extended Platform, Craft Creations DCD558 Goldfinch in Cherry Diecut Decoupage, 0.5 & 1mm Doublesided Adhesive Foam Squares, Tombow Mono Multi Glue, WRMK Perfect Layers Guides, Cardstock - White & Green

Dies:  Cheery Lynn Designs Step Card #1 B348 (retired), Spellbinder Labels 1 Small Nestabilities S4-308 (retired)


Saturday, August 15, 2026

Vintage Tools Masculine Card

 
Hi everyone,

I originally made this card as my Splitcoaststampers Design Team Project for the February Fan Club Challenge CT0226 of 'Good People' - and one of the suggestions was to make a Thank You Card for people who help:


Now that it is 6 months since I shared this card in the Fan Club Gallery, I can share it here on my blog.

In case you don't know, the tool on the card is a wordworking plane which is used to flatten, reduce the thickness of and smooth wood surfaces by shaving off thin layers with a sharpened blade.  It transforms rough, uneven timber into straight, true, and refined pieces, essential for furniture making and joinery.  My late father's passion was working with wood and used this tool alot.  I used to love sitting with him in his workshop watching him work.  After he left school at Grade 8, he took himself off to Night School in the 1930s to learn cabinet-making and was very skilled.
 
I stamped the Plane and Sentiment using Dark Grey Ink onto White Cardstock.  I diecut the panel using a Lifestyle Nesting Circle Die then went around the edges using Dark Grey Ink.  I layered the main panel onto a grey piece of Kaisercraft Documented Designer Paper then diecut black cardstock using a Spellbinders Inverted Scalloped Circle Die and my Big Shot.  I popped the panel up a little using scrap pieces of Black Cardstock.
 
The top designer paper on the card base is from the Kaisercraft Documented Pad - and the bottom is by Mintay Garage from their Add-On Pack.  This Kaisercraft range is old and was released in 2017.
 
The Black Cardstock centre panel was dry embossed using a free embossing folder that came with a UK Cardmaking Magazine ages ago.  I sanded the panel using a Kaisercraft Sanding Tool - which I thought was in-keeping with the whole vibe of my card.
 
I added the 3/8" / 1 cm wide Black Stitched Grosgrain Ribbon in two separate elements because I find it easier for me that way.  
 
The card base is Dark Grey.
 
Lastly, I added 3 x Kaisercraft Black Pearls to the top RHS.
 
Finished size is:  4-1/4" x 5-15/16" or 118mm x 150mm.

I think you could use the card for a birthday as well - or just to tell someone how amazing they are.
 
Thanks for stopping by!
 
Jocelyn
 
 
Card Recipe:
 
Stamps:  Vintage Tools
 
Ink:  Dark Grey

Designer Paper:  Mintay Garage 6" x 8" Add-On Pack MT-GAG-11, Kaisercraft Documented 6-1/2" x 6-1/2" Pad (retired)
 
Accessories:  Ink Blending Tool + Domed Pad, Big Shot, Diamond Embossing Folder (free with magazine), Kaisercraft Sanding Tool, Kaisercraft Black Pearls BR211, Tombow Mono Multi Glue, 3/8"-1cm wide Black Grosgrain Ribbon, Cardstock - Black + White + Dark Grey 
 
Dies:  
Lifestyle Nesting Circles (retired), Spellbinders Inverted Scalloped Circles S4-195 (retired)


Tuesday, January 6, 2026

Stampin' Up Snowy Scenes Christmas Card

 
Hi everyone,

Today I am sharing another Christmas Card that I made during this Christmas season:


The great thing about the Stampin' Up Snowy Scenes Designer Series Paper is that you can cut out all these awesome snowglobes to use on your cards - so I spent quite a bit of time fussy-cutting all the different ones out.  I went around the edge of the "glass" with Stampin' Up Pool Party Ink to hide any imperfections in my cutting.  I popped the snowglobe up on dimensionals.

The dry embossing was done with my Big Shot and a Cart-Us Snowflake Embossing Folder (sorry, I don't know the exact name) using Stampin' Up Pool Party Cardstock.

The strip of designer paper on the LHS is from the same Snowy Scenes dsp.  

The sentiment is from a recently retired set Stampin' Up - Greetings of the Season - and was stamped using Stampin' Up Garden Green Ink.  I diecut it using an old favourite die of mine called Spellbinders Labels Trio which I have had forever so long retired.  I popped up the sentiment a little using scraps of white cardstock.

As finishing touches, I added 3 x Silver Glitter Cardstock Punched Snowflakes to the snowglobe base with a tiny Molossi Red Rhinestone in each centre - plus two tiny Molossi Blue Rhinestones to the snowflakes on the snowglobe.

Finished size is:  5-5/8" x 4-1/16" or 144mm x 104mm.

Thanks for stopping by!

Jocelyn


Card Recipe:

Stamps:  Stampin' Up Greetings of the Season #164325 (retired)

Ink:  Stampin' Up Garden Green + Pool Party

Designer Paper:  Stampin' Up Snowy Scenes #164333 12" x 12"

Accessories:  Big Shot, Stamping Platform, Molossi Rhinestones - red + blue, Cart-Us Snowflake Embossing Folder, Silver Glitter Cardstock, Stampin' Up Pool Party Cardstock, Kaisercraft White Cardstock + White Card Base, Tombow Mono Multi Glue, Art Glitter Glue, Dimensionals

Punches:  Snowflake

Dies:  Spellbinders Shapeabilities Labels Trio S3-147 (retired)


Thursday, April 10, 2025

Penny Back So Loved Wedding Anniversary Card

 
Hi everyone 😃

My husband and I just celebrated our 36th Wedding Anniversary.  It hardly seems that we have been married that long - yet we have - and I am so lucky to be married to such a great guy.  We went out for our evening meal to our local RSL and had a lovely, quiet day at home otherwise.  I received 2 gorgeous bunches of pink roses and a beautiful card.  Our daughter made us the most-amazing mini scrapbook album with photos of us from the last 10 years.   We aren't ones for big celebrations and prefer to keep things low-key.  I am definitely not one for dressing up and going to a fancy restaurant because (a) I like simple foods like Roast of the Day, and (b) it's too expensive, and (c) they have white tablecloths and I am so incredibly clumsy.  I am also clumsy when I cook and are known as Messy Chef - a play on Masterchef - hee hee 😆

And now for story time:  around 24 years ago, my boss gave me an $80 voucher for Christmas to a local and very fancy restaurant.  We booked for 6.00 pm and we were the only ones there till about 7.30 pm.  And then people started arriving really, REALLY dressed up - so much so that I felt more than a little underdressed - but I wasn't wearing jeans and was actually dressed up so I thought!  I guess we were naive and honestly didn't realise that it was a fancy restaurant till we got there (pre-internet days for us) and saw the decor and then the menu and went, uh oh.  The glasses of House Wine turned out to be $25 each as we mistook the menu for meaning $25 for a bottle of House Wine because it said:  "House Wine $25" - and then realised our mistake - so that was $50 of the voucher used already!  We got the cheapest food on the menu and were still over $100 out-of-pocket.  It was just as well that we were both working at the time and it was pre-kids!  And to be honest, I really had no idea what I was eating as the description was completely lost on me - food I was completely unfamiliar with.  I am not taking anything away from the Chef of course - it's just not my scene - and having pub fare like a Garlic Bread Entree and a banging Roast of the Day makes me very happy and you are in and out within an hour.  Suits me just fine 😃

Anyway, onto the card I made for my husband:


This is also my card for the following Challenges (click on the underlined links to take you to the Challenges):
  • Crafty Catz Challenge - #691 - Anything Goes with No Optional Twist
  • Penny Black Saturday Challenge - PBSC April - Anything Goes with Optional Easter
  • Crazy Critter Challenges - Challenge #97 - Anything Goes with a Featured Critter
The main image is by Penny Black from their So Loved Set.  I stamped the cat with Versafine Onyx Black Ink onto Bellbird Paperarts 210gsm Hot Pressed Watercolour Paper and coloured it using various brands of Watercolour Pencils and a #4 Round Paintbrush.  I went over the black lines using an Anko Black 0.3 Pen to darken up the lines on the image.

I re-stamped the image onto a piece of the designer paper lining up the 'One True Love' from the paper to be the centre of the heart cushion then fussy-cut it out.  I re-stamped the image again onto Watercolour Paper and fussy-cut the paws that are holding the cushion.  I went around the edges with an Anko Black Brush Pen to hide any imperfections with my cutting.  I glued the cushion and paws on using Tombow Mono Multi Glue and it looks really cool in real life because you can see a bit of dimension.  I side-loaded a flat paintbrush with Folk Art Burgundy Acrylic Paint and went around the edge of the cushion to make it look a bit more rounded.  

Here is a close-up:


The sentiment is by Impression Obsession - Sentiments 1 - which I have had forever and is retired.  I used my Stamping Platform to ensure perfect placement and to stamp it a couple of times to darken it up.  

I used my EK Success Arrows Border Punch to punch out some Burgundy Cardstock Hearts (the leftover punchies look like tiny hearts) and glued them on using Tombow Mono Aqua Glue then added some Uniquely Creative Clear Sparkle Brush to them for a bit sparkle.

The main image was diecut using a Lifestyle Nesting Circle Die.  I diecut some Dark Teal Cardstock using a My Favorite Things Pierced Stax Circle Die then diecut Burgundy Cardstock using a Spellbinders Classic Scalloped Circle Die.

All the designer papers are by Bo Bunny - Love Letters - which are really old and are from around 2012.  I wish that I had bought more of this collection as I just adore the colour palette and have used it alot over the years.  

The bottom panel was punched using a Fiskars Scallop Border Punch.  The Dark Teal and Burgundy Cardstock layers were trimmed to 1/16" using my We R Memory Keepers Perfect Layers Guides.  I attached the Cream Ribbon in two separate elements then popped the panel up a little on scraps of white cardstock.

The Black Cardstock on the card base was trimmed to 1/8" and the Dark Teal + Burgundy Cardstock to 1/16" using my WRMK Perfect Layers Guides.

Once I had finished my card front, I glued it to a White Card Base.

And now here is a pic of the card inside:


The sentiment is by Avery Elle - Lots of Love - which was released in 2012 so long-retired.  I stamped it using Versafine Onyx Black Ink and then promptly smeared it......grrrrr!  So I re-stamped it onto a separate piece of white cardstock and heat-set it using my heat-gun before I had a chance to smear it - then diecut it using a Lifestyle Nesting Oval.  I layered that onto a Dark Teal Cardstock diecut oval.  

I punched two hearts from Burgundy Cardstock using an Anko Heart Punch.  I bought this punch in a set of 4 different punches from KMart.  These punches punch beautifully and I am really impressed with them.  I added some sparkle with my Uniquely Creative Clear Sparkle Brush.

I added the strips of designer paper just to tie everything together.

Thanks for visiting my blog today.

Jocelyn


Card Recipe - Front:

Stamps:  Penny Black So Loved 30-457 clear set, Impression Obsession Sentiments 1 WP16 clear set (retired)

Ink:  Versafine Onyx Back

Designer Paper:  Bo Bunny Love Letters #13517517 6" x 6" Pad (retired)

Accessories:  Big Shot, Perfect Layers Tools, Kaisercraft Trimmer, Stamping Platform, Bellbird Paperarts 210gsm Cotton Blend Watercolour Paper, Watercolour Pencils, #4 Round + Flat Paintbrush, Folk Art Burgundy Acrylic Paint, Anko Black Pen 0.3 + Brush, Uniquely Creative Clear Sparkle Brush, WRMK Perfect Layers Guides, Cream Ribbon 1/2" or 12.5mm wide, Cardstock - Burgundy + Dark Teal + Black + Scraps of White, Square White Card Base

Dies:  My Favorite Things Pierced Stax Die-namics, Lifestyle Nesting Circles, Spellbinder Classic Scalloped Circles Small S4-125

Punches:  EK Success Arrows Border, Fiskars Scallop Border


Card Recipe - Inside:

Stamps:  Avery Elle Lots of Love clear set (retired)

Ink:  Versafine Onyx Black

Designer Paper:  Bo Bunny Love Letters #13517517 6" x 6" Pad (retired)

Accessories:  Big Shot, WRMK Perfect Layers Guides, Heat-Gun Uniquely Creative Clear Sparkle Brush, Cardstock - White, Dark Teal, Burgundy, Black

Dies:  Lifestyle Nesting Ovals

Punches:  Anko Heart Punch #68775858


Friday, April 4, 2025

Penny Black Frolic Birthday Card!

 
Hi everyone 😃 

Today I am sharing a Birthday Card that I made for my niece:


This is also my card for the following Challenge:

Retro Rubber Challenge #251 - Anything Goes - RRCB251.  This Challenge requires you to use stamps that are over a year old and you must state how old - or roughly how old - your stamp is.  I was using this cat stamp back in 2014 so it is at least 11 years old.  The sentiment I was also using back in 2016 so is at least 9 years old.  Click on the underlined link to take you to the Challenge. 

I used the same layout as my previous card because it was easy and I really liked it.  I think this layout will be another one of my "go-to" card sketches which is especially useful when my mojo has disappeared.

The main image is by Penny Black - Frolic.  As I already stated,  I have had this wood-mounted stamp for a really long time and is one of my favourites.  You just can't help but smile at that adorable cat!  I stamped it using Versafine Onyx Black Ink onto Ranger Watercolour Cardstock and coloured it using Watercolour Pencils + Kuretake Clean Color Real Brush Markers and a #4 round paintbrush.

I went over the black lines using a Black Copic Multiliner to darken them up after my colouring.  The sentiment is by Impression Obsession Sentiments 1 which is retired.  I have used this sentiment set many times over the years because you can just add a small sentiment to an image panel when there really isn't room to add a larger one.  I diecut the main image using my Big Shot and Spellbinders Labels 1 Nestabilities.

Here is a close-up:


All the designer papers are by Cocoa Vanilla - Happiness.  The paper on the base is from their 6" x 8" pad and the Daisy paper down the centre is a 12" x 12" sheet.  The papers are a few years old and retired.

The ribbon is from my stash and was glued on using Helmar's Fabric Glue.  I added Fray Stop to the cut edges to stop them from fraying.  The Pink Enamel Dots are by Stampin' Up from their set 'It's my Party' and are retired.  

I used an EK Success Arrows Border Punch to punch tiny hearts from a scrap of pink designer paper (the leftover punchies look like tiny hearts) and glued them around the sentiment and main image using Tombow Mono Aqua Glue.   

Finishing touches were Kindyglitz Crystalina Glitter Glue to the butterflies + the tiny hearts - and Nuvo White Blizzard Glitter Drops to the flower centres.

Once I had finished the card front, I glued it to a white card base.

Here is a picture of the card inside:


The Happy Birthday is from a retired Stampin' Up set called Sweet Icecream.  I stamped it using Versafine Onyx Black then added lots of the punched tiny hearts around it plus Kindyglitz Crystalina Glitter Glue to the hearts for some sparkle.

On a personal note, my partner has been on Long Service Leave since November 2024.  It has been great to have him around more and he has been enjoying catching up on jobs around the house that he has been wanting to do for quite some years.  This has also given me more crafting time because he is doing things like going up to the shops and other running around that I normally do which is a great time-sucker.  

I have also been on a mission for over a year to sort through and set up my craft room better so I have been able to concentrate on that and are 95% there.  I used KMart, Target and Amazon storage solutions for most my storage so done it on a small budget.  I am finding that I am more creative because now everything has a place and it is so much easier to put things away and it's easier to find things.  I was lucky enough to find a 2nd-hand 4 x 4 Ikea Kallax Shelf Unit on Facebook Marketplace in the next suburb for the bargain price of $20.  It just needed a bit of a clean and it has been fantastic for rejigging my storage.  I put in some over the wardrobe storage baskets that I got from Target and it has been brilliant because I can see what I have.  If I can't see what I have because it's behind the wardrobe door, I forget it's there so I don't use it.  And so far, my room is working really well for me and I am alot happier.  

Thanks for stopping by my blog today!

Jocelyn


Card Recipe - Card Front:

Stamps:  Penny Black Frolic 3972K wood-mount, Impression Obsession Sentiments 1 WP16 clear set (retired)

Ink:  Versafine Onyx Black

Designer Paper:  Cocoa Vanilla Happiness 6" x 8" and 12" x 12" (retired)

Accessories:  Big Shot, Stampin' Up It's My Party Enamel Dots (ret), Watercolour Pencils, Kuretake Clear Color Real Brush Markers, #4 round Paintbrush, Black Copic Multiliner, Stamping Platform, Kindyglitz Crystalina Glitter Glue, Nuvo Glitter Drops - White Blizzard 758N, Ribbon - 6mm or 1/4" wide, Fray Stop, Helmar's Fabric Glue, Kaisercraft Trimmer, Cardstock - Dark Teal + Navy Blue, Ranger Watercolour Cardstock, White Card Base

Dies:  Spellbinders Labels 1 Small S4-308 and S4-161

Punches:  EK Success Arrows Border


Card Recipe - Card Inside:

Stamps:  Stampin' Up Sweet Icecream (retired)

Ink:  Versafine Onyx Black

Designer Paper:  Cocoa Vanilla Happiness 12" x 12" (retired), Scrap of Pink

Accessories:  Cardstock - Dark Teal + Navy Blue + White, Kindyglitz Crystalina Glitter Glue

Punches:  EK Success Arrows Border


Monday, March 31, 2025

Penny Black Butterfly Bear Thank You Card!

 
Hi blogging friends 😁 

Today I am sharing a Thank You Card that I made for a lady who recently helped me: 


This is also my card for following Challenge:

Penny Black Saturday Challenge - March - Anything Goes or On The Farm (obviously I did Anything Goes).  

Back in 1970 when I was very young, my Father (who has been gone around 30 years now) gave me a set of Staedtler Watercolour Pencils and told me how special they were because you could paint with them.  I was completely blown away at this concept and I filled my books with countless paintings of birds because I loved Australian birds.  Birds were always a passion of mine even from a very young age and they still are.   I took very good care of my pencils but did somehow manage to lose one of them over the years.  

Recently, I have been swatching my other pencils eg: Derwent Inktense, Lyras etc. and it was easy to find colour charts online but I couldn't find one for my old pencils.   A couple of weeks ago, I contacted Staedtler in Australia to see if they had a colour chart for these pencils and eventually they tracked one down for me.  No easy task for 55 year old pencils!  The lady was so helpful and really went out of her way to find one which I really appreciated.  So I thought it was fitting that I send her a card that I painted using those pencils.

After painting the image, I re-stamped it and fussy-cut the butterflies then glued them on the base image to give a bit of dimension to the butterflies.  I went over all the black lines using an Copic Black Multi-liner to darken them up.

The sentiment is by Impression Obsession from a set I bought years ago so long retired.  I was careful to use a Stamping Platform so if it didn't stamp clearly the first time, I could re-stamp.

The main image panel and subsequent cardstock layers were diecut using my Big Shot and Labels 1 Nestabilities.  All the designer papers are by Cocoa Vanilla - Unforgettable from their 6" x 8" paper stack which was released in 2019.  

I glued on the teal satin ribbon using Helmar's Fabric Glue then added 3 x Aqua Couture Creations Self-Adhesive Gemstones underneath the main panel.  I added some Fray Stop to the cut ends of the ribbon to stop them from fraying.

Finishing touches were adding Kindyglitz Crystalina Glitter Glue to the butterflies and the teddy's cheeks.  Here is a close-up:


Once I had finished my card front, I glued it to a white card base using Tombow Mono Multi Glue.

Thanks for visiting my blog today.

Jocelyn


Card Recipe:

Stamps:  Penny Black Butterfly Bear 3696H wood-mount, Impression Obsession Sentiments 1 WP16 clear set (retired)

Ink:  Versafine Onyx Black

Designer Paper:  Cocoa Vanilla Unforgettable 6" x 8" Paper Stack (from 2019 and retired)

Accessories:  Stamping Platform, Copic Black Multi-liner, Teal Ribbon 9mm - 3/8" wide, Fray Stop, Big Shot, Couture Creations Gemstones Aqua, Kindyglitz Crystalina Glitter Glue, Fussy-cutting Scissors, WRMK Perfect Layers Tools, Helmar's Fabric Glue, Tombow Mono Multi Glue, Staedtler Tradition Aquarell Watercolour Pencils, #4 round Paintbrush, Ranger White Watercolour Cardstock, Other Cardstock - Navy Blue + Teal, Square White Card Base

Dies:  Spellbinders Labels 1 Small S4-308 + Labels 1 S4-161


Wednesday, April 17, 2024

Penny Black Critters in Love Wedding Anniversary Card

 
Hi everyone 😀

Today I am sharing a Wedding Anniversary card that I made for my husband.  We are celebrating 35 years!  It really doesn't seem that we were married that long ago but somehow, it is!!  

I am fortunate that my husband loves cute critters and especially cats on his cards which it makes things so much easier because I have a ton of cute Penny Black critters and loads of cats😁


This is also my card for the following Challenges (click on the underlined link to their respective websites for more info):

Penny Black Saturday Challenge - PBSC April - Anything Goes with Optional Extra of Numbers

Crafty Catz Challenge - #669 - Anything Goes + Any Cute Critter

Splitcoaststampers - Free for All Friday Challenge - F4A729 - Cute Animals

The main image is by Penny Black from the set "Critters in Love".   Isn't it sweet?!  I stamped it onto Bellbird Paperarts Watercolour paper using Versafine Onyx Black ink and coloured it with a mix of Derwent Inktense and Lyra Watercolour pencils using a #2 round paintbrush.   I punched a heart using my Carl Craft Heart Duo CP-8 punch and glued it on using Tombow Mono Aqua glue.   I went over all the black lines on the image with a Zig .01 Black Pen to darken then up again.   I diecut the image and the other layers using my Big Shot and Lifestyle Nesting Circles dies.

The sentiment is by Elzybells from their Swirly Greetings set.  Unfortunately Elzybells are no longer in business.  I still miss them and treasure all the stamps that I have.  I can't ever imagine having to part with them - I LOVE them!  I used an Impression Obsession Mini Heart Row die to add the hearts either side of the sentiment.  I glued them on with Tombow Mono Aqua glue.  I diecut the sentiment using a Spellbinders Labels Trio die and popped it up.

Here is a close-up of the image:


The designer papers are by Bo Bunny - Love Letters - and are really old - from 2012.  

The teal and cherry and cardstock layers on the card base were trimmed to 1/16" using my WRMK Layer Guides.  The black layer was trimmed to 1/8".  

The side panel punched border was done with a Fiskars Scallop Border punch.  I added the ribbon in 2 separate elements.  The side panel is popped up.  For the most part, I use scraps of cardstock to pop up panels instead of dimensionals.  It saves money and uses up my scraps.  I added the ribbon in two separate elements.

Lastly, I added some Wink of Stella Clear Glitter brush to the 3 hearts.

Once I had finished the card front, I glued it to a white card base using my favourite glue - Tombow Mono Multi.  Finished size is 5" x 5" or 126mm x 126mm.

I'll finish with a cute photo of our Freya:  


Thanks for visiting my blog today.

Jocelyn


Card Recipe:

Stamps:  Penny Black Critters in Love 30-028 clear set, Elzybells Swirly Greetings 20-004-CB clear set (retired)

Ink:  Versafine Onyx Black

Designer Paper:  Bo Bunny Love Letters 6" x 6" pad (retired - from 2012)

Accessories:  Big Shot, Zig .01 Black pen, Derwent Inktense and Lyra Watercolour Pencils, Born #2 round Taklon paint brush, 3/8" wide Ribbon (stash), We R Memory Keepers Layer Guides, Bellbird Paperarts 140lb Cotton Watercolour Paper, Kaisercraft Paper Trimmer, Stamping Platform, Tombow Mono Multi and Mono Aqua Glue, Cardstock - Black, Teal + Kaisercraft Cherry + scraps of white, Anko White Card Base (KMart)

Dies:  Lifestyle Nesting Circles L-CC-001 (retired), Impression Obsession Mini Heart Row DIE134-D, Spellbinder Shapeabilities Labels Trio S3-147 (retired)

Punches:  Carl CP-8 Heart Duo, Fiskars Scallop Border


Saturday, April 29, 2023

Stampin' Up Beautiful You 21st Birthday Card and Gift Box

 
Hi everyone 😊

Today I am sharing a card and gift box that I made for my niece's 21st birthday.  My niece had a party in a restaurant which I thought was a great idea when there are alot of people invited.  Much easier to cater for and you don't have to clean up afterwards LOL!  My husband and daughter went along but I didn't due to my never-ending fatigue from long-COVID and I didn't want to be a wet blanket and ask to go home after just an hour of being there.  I was disappointed that I couldn't go but at least people are understanding of how debilitating long-COVID can be.


The main image and sentiment are from a retired set by Stampin' Up called Beautiful You.  I adore this stamp set and one that I will never part with.  I stamped the image using Versafine Onyx Black ink onto Ranger watercolour cardstock and coloured it with Lyra watercolour pencils and a #2 round paintbrush.  I think it took me about 3 minutes to colour it!  I diecut the image using my Big Shot and a Lifestyle Nesting Circle die and layered it onto the peach designer paper then diecut a scalloped circle from the darker blue designer paper.

All the papers are my Mintay - Harmony.  Aren't the colours gorgeous?!  

For the LHS panel, I dry embossed the peach designer paper with a retired Cuttlebug Textile embossing folder.   I have really been enjoying using my embossing folders again.  They kind-of fell out-of-favour for quite a few years but with all the amazing 3D embossing folders now available, they are back on-trend.  The blue designer paper was punched using a Martha Stewart Lace Doily edge punch.  I tied on some peach organza ribbon then threaded some peach/gold twine through a gold heart charm and glued that underneath the organza ribbon using fabric glue.  The twine came in a pack of 6 from KMart.  

The sentiment panel was diecut using a retired Spellbinders Shapeabilities Labels Trio die and popped up on dimensionals.  

The peach diamantes on the top RHS I bought on EBay ages ago.  It was a bulk lot of all sorts of colours.  I glued them on using Helmar 450 glue.

Once I had finished the card front, I glued it onto a white card base using Tombow Mono Multi glue.

I decorated the card inside too.  Please excuse the quality of the image but I took it very late in the afternoon and the light was dreary and no amount of editing seemed to improve it much.  Oh well!


The sentiment is also from the Beautiful You stamp set.  I added a strip of leftover designer paper then added the stickers on the LHS from the Mintay Harmony Cardboard Sticker sheet.  

Here is the gift box:


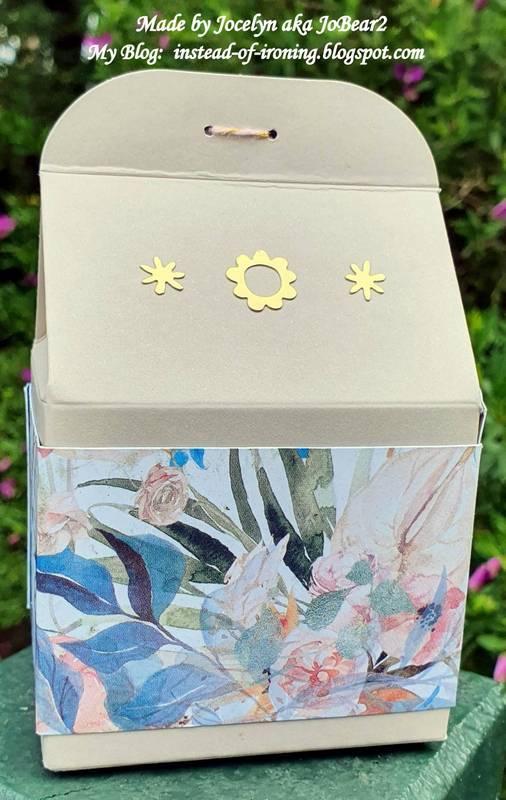
This was a last-minute make so by the time I finished it to photograph it, the light was terrible for photographing.  The box is by Stampin' Up and has been in my stash forever and retired.   I wrapped some designer paper around the box then punched two tiny holes using a retired Stampin' Up 1/16" Hole Punch.  I bought this punch on clearance and it is very handy when you only want a tiny hole in something.  I threaded the peach/gold twine through the holes.  The sentiment is also from the Beautiful You stamp set.  I diecut the sentiment using a Spellbinders Oval Nestabilities die and popped it up on dimensionals.   I ended up stamping the sentiment 3 times after smearing it when I diecut it because I was too impatient to let it dry!  Amazing how you just don't think when you are under time-pressure!   The gold stickers are also from Stampin' Up but long retired.

Here is another photo of the box from the side:


And a photo of the back:  


I popped a pair of earrings in a small organza bag into the box and nestled them in some gold tissue paper.  I bought the earrings from my local Pharmacy which has some beautiful giftware but they didn't come in a box so I had to put my thinking cap on for how to wrap them and to make them look elegant.  I was really pleased with how the box turned out and I love how the box matches the card.

Thanks for stopping by!

Jocelyn


Card Recipe:

Stamps:  Stampin' Up Beautiful You (retired)

Ink:  Versafine Onyx Black

Designer Paper:  Mintay Harmony 6" x 6" paper pad + 12" x 12" papers + Sticker Sheet

Accessories:  Big Shot, Cuttlebug Textile embossing folder (retired), gold heart charm (stash), 1" wide peach organza ribbon (stash), peach/gold twine - KMart, Lyra watercolour pencils, #2 round paintbrush, dimensionals, Helmar 450 glue, Tombow Mono Multi glue, fabric glue, peach diamantes, Wink of Stella clear glitter brush, white card base, Ranger watercolour cardstock

Dies:  Spellbinder Shapeabilities S3-147 Labels Trio (retired), Lifestyle Nesting Circles + Scalloped Circles

Punches:  Martha Stewart Doily Lace Edge


Gift Box Recipe:

Stamps:  Stampin' Up Beautiful You (retired)

Ink:  Versafine Onyx Black

Designer Paper:  Mintay Harmony 6" x 6" paper pad

Accessories:  Stampin' Up Kraft Gift Box (retired), Stampin' Up gold stickers (retired), Stampin' Up 1/16" hole punch (retired), Big Shot, doublesided tape, dimensionals, peach/gold twine - KMart, white cardstock scrap

Dies:  Spellbinder Scalloped Oval Nestabilities