Showing posts with label Nestabilities. Show all posts

Sunday, March 15, 2026

Stampin' Up Leaf Collection Hello Card

 
Hi everyone,

Today I am sharing a card that I made for one of the lovely ladies in our Stampin' Up Class that we attend once a month:

 
I wanted to brighten my friend's day with a card plus a surprise gift that I am including.  I do love to send "happy mail" when someone least expects it.  Sure, it's lovely to get a birthday card (not that I get very many nowadays) - but it's so nice to receive a handmade card in the mail when you aren't expecting it.  I think it's sad that people just send a message on Facebook when it's your birthday.  It's like it's a cookie cutter social media task.  And to me, it feels so impersonal, robotic and obligatory rather than heartfelt.  I have been making a point in the last year to send out Thank You Cards and people really appreciate them.

This is also my card for the following Challenges - click on the underlined link to take you to each challenge:
  • Splitcoaststampers - Free for All Friday F4A838 - 3 of a Kind - mine is the 3 ink colours as well as the 3 different sized clear gems
  • Splitcoaststampers - Technique Lover's TLC1004 - Joseph's Coat
  • Crafty Catz - #709 - Anything Goes
  • Cardz for Galz - #271 - Embossing Heat or Dry 

I used the Joseph's Coat Technique which I only learned how to do last year - but it has been around for quite a long time.  First, I took a sheet of White Cardstock and randomly coloured splotches of ink all over it using my Ink Blending Tools fitted with a Domed Pad.  I used all Stampin' Up Inks in the colours Watermelon Wonder + Delightful Dijon (both retired) and Garden Green (still current).  I was really going for an Autumn feel because it is Autumn here where I live in Australia and the leaves are just starting to turn.  You don't have to be neat nor blend colours.  This is what the panel looked like after adding the inks - and doesn't it look like a hot mess?!!

I then heat-set the panel to make sure it was completely dry before moving onto the next step. 

I used a Powder Tool all over the panel then stamped my leaves using Versamark Watermark Ink.  The image is called Stampin' Up - Leaf Collection and is one solid stamp.  This a retired stamp, but one I absolutely LOVE.  I poured on Ranger Clear Detail Embossing Powder and heat-set it.  I went over all the panel with Versafine Clair Nocturne Ink and the embossed image resists the black ink.  I would definitely recommend disposable gloves for that part unless you like having black ink all over your hands!  

You then wipe over the panel using a piece of paper towel to remove the excess black ink off the embossed image.  And then the colourful image seems to magically appear which is why it is called Joseph's Coat.   It really amazes me how the ink colours change quite a bit.  You would not believe that it was Garden Green Ink as it looks more teal.  

I layered the panel onto Stampin' Up Crushed Curry Cardstock with a 1/16" border, then onto Black Cardstock with a 1/8" border which were done using my We R Memory Keepers Perfect Layer Guides.

The sentiment is also by Stampin' Up - Fabulous Sayings - which you could get for $9 in January once your order was over a certain amount - but it is actually still available when I checked tonight even though it is March.  I guess it will be available until sold out.  This is a really, really great set and definitely worth getting:

I stamped the sentiment using
Versafine Onyx Black Ink onto Stampin' Up Very Vanilla Cardstock, then diecut it using my Big Shot and a Spellbinders Oval Nestabilities Die.  I layered this onto Crushed Curry Cardstock that was diecut using a Spellbinders Scalloped Oval Nestabilities Die.  I popped the panel up on scraps of cardstock.  

I added 5 x Clear Gems in 3 different sizes around the sentiment - 3 on the top RHS and 2 on the bottom LHS.  I used Art Glitter Glue to attach them because this glue dries completely clear.  I love how the clear gems look like drops of rain.

Lastly, I attached my card front to a Kaisercraft White Card Base using Tombow Mono Multi Glue.

I think you could use this card for lots of different occasions.

Thanks for stopping by!

Jocelyn


Card Recipe:

Stamps:  Stampin' Up Leaf Collection #163610 (retired) + Fabulous Sayings #167972

Ink:  Stampin' Up Watermelon Wonder + Delightful Dijon (both retired) + Garden Green, Versafine Clair Nocturne, Versafine Onyx Black

Designer Paper:  None

Accessories:  Big Shot, Ink Blending Tool with Domed Pads, Heat-Gun, Powder Tool, Ranger Clear Detail Embossing Powder, WRMK Perfect Layers Guides,  Disposable Gloves, Paperartz Clear Gems, Art Glitter Glue, Tombow Mono Multi Glue, Cardstock - Stampin' Up Crushed Curry + Very Vanilla + White + Black, Kaisercraft White Card Base

Dies:  Spellbinders Oval Nestabilities + Scalloped Oval Nestabilities


Wednesday, July 2, 2025

Paper Tole Rose Thank You Card

 
Hi blogging friends,

This is my third Thank You Card that I've made to thank people for their support following my Mum's passing in June:


I am finding being in my Craft Room and creating is like a healing balm for my soul.  Even though Mum's passing at age 94 wasn't unexpected, it has been difficult because she would go downhill then rally, then go downhill then rally again - but she would just become more and more frail each time.  I have taken comfort in that she passed peacefully in her sleep.  

Challenges:

I am entering my card in the following Challenges - click on the underlined link to take you to the Challenge:

Crafty Catz Weekly Challenge #697 of Anything Goes

The Paper Players - Tic Tac Toe Challenge - PP744 - choose at least 3 elements across, down or diagonally.  I chose Flowers, Diecut and Embossing.


I again decided to use a Paper Tole or Diecut Decouage image by Reddy Creative Cards but did trim the image down a little.  I used 0.5mm Self-Adhesive Doublesided Foam Squares between each layer.  

The designer papers are by Uniquely Creative - Dear Diary - which were released in June this year.  These papers are so exquisitely beautiful - I adore them!

The cardstock layers are Dusty Rose and Sage - and the dark green layer is actually some designer paper called Elation P2607 from Kaisercraft's Peace and Joy Collection which was released about 2019.  I couldn't find the right shade of dark green cardstock in my stash so this fitted the bill perfectly.

The dry embossing across the middle is my old favourite:  Cuttlebug Textile Embossing Folder.  I have used this folder so many times over the years and still love it as much as when I first bought it.

The sentiment is by Kaisercraft - Banksia Rose Collectables - which is a recent release.  It matched so perfectly like it was just "meant to be".  I diecut some Dusty Rose Cardstock using my Big Shot and Spellbinders Petite Scalloped Circle Nestabilities and glued that underneath the sentiment using Tombow Mono Multi Glue.

Both the main image panel and sentiment are popped up on scraps of white cardstock.

I diecut 5 x Dusty Rose Cardstock Hearts using an Impression Obsession die called Heart of Hearts.  This particular die cuts out a myriad of different styles and sizes of hearts which comes in very handy.  I glued four around the main image and one on the sentiment panel.  I added some Wink of Stella Clear Glitter Brush to the hearts which added some subtle sparkle.  

Lastly, I glued on some Pale Green Sparklets using Helmar's 450 Quick Dry Adhesive then attached my card front to a Kaisercraft White Card Base.

Finished size is 5-5/8" x 5-5/8" or 143mm x 143mm.

And now here is a pic of the card inside:


I again used the Uniquely Creative Dear Diary Designer Papers for the main background.  I glued on some flowers and leaves from the Uniquely Creative Dear Diary Creative Cuts but also fussy-cut some flowers and leaves from the papers.

Thanks for visiting my blog today!

Jocelyn


Card Recipe:

Stamps and Ink:  None

Designer Paper:  Uniquely Creative Dear Diary 6" x 6" + 12" x 12" + Creative Cuts, Kaisercraft Peace and Joy - Elation P2607 12" x 12"

Accessories:  Reddy Creative Cards Diecut Decoupage #83873, Kaisercraft Trimmer, Pale Green Sparklets (EBay), 0.5mm Self-Adhesive Doublesided Foam Squares, Big Shot, Cuttlebug Textile Embossing Folder, Wink of Stella Clear Glitter Brush, Tombow Mono Multi Glue, Helmar's 450 Quick Dry Adhesive, Kaisercraft White Square Card Base, Cardstock - Dusty Rose + Sage + Scraps of White

Dies:  Spellbinders Petite Scalloped Circle Nestabilities, Impression Obsession Heart of Hearts DIE052-I


Friday, April 4, 2025

Penny Black Frolic Birthday Card!

 
Hi everyone 😃 

Today I am sharing a Birthday Card that I made for my niece:


This is also my card for the following Challenge:

Retro Rubber Challenge #251 - Anything Goes - RRCB251.  This Challenge requires you to use stamps that are over a year old and you must state how old - or roughly how old - your stamp is.  I was using this cat stamp back in 2014 so it is at least 11 years old.  The sentiment I was also using back in 2016 so is at least 9 years old.  Click on the underlined link to take you to the Challenge. 

I used the same layout as my previous card because it was easy and I really liked it.  I think this layout will be another one of my "go-to" card sketches which is especially useful when my mojo has disappeared.

The main image is by Penny Black - Frolic.  As I already stated,  I have had this wood-mounted stamp for a really long time and is one of my favourites.  You just can't help but smile at that adorable cat!  I stamped it using Versafine Onyx Black Ink onto Ranger Watercolour Cardstock and coloured it using Watercolour Pencils + Kuretake Clean Color Real Brush Markers and a #4 round paintbrush.

I went over the black lines using a Black Copic Multiliner to darken them up after my colouring.  The sentiment is by Impression Obsession Sentiments 1 which is retired.  I have used this sentiment set many times over the years because you can just add a small sentiment to an image panel when there really isn't room to add a larger one.  I diecut the main image using my Big Shot and Spellbinders Labels 1 Nestabilities.

Here is a close-up:


All the designer papers are by Cocoa Vanilla - Happiness.  The paper on the base is from their 6" x 8" pad and the Daisy paper down the centre is a 12" x 12" sheet.  The papers are a few years old and retired.

The ribbon is from my stash and was glued on using Helmar's Fabric Glue.  I added Fray Stop to the cut edges to stop them from fraying.  The Pink Enamel Dots are by Stampin' Up from their set 'It's my Party' and are retired.  

I used an EK Success Arrows Border Punch to punch tiny hearts from a scrap of pink designer paper (the leftover punchies look like tiny hearts) and glued them around the sentiment and main image using Tombow Mono Aqua Glue.   

Finishing touches were Kindyglitz Crystalina Glitter Glue to the butterflies + the tiny hearts - and Nuvo White Blizzard Glitter Drops to the flower centres.

Once I had finished the card front, I glued it to a white card base.

Here is a picture of the card inside:


The Happy Birthday is from a retired Stampin' Up set called Sweet Icecream.  I stamped it using Versafine Onyx Black then added lots of the punched tiny hearts around it plus Kindyglitz Crystalina Glitter Glue to the hearts for some sparkle.

On a personal note, my partner has been on Long Service Leave since November 2024.  It has been great to have him around more and he has been enjoying catching up on jobs around the house that he has been wanting to do for quite some years.  This has also given me more crafting time because he is doing things like going up to the shops and other running around that I normally do which is a great time-sucker.  

I have also been on a mission for over a year to sort through and set up my craft room better so I have been able to concentrate on that and are 95% there.  I used KMart, Target and Amazon storage solutions for most my storage so done it on a small budget.  I am finding that I am more creative because now everything has a place and it is so much easier to put things away and it's easier to find things.  I was lucky enough to find a 2nd-hand 4 x 4 Ikea Kallax Shelf Unit on Facebook Marketplace in the next suburb for the bargain price of $20.  It just needed a bit of a clean and it has been fantastic for rejigging my storage.  I put in some over the wardrobe storage baskets that I got from Target and it has been brilliant because I can see what I have.  If I can't see what I have because it's behind the wardrobe door, I forget it's there so I don't use it.  And so far, my room is working really well for me and I am alot happier.  

Thanks for stopping by my blog today!

Jocelyn


Card Recipe - Card Front:

Stamps:  Penny Black Frolic 3972K wood-mount, Impression Obsession Sentiments 1 WP16 clear set (retired)

Ink:  Versafine Onyx Black

Designer Paper:  Cocoa Vanilla Happiness 6" x 8" and 12" x 12" (retired)

Accessories:  Big Shot, Stampin' Up It's My Party Enamel Dots (ret), Watercolour Pencils, Kuretake Clear Color Real Brush Markers, #4 round Paintbrush, Black Copic Multiliner, Stamping Platform, Kindyglitz Crystalina Glitter Glue, Nuvo Glitter Drops - White Blizzard 758N, Ribbon - 6mm or 1/4" wide, Fray Stop, Helmar's Fabric Glue, Kaisercraft Trimmer, Cardstock - Dark Teal + Navy Blue, Ranger Watercolour Cardstock, White Card Base

Dies:  Spellbinders Labels 1 Small S4-308 and S4-161

Punches:  EK Success Arrows Border


Card Recipe - Card Inside:

Stamps:  Stampin' Up Sweet Icecream (retired)

Ink:  Versafine Onyx Black

Designer Paper:  Cocoa Vanilla Happiness 12" x 12" (retired), Scrap of Pink

Accessories:  Cardstock - Dark Teal + Navy Blue + White, Kindyglitz Crystalina Glitter Glue

Punches:  EK Success Arrows Border


Monday, March 31, 2025

Penny Black Butterfly Bear Thank You Card!

 
Hi blogging friends 😁 

Today I am sharing a Thank You Card that I made for a lady who recently helped me: 


This is also my card for following Challenge:

Penny Black Saturday Challenge - March - Anything Goes or On The Farm (obviously I did Anything Goes).  

Back in 1970 when I was very young, my Father (who has been gone around 30 years now) gave me a set of Staedtler Watercolour Pencils and told me how special they were because you could paint with them.  I was completely blown away at this concept and I filled my books with countless paintings of birds because I loved Australian birds.  Birds were always a passion of mine even from a very young age and they still are.   I took very good care of my pencils but did somehow manage to lose one of them over the years.  

Recently, I have been swatching my other pencils eg: Derwent Inktense, Lyras etc. and it was easy to find colour charts online but I couldn't find one for my old pencils.   A couple of weeks ago, I contacted Staedtler in Australia to see if they had a colour chart for these pencils and eventually they tracked one down for me.  No easy task for 55 year old pencils!  The lady was so helpful and really went out of her way to find one which I really appreciated.  So I thought it was fitting that I send her a card that I painted using those pencils.

After painting the image, I re-stamped it and fussy-cut the butterflies then glued them on the base image to give a bit of dimension to the butterflies.  I went over all the black lines using an Copic Black Multi-liner to darken them up.

The sentiment is by Impression Obsession from a set I bought years ago so long retired.  I was careful to use a Stamping Platform so if it didn't stamp clearly the first time, I could re-stamp.

The main image panel and subsequent cardstock layers were diecut using my Big Shot and Labels 1 Nestabilities.  All the designer papers are by Cocoa Vanilla - Unforgettable from their 6" x 8" paper stack which was released in 2019.  

I glued on the teal satin ribbon using Helmar's Fabric Glue then added 3 x Aqua Couture Creations Self-Adhesive Gemstones underneath the main panel.  I added some Fray Stop to the cut ends of the ribbon to stop them from fraying.

Finishing touches were adding Kindyglitz Crystalina Glitter Glue to the butterflies and the teddy's cheeks.  Here is a close-up:


Once I had finished my card front, I glued it to a white card base using Tombow Mono Multi Glue.

Thanks for visiting my blog today.

Jocelyn


Card Recipe:

Stamps:  Penny Black Butterfly Bear 3696H wood-mount, Impression Obsession Sentiments 1 WP16 clear set (retired)

Ink:  Versafine Onyx Black

Designer Paper:  Cocoa Vanilla Unforgettable 6" x 8" Paper Stack (from 2019 and retired)

Accessories:  Stamping Platform, Copic Black Multi-liner, Teal Ribbon 9mm - 3/8" wide, Fray Stop, Big Shot, Couture Creations Gemstones Aqua, Kindyglitz Crystalina Glitter Glue, Fussy-cutting Scissors, WRMK Perfect Layers Tools, Helmar's Fabric Glue, Tombow Mono Multi Glue, Staedtler Tradition Aquarell Watercolour Pencils, #4 round Paintbrush, Ranger White Watercolour Cardstock, Other Cardstock - Navy Blue + Teal, Square White Card Base

Dies:  Spellbinders Labels 1 Small S4-308 + Labels 1 S4-161


Saturday, April 29, 2023

Stampin' Up Beautiful You 21st Birthday Card and Gift Box

 
Hi everyone 😊

Today I am sharing a card and gift box that I made for my niece's 21st birthday.  My niece had a party in a restaurant which I thought was a great idea when there are alot of people invited.  Much easier to cater for and you don't have to clean up afterwards LOL!  My husband and daughter went along but I didn't due to my never-ending fatigue from long-COVID and I didn't want to be a wet blanket and ask to go home after just an hour of being there.  I was disappointed that I couldn't go but at least people are understanding of how debilitating long-COVID can be.


The main image and sentiment are from a retired set by Stampin' Up called Beautiful You.  I adore this stamp set and one that I will never part with.  I stamped the image using Versafine Onyx Black ink onto Ranger watercolour cardstock and coloured it with Lyra watercolour pencils and a #2 round paintbrush.  I think it took me about 3 minutes to colour it!  I diecut the image using my Big Shot and a Lifestyle Nesting Circle die and layered it onto the peach designer paper then diecut a scalloped circle from the darker blue designer paper.

All the papers are my Mintay - Harmony.  Aren't the colours gorgeous?!  

For the LHS panel, I dry embossed the peach designer paper with a retired Cuttlebug Textile embossing folder.   I have really been enjoying using my embossing folders again.  They kind-of fell out-of-favour for quite a few years but with all the amazing 3D embossing folders now available, they are back on-trend.  The blue designer paper was punched using a Martha Stewart Lace Doily edge punch.  I tied on some peach organza ribbon then threaded some peach/gold twine through a gold heart charm and glued that underneath the organza ribbon using fabric glue.  The twine came in a pack of 6 from KMart.  

The sentiment panel was diecut using a retired Spellbinders Shapeabilities Labels Trio die and popped up on dimensionals.  

The peach diamantes on the top RHS I bought on EBay ages ago.  It was a bulk lot of all sorts of colours.  I glued them on using Helmar 450 glue.

Once I had finished the card front, I glued it onto a white card base using Tombow Mono Multi glue.

I decorated the card inside too.  Please excuse the quality of the image but I took it very late in the afternoon and the light was dreary and no amount of editing seemed to improve it much.  Oh well!


The sentiment is also from the Beautiful You stamp set.  I added a strip of leftover designer paper then added the stickers on the LHS from the Mintay Harmony Cardboard Sticker sheet.  

Here is the gift box:


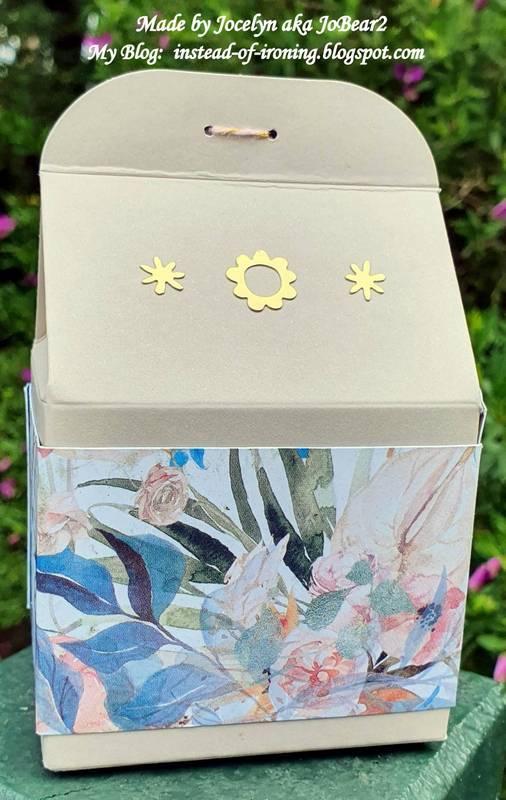
This was a last-minute make so by the time I finished it to photograph it, the light was terrible for photographing.  The box is by Stampin' Up and has been in my stash forever and retired.   I wrapped some designer paper around the box then punched two tiny holes using a retired Stampin' Up 1/16" Hole Punch.  I bought this punch on clearance and it is very handy when you only want a tiny hole in something.  I threaded the peach/gold twine through the holes.  The sentiment is also from the Beautiful You stamp set.  I diecut the sentiment using a Spellbinders Oval Nestabilities die and popped it up on dimensionals.   I ended up stamping the sentiment 3 times after smearing it when I diecut it because I was too impatient to let it dry!  Amazing how you just don't think when you are under time-pressure!   The gold stickers are also from Stampin' Up but long retired.

Here is another photo of the box from the side:


And a photo of the back:  


I popped a pair of earrings in a small organza bag into the box and nestled them in some gold tissue paper.  I bought the earrings from my local Pharmacy which has some beautiful giftware but they didn't come in a box so I had to put my thinking cap on for how to wrap them and to make them look elegant.  I was really pleased with how the box turned out and I love how the box matches the card.

Thanks for stopping by!

Jocelyn


Card Recipe:

Stamps:  Stampin' Up Beautiful You (retired)

Ink:  Versafine Onyx Black

Designer Paper:  Mintay Harmony 6" x 6" paper pad + 12" x 12" papers + Sticker Sheet

Accessories:  Big Shot, Cuttlebug Textile embossing folder (retired), gold heart charm (stash), 1" wide peach organza ribbon (stash), peach/gold twine - KMart, Lyra watercolour pencils, #2 round paintbrush, dimensionals, Helmar 450 glue, Tombow Mono Multi glue, fabric glue, peach diamantes, Wink of Stella clear glitter brush, white card base, Ranger watercolour cardstock

Dies:  Spellbinder Shapeabilities S3-147 Labels Trio (retired), Lifestyle Nesting Circles + Scalloped Circles

Punches:  Martha Stewart Doily Lace Edge


Gift Box Recipe:

Stamps:  Stampin' Up Beautiful You (retired)

Ink:  Versafine Onyx Black

Designer Paper:  Mintay Harmony 6" x 6" paper pad

Accessories:  Stampin' Up Kraft Gift Box (retired), Stampin' Up gold stickers (retired), Stampin' Up 1/16" hole punch (retired), Big Shot, doublesided tape, dimensionals, peach/gold twine - KMart, white cardstock scrap

Dies:  Spellbinder Scalloped Oval Nestabilities


Sunday, May 30, 2021

Sizzix Branches with Leaves Embossing Folder Card

 
Hi everyone😀

Well, Melbourne is back in their 4th Lockdown due to COVID-19 so I am distracting myself by doing craft.   I have plans to tidy up my Craft Room as well.  It never ceases to surprise me how much mess you can make from making just one card!

So today, I am sharing a simple card that I hope will inspire you to get out your embossing folders and have a play.  Note that this is NOT my idea and I am pretty sure I first saw it on Splitcoaststampers. 


The embossing folder is a retired one by Sizzix - Branches with Leaves - but there are plenty of other similar embossing folders available.  I coloured the embossing folder with various blue-green shades of Tombow Pens plus a beige shade.  I used my Ranger Mini Mister to spray the embossing folder with water, popped in my cream cardstock and ran it through my Big Shot then dried it off with my heat-gun.  I rounded the top and bottom right-hand corners using my Corner Chomper then tied on the twine.  I layered this onto kraft cardstock, popped the panel up with dimensionals then rounded those corners as well.

The sentiment is from a set by Stamp-It Australia who I don't believe are still in business (correct me if I am wrong).  I know the company was for sale and someone bought it but don't know anything else.   I stamped the sentiment onto cream cardstock using Colorbox Peacock pigment ink then diecut it using a Spellbinders Oval Nestabilities die.  The panel is popped up on dimensionals.

I punched 3 hearts from light beige cardstock using a Carl CP-1 Heart punch and stacked them together for dimension and my card was finished.

This is my card for the following Challenges:

Through the Craft Room Door - May 25th Challenge - Anything Goes
Splitcoaststampers - Free for All Friday F4A584 - Texture

Thanks for visiting my blog today and for any comments that you care to leave 😃 

Jocelyn


Card Recipe:

Stamps:  Stamp-It Australia siset-014 sentiment set 

Ink:  Colorbox Peacock pigment

Designer Paper:  None

Accessories:  Big Shot, Tombow Pens, Heat-gun, Ranger Mini Mister, Corner Chomper, twine (stash), dimensionals, Sizzix Branches with Leaves embossing folder #661352 (retired), Cardstock: cream, light beige, kraft card base

Dies:  Spellbinders Oval Nestabilities

Punches:  Carl CP-1 Heart


Thursday, September 17, 2020

Docrafts Forever Friends Kraft Notes Thank You Card


Hi everyone😊

Today I am sharing a 'Thank you' card that I made for a friend:


All the designer papers and the main image are by Docrafts from their Forever Friends Kraft Notes Collection which came out years ago.  I have always loved this collection and made alot of cards using it.  

All the layers were trimmed to 1/16" using my Perfect Layers Tools.

The side panel was punched using a Martha Stewart Pinking Scallop edge punch.

The sentiment is by Stampin' Up! and came from their Looking Up Card Kit (still in their current catalogue).  Just as an aside:  this is a fantastic Card Kit and everything is included - even the ink pad - and the cards are perfect for guys.  You can find it HERE.   I stamped the sentiment using Versafine Vintage Sepia ink which I thought matched the rest of the card's muted tones.  I diecut the sentiment using my Big Shot and a Spellbinders Oval Nestabilities die and layered it onto the pink designer paper which was diecut using a Spellbinders Scalloped Oval Nestabilities die.  I added a Kaisercraft Epoxy Sticker from their Candy collection.  I just looked online and it appears that they have been discontinued.....sigh.....wish I had bought more of them......

You can't tell from the photo but I added sparkle all over the heart using a Wink of Stella Clear Glitter brush. 

Lastly, I tied on some ribbon from my stash and popped the card front onto a white card base using Tombow Mono Multi glue.  Finished size is 5-1/2" x 5-1/2" or approximately 14cm x 14cm.

I think you could use this image for many occasions - love, anniversary, Valentines, friendship.

Thanks for visiting my blog today!

Jocelyn


Card Recipe:

Stamps:  Sentiment from Stampin' Up! Looking Up card kit

Ink:  Versafine Vintage Sepia

Designer Paper:  Docrafts Forever Friends Kraft Notes (retired)

Accessories:  Image from Docrafts Forever Friends Kraft Notes (retired), Big Shot, Perfect Layers Tools, Wink of Stella Clear Glitter brush, dimensionals, Tombow Mono Multi glue, Kaisercraft Candy epoxy stickers (discontinued), ribbon (stash), white cardstock & white cardstock base

Dies:  Spellbinder Oval and Scalloped Oval Nestabilities

Punches:  Martha Stewart Pinking Scallop edge


Friday, October 2, 2015

Clean and Simple Wedding Card


Hi blogging friendsSmiley from Millan.Net

It feels good to be able to play in my Craft Room a bit more - and today I am sharing a Wedding Card:


This is also my entry for the following challenges:

Papertake Weekly Challenge - Take your pick - the last challenge of every month has several themes and you simply take your pick from them.  There’s a sketch, a colour theme, a product theme and a technique theme to choose from. I chose the Technique Theme which is:   Embossing either heat, dry or simply embossing a die or using an embossing folder.  I used heat embossing and dry embossing on my card.

Simon Says Stamp Wednesday Challenge - Anything Goes - they are showcasing Clearly Besotted Products this week but you don’t have to use them to join in, however, if you have some, they would love to see them used.  I didn't use those products.

Splitcoaststampers - Clean and Simple CAS310 Challenge - Love is in the Air - which is from February but there are no time limits to play SCS Challenges.

Anyway, on to my card........

I love to use embossing folders to make wedding cards and used one of my all-time favourite folders by Craft Concepts - Budding Vine.  So pretty, don't you think?!  Once I worked out whereabouts on the card I was going to put my cord, I made two pencil lines about 1/2" apart so that I knew exactly where to do the dry embossing, then used my Martha Stewart Score Board to score a line right underneath and above the dry embossing.  I really love how the score line just "finishes" the dry embossing edge.

I used a Corner Chomper on the 1/2" setting to round the bottom corners then tied on the silver cord which came from my local supermarket last Christmas.  I added Fray Stop to the cut ends to stop them from fraying and added a dot of Super Glue to the knot to stop the cord from coming undone.  I attached the dry embossed panel to a top-opening white cardstock base by using lots of doublesided tape and a bit of Tombow Mono Multi glue (less surface area from the dry embossing = need more adhesive!) then trimmed the bottom and side edges to 1/16" using my Perfect Layers Tools.  I  rounded the bottom corners using the same 1/2" setting on the Corner Chomper. 

The sentiment panel was diecut using a Spellbinders Nestabilities Floral Ovals die (I used the 2nd largest die).  The sentiment is from a Simon Says Stamp set - Sending and Wishing and was stamped using Versamark Watermark ink and heat-set using Ranger Silver Superfine embossing powder.  I attached the sentiment panel using dimensionals.

Lastly, I punched a heart from pink glitter cardstock using a Carl CP-1 Heart punch.  Initially, I had punched a red glitter cardstock heart but decided to go for a softer look by using the pink instead. 

Finished size is 5 inches x 5 inches or 127mm x 127mm.

Thanks for visiting my blog today!

Jocelyn


Card Recipe:

Stamps:  Simon Says Stamp Sending and Wishing SSS101475 clear set

Ink:  Versamark Watermark

Designer Paper:  None

Dies:  Spellbinder Floral Oval Nestabilities S4-356

Accessories:  Big Shot, Martha Stewart Score Board, Craft Concepts Budding Vine embossing folder, silver cord - Woolworths Christmas Collection, Fray Stop, We R Memory Keepers 1/2" Corner Chomper, Super glue, Tombow Mono Multi glue, doublesided tape, dimensionals, Ranger Superfine Silver embossing powder SFJ18292, heat-gun, cardstock - white, pale pink glitter

Punches:  Carl CP-1 Heart

Monday, September 22, 2014

My first Centre-Step birthday card for my Mum

Hi blogging friendsFrom Millan.Net

I have felt very, very dry creative-wise in recent weeks and really only made a mess in my Craft Room with nothing to show for it.  One of those phases where you try new techniques but they don't work; nothing appeals to you in your stash and you just get frustrated.   Two of my extended family had birthdays during the past few weeks but I ended up buying cards for them as I just couldn't think of anything to make! 

But, in the last week, I have finally found Mr Mojo and started creating again....phew....I was starting to think I would never make any more cards!  Just as well as my mother's birthday is coming up this week and I wanted to make her an extra-special card as Mum is one of my biggest fans and always so enthusiastic about my cardmaking.  There was no way I wanted to buy a card for my Mum - it wouldn't feel right - and here is what I came up with - which is also my entry for the Incy Wincy Designs Challenge of 'Anything Goes' as well as two Splitcoaststampers Challenges (details and links are near the end of my blog post):


The image is from Craft Creations and is called Birds in Blossom.  I picked it up at the Paperific Show which was held during the last week in August at Ascot Vale (a suburb of Melbourne).

By the way, the show was fantastic and I just loved surrounding myself with other enthusiastic cardmakers and a huge array of cardmaking supplies......crafty heaven!!   I met people who had flown over from Western Australia (which, for my overseas readers, is over 3,400 kilometres one way - more than 2000 miles!) and even some from New Zealand!  It was great to meet my Stampin' Up Demonstrator for the first time and do a Christmas card workshop together.  I came home with lots of goodies as I save up for nearly a year in anticipation of the show - but I do take cash rather than a credit card so I can keep a lid on my spending.  Just to have some solo me-time where I am not thinking about anything medical in relation to my loved one is very soothing for my soul and I really enjoyed being able to have a whole day out.  My husband was looking after our loved one and made dinner as well so when I arrived home about 5:30pm, all I had to do was sit down and have a cuppa and look through all my goodies:  what a wonderful man he is!   Anyway, back to my card.............

Once I had layered up the image using dimensionals (which was very time-consuming!), I was a little stuck with what to do with it as it is quite large.  Then a light-bulb went off when I espied a Centre-Step Card die by Cheery Lynn in my stash which I bought from Fat Cat's Card Corner at the Paperific Show last year.  I remember at the time, Kaaren (who owns the store) said that the die was no longer being made by Cheery Lynn as it was too expensive to manufacture and that once the die was sold out, that was it - there would be no more manufactured.  I didn't pay alot for the die as it was being sold at cost.

Of course, you can make your own Centre-Step cards - you don't need a die - but boy, does the die make it easier because not only does this particular one cut the card base and score where the folds are, but you have separate dies that diecut the panels so your layers are perfectly matched.  And I love that this type of card folds up flat.   I am absolutely hopeless at measuring things correctly which is why most of my cards are just simple cards folded in the centre, so without a die, I personally wouldn't even try making this sort of card base!   You need an extended platform for your Big Shot to use the die as the die is really long.  You are extremely unlikely to find this particular Cheery Lynn die online but Crafts Too are releasing a Step Card die in October.  You can also buy Centre Step Card blanks on EBay Australia as well as a few other places depending on where you live in the world.

I bought an 8" x 8" paper pad of Graphic 45 Botanical Tea at the Paperific Show which I absolutely adore - and they matched the image so perfectly that I did a happy danceFrom Millan.Net  Sometimes I can struggle to find matching papers to a Topper or Decoupage (paper tole) image but in this case, it was a match made in heaven.

The main image was taller than the actual diecut card centre panel but it didn't matter and the card still folds up flat (other than the layering sticking up a little of course).  All the layers are from the Graphic 45 pad and I stuck them down onto a white cardstock diecut Step-Card base.  Here is a slightly different angle so you can see the card shape a little better:


The sentiment was popped up on dimensionals and I added Stampin' Up! Dazzling Diamonds glitter glue to all the flower centres.  Lastly, I added a pink heart Sparklet to the bottom right-hand side.  I didn't really want to do anything more fancy as I just wanted to let the image shine.  I did actually go around the blue panels with Polar Blue ink to hide any white cardstock that was showing and as the blue paper layer around the sentiment was handcut, the inking hid any imperfections in my cutting.  Here is a close-up so you can see more details of the dimension:


I decorated the card inside using the same designer papers and diecut some white cardstock using a Spellbinder Floral Oval Nestabilities die (I used the largest die in the set) then added some Soft Pink rhinestones to the top, bottom, right and left sides in the centre of the flower. The floral designer paper was diecut using one of the Step-Card dies in the set.


Challenges:

I am entering my card in the following challenges -

Incy Wincy Designs - Anything Goes 

Splitcoaststampers - Free for All Friday F4A239 - Birds - put a bird anywhere on your project

Splitcoaststampers - Technique Lover's Challenge - TLC190 - Stair Step Fold Card (which is from ages ago but there is no time limit on SCS Challenges)

Thanks for visiting my blog today and for any comments that you care to leave - they are so appreciated!

Jocelyn


Card Recipe:

Stamps:  None

Ink:  Versacolor Polar Blue pigment

Designer Paper:  Graphic 45 Botanical Tea 8" x 8"

Accessories:  Big Shot, Big Shot Extended Platform and Plates, Cheery Lynn Centre-Step card die (retired), Spellbinder Floral Oval Nestabilities S4-356, dimensionals, Stampin' Up Dazzling Diamonds glitter glue, Craft Creations Birds in Blossom diecut 3D decoupage sheet, Kaisercraft Heart Sparklet RS420, Kaisercraft Soft Pink SB701 rhinestones, white cardstock