Showing posts with label Embossalicious embossing folders. Show all posts

Friday, April 18, 2025

Penny Black Garden Friends Easter Card + Easter Egg Holder

 
Hi everyone 

My Craft Room has been a real hive of activity lately and I am loving being able to have more time to create.

I made this card for my daughter for Easter:


This is also my card for the following Challenges (click on the underlined link to take you to the Challenge):
  • Penny Black Saturday Challenge - PBSC April - Anything Goes with Optional Easter
  • Shopping our Stash - SOS545 - Hippity Hop - Make an Easter Card or a Card featuring a Rabbit or Chick 
  • Critter Crazy Challenges #97 - Anything Goes Featured Critter Theme
The main image is by Penny Black - Garden Friends - and was stamped with Versafine Onyx Black Ink onto Ranger Watercolour Cardstock.  I coloured the image with Watercolour Pencils then went over the black lines with a Black Copic Multi-liner to darken the lines up.

I diecut the panel using my Big Shot and Nesting Card Templates - and then things went awry!  You see the square designer paper on the base?  I measured my designer paper wrongly and cut it into a square instead of a rectangle as I was going to put the chicks onto a rectangular card.  Oh well, I thought - I will just cut another piece of that designer paper - but I had none of that particular one left in the 6" x 6" pad - and I really, REALLY wanted to use that one.  So, pivot I thought and don't waste the square of designer paper - use it instead and I did - but then couldn't figure out a good layout for my card.  I know in the end, it is a simple layout but it just frustrated me no end and I couldn't figure out whether I wanted the blue cardstock or pink - or should I go yellow?  I just kept changing my mind and couldn't settle on what I wanted so I left it on my desk until the next day.

The next day, I finally decided to go with the Blue Cardstock and then struggled with the layout again as I tried this and that and nothing seemed to look right.  It was just one of those frustrating cards that just seems to be hard work!  Eventually I settled on what other designer papers to add to my card so I had my main panel finished.  Here is a close-up of those cute little chicks:


And then couldn't make up my mind whether I should put the finished panel on a plain white card base or not.  In the end, I thought adding some dry embossing to the white card base looked better than plain so used my Crafter's Companion EF6 Embossalicious Embossing Folder and I like how it complemented the original square of the designer paper as well as the tiny flowers on the stamped image.  Of course, my frustrations continued as the embossing folder slipped the first time when I put it through my Big Shot so it embossed all crooked and I had to get another card base and redo it.  

I rounded the corners of the Kaisercraft White Card Base using my We R Memory Keepers 1/2" Corner Chomper.  All the blue cardstock layers were trimmed to 1/8" using my Perfect Layers Guides.

And then the ribbon - ohhhh, that ribbon gave me so much grief.  I struggled with what colour and type - and then eventually settled on the organza ribbon because it was so hard to match the blue colour with a solid blue coloured ribbon from my stash - I could not find the right shade.  This particular organza ribbon seemed to have a mind of its own and I gave up tying a bow because it wouldn't sit flat and looked totally weird.  Well, just knot it instead I told myself but do you think it would sit flat as well?  Nope!  It did NOT want to play nicely!  And ultimately, I used a tiny glue dot to hold the RHS of the ribbon down because it insisted on sticking up at 90 degrees.  

The sentiment is the same sentiment set I have used on my last couple of cards and I decided to cut out the sentiment and pop it up on dimensionals.  Even trying to figure out where to put the sentiment was driving me bonkers!  I added some Tiny Pink Cardstock Hearts around the main image panel by using my EK Success Arrows Border Punch (the leftover punchies look like tiny hearts).  I glued them on using a Uniquely Creative Fine Glue Pen.

Of course, I had to add glitter to the hearts and flowers using Kindyglitz Crystalina Glitter Glue.  I needed some sparkle to bring a bit of life to the card.

Ultimately, this card took 1000 times longer to make than it should have, however, I am happy with the end result.  And I like the layout and will definitely store this layout in my Card Sketches Folder as it is great for smaller, more vertical images.  

Sticking to my New Year's Resolution to try new crafty things, I decided to make an Easter Egg Holder which was certainly a challenge - but that's why I am trying new things that take me out of my comfort-zone.  Here is what I came up with:


Last year, I was doing an order with Scrapbook.Com (in the USA in case you don't know) and they always have free things you can add to your cart - and they had these really cute Nesting Bunnies which they call "Nested Peeps".  So when I received them, I was actually surprised how big the largest die was:

They retail for US$35 (although they are on special at the moment) so it really was an amazing free gift.  Scrapbook.com are the only US Company that I buy from because their postage to Australia is very reasonable - but I don't buy from them all that often because when you factor in the exchange rate between Australia and the USA, it does start to add up. 

I had this idea in my head when I was trying to get to sleep the other night that I might be able to diecut the bunny twice and have some cardstock at the bottom between the back and front to allow for the size of the egg.  Here is a side view so you know what I mean:


I then came up with the idea to diecut the bunny's tummy with one of my Spellbinders Nested Eggs Dies to accommodate the Easter Egg - holding it in place.  It took quite a bit of fiddling around and I did a prototype first to see if it would work - and then I realised that I would have to diecut the back of the bunny as well or the Easter Egg wouldn't stay in place:
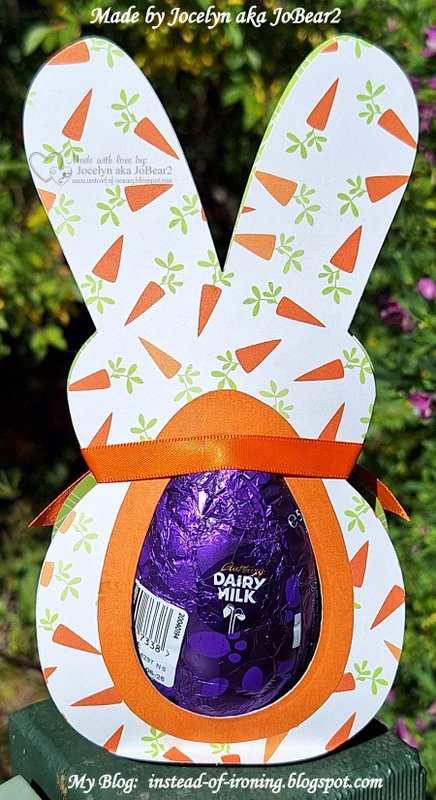

I used some older papers by Echo Park - Happy Easter 12" x 12" - first released in 2015.  I diecut the Orange Cardstock using the Spellbinders Nested Eggs Nestabilities and then diecut the centre where the Easter Egg fitted it.

I used the same paper range to diecut the bunny to put on the inside just to pretty it up instead of just having the white cardstock.  You can just see the paper from the side view photo but it is actually green in real life.

I tied some Orange Ribbon around the bunny's neck to hold it all together and added Fray Stop to the cut ends to stop them from fraying.

I was really happy with how it turned out and it was great to see it all come together as I envisioned it after struggling with the card so much!

Thanks for stopping by!

Jocelyn


Card Recipe:

Stamps:  Penny Black Garden Friends 30-021 Clear Set, Impression Obsession Sentiments 1 WP16 (retired)

Ink:  Versafine Onyx Black

Designer Paper:  American Crafts Hello Spring #320548 (from 2016 - retired)

Accessories:  Big Shot, Dimensionals, Watercolour Pencils, #4 Round Paintbrush, Kindyglitz Crystalina Glitter Glue, WRMK Perfect Layers Guides, Ranger Watercolour Cardstock, Black Copic Multi-liner, American Crafts Organza Ribbon 3/8" or 9mm wide, Fray Stop, Crafter's Companion Die'Sire Embossalicious EF6 Embossing Folder, Tombow Mono Multi Glue, Uniquely Creative Fine Glue Pen, Mini Glue Dot, Cardstock - Scrap of Pink + Blue, Kaisercraft White Card Base

Dies:  Lifestyle Crafts Quickutz Nesting Card Templates DC0431

Punches:  WRMK 1/2" Corner Chomper, EK Success Arrows Border


Easter Egg Holder Recipe:

Designer Paper:  Echo Park Happy Easter 12" x 12" (from 2015 - retired)

Accessories:  Big Shot, Orange Ribbon 3/8" or 9mm wide (stash), Fray Stop, Cardstock - White + Orange

Dies:  Scrapbook.com Nesting Peeps sbc-shapes-19, Spellbinder Nested Eggs Nestabilities S4-264


Friday, July 21, 2023

Docraft Forever Friends Kraft Notes Baby Girl Card

 
Hi everyone 😊

Today I am sharing a Baby Card that I made for my niece and partner who just had their first baby - a beautiful little girl.  So I am a Great-Aunt again for the 11th time!  Wow, I feel so OLD!  


This is also my card for the following Challenges:  

Ellibelle's Corner - Craft Wednesday Challenge for July - Anything Goes

Splitcoaststampers - Free for All Friday F4A693 - Oh Baby Baby! - Share your Baby Creations 

Shopping our Stash - SOS501 - No Stamping Allowed - where they don't want you to use your stamps but instead use patterned paper, stickers, die cuts, stencils, pictures etc.  

Please click on the underlined link to go to their respective Challenge. 

The main image is diecut decoupage by Docrafts from their Forever Friends Kraft Notes collection.  There aren't many layers so it was super-easy to put together with 0.5mm dimensionals.  You can see the dimension in this photo:


The bottom daisy designer paper is also from the Docrafts Kraft Notes Design Stax 6" x 6" paper.  The top pink designer paper is from the 12" x 12" pad and was dry-embossed using my Big Shot and Crafter's Companion Die'sire Embossalicious EF-6 embossing folder which added some lovely texture to my card.  I have had this folder for many years and is long-retired.

I diecut some small hearts from pink glitter cardstock using an Impression Obsession die - Mini Hearts Row - and glued them on using Tombow Mono Aqua glue around the main image panel.  The 3 larger hearts at the bottom RHS were punched from pink glitter cardstock using a Carl CP-8 Heart Duo punch.  I added a strip of pink glitter cardstock across the centre which tied everything together.

Everything is layered onto an Anko white card base using my favourite glue - Tombow Mono Multi.  

Finished size is 5-1/4" x 5-1/4" or 134mm x 134mm.

Thanks for visiting my blog today.

Jocelyn


Card Recipe:

Stamps and Ink:  None

Designer Paper:  Docrafts Forever Friends Kraft Notes 6" x 6" Design Stax + 12" x 12" pad (retired)

Accessories:  Docrafts Forever Friends Kraft Notes Diecut Decoupage (retired), Big Shot, Crafter's Companion Die'sire Embossalicious EF-6 embossing folder (retired), 0.5mm dimensionals, Tombow Mono Multi + Aqua glue, pink glitter cardstock, white card base - Anko - KMart Australia

Dies:  Impression Obsession Mini Hearts Row DIE134-D

Punches:  Carl CP-8 Heart Duo


Wednesday, June 4, 2014

More Embossing folder stamping......

Hi blogging friends From Millan.Net

Hot on the heels of my last post where I shared my first card using the Embossing Folder Stamping technique, here is another card that I made with this same technique but with a few extra things thrown in:


I used a Die-sire Floral Embossalicious embossing folder for the stamping and scribbled on various colours of Tombow pens - numbers 723, 090, 993, 991, 673.  The good thing about Tombow pens is that it doesn't matter if you get another colour on the nib because you just scribble it out on a sheet of scrap paper.  I sprayed on some water using my Ranger Mini Mister then lay my watercolour paper on top.  I recently purchased some Tim Holtz Distress Watercolour cardstock and I love it because it is really white and has a smooth and a rough side.  In this instance, I used the smooth side.

I left my watercolour paper on top for about a minute and pressed down with my fingers to make sure I had good coverage on the paper, then lifted it off.  I dried off the paper very thoroughly with my heat-gun and put it aside for a little while.  In the meantime, I scribbled the same colour Tombow Pens onto my Craft Mat, sprayed on some water and used another sheet of watercolour cardstock to smooch the colours around so that I had matching cardstock for diecutting the butterflies and for adding the top and bottom borders.

I decided to run the stamped background through my Big Shot using the same embossing folder to add some texture but had to be extremely careful to match up the stamping with the embossing folder and added plenty of removable tape to secure it in place so the cardstock didn't move.  In fact, my first attempt was a fail because I didn't quite line things up so had to start all over again.......unhappy sigh...... but we learn from our mistakes, don't we?!

What I discovered is that the watercolour cardstock tends to stretch a little in the Big shot because the embossing is pressing into what you have stamped so when your folder is very detailed like the one I used, you do end up with one end matching well and the other end goes a bit 'out' as the cardstock stretches.  Anyway, I do love how pretty and lacy it turned out with the added embossing/texture.

The butterflies are dies by Memory Box - Moonlight Butterfly (which is the butterfly base) and the matching Kaleidoscope die (which is the detailed butterfly top).  The body/antennae is a separate die from the Kaleidoscope set.  The Moonlight Butterfly die comes with a body/antennae die too but it is slightly different to the Kaleidoscope one.

I glued down just the centre of the butterflies using Tombow Mono Multi glue so I could bend the wings up a little.  The bottom border was punched with a Martha Stewart Lace Doily edge punch which was difficult because the cardstock was a bit too thick and it jammed!  Fortunately, after a few moments of choice words, I was able to finally get it to punch right through but I won't use the watercolour cardstock in it again - I have learned my lesson!  I only just replaced this punch a few weeks ago so hopefully I haven't shortened its life!

I added some Pink Kindyglitz glitter glue to the butterflies and used Glossy Accents to add some pink 8mm sequins and some clear 5mm sequins.  The clear ones are fantastic because they pick up the colours around them so they look like pink ones!  Here is a close-up:


Lastly, I tied on the pink ribbon and added Fray Stop to the cut ends.  I wondered if I should add a sentiment but really didn't want to cover up the pretty background so left it off.

My niece and her partner recently became engaged so this card will be going to the happy couple but I think you could use the card for alot of different occasions and not just for an engagement.

Challenges:

I am linking my card up to the following challenges -

Papertake Weekly Challenge - Anything Goes - with the optional extra of adding something that reminds you of summer or has a summery theme (I didn't do that bit as it is winter here and can't get my head around summery things 'cos my little feet are like ice-blocks)

Crafty Catz Challenge #233 - Anything Goes

Splitcoaststampers - Technique Lovers Challenge TLC482 - To Emboss or to Stamp (specifically for Embossing Folder stamping), and

Splitcoaststampers - Free for All Friday F4A223 - Use that Stash - where we have to use our Crafty Stash.  For me, it is the butterfly dies.   I have a lovely stash (which is continually growing) of butterfly dies - all brands - I love them 'cos they're just so pretty (especially the Memory Box ones!) but keep forgetting to use them on projects - and, because I don't embellish my cards alot, they don't seem to "fit" anywhere.  This time, I made a huge effort to use them and I am so glad I did!

Thanks for visiting my blog today!

Jocelyn


Card Recipe:

Stamps, Ink, Designer Paper:  None

Accessories:  Tim Holtz Distress watercolor cardstock, Big Shot, Die'sire Embossalicious EF-6 Floral embossing folder, Tombow pens - 723, 090, 993, 991, 673, Craft Sheet, Ranger Mini Mister, sequins - 8mm pink and 5mm clear, Kindyglitz pink glitter glue, Glossy Accents, Memory Box dies Moonlight Butterfly #98260 and Kaleidoscope Butterfly and body/antennae #98261, pink ribbon, Fray Stop, Tombow Mono Multi glue, heat-gun

Punches:  Martha Stewart Lace Doily edge punch

Friday, December 20, 2013

Penny Black After You Christmas card

Hi blogging friends From Millan.Net

And a special welcome to my newest follower on BlogLovin'!  Thank you for taking an interest in my craft.  

Today I am sharing another Penny Black Christmas card.  Yes, I do freely admit that I am a little obsessed with the Margaret Sherry Penny Black animals - I still love them as much today as when I first saw them about 10 years ago.  And I don't think that they go out of style - they are timeless in my humble opinion.  I picked up this particular stamp - After you - at the last Craft Show that I went to in October.  
Now that my wonderful friend C (hi C - From Millan.Net ) has the card in her hot little hands, I can share it here on my blog:
 

I stamped the image with Ranger Archival Jet Black ink onto watercolour paper and coloured it with a variety of mediums:  Tombow pens plus several brands of watercolour pencils.  I chalked around the image with blue chalk for the sky and added Cotton White Fun Flock mixed with fine glitter for the snow.  I added Kindyglitz Crystalina glitter glue to the envelopes that the hedgehogs are holding.

The designer paper is by Kaisercraft - Santa's List which was released a few months back.  This is the first year that I have barely bought any Christmas papers as I have been "shopping my stash of papers" this year which was my 2013 Resolution.  Mind you, I do have plenty of Christmas papers in my stash already and I am not likely to run out any day soon so it's not like I need any LOL! 

I used my Perfect Layers Tools to trim the borders:  1/8" for the base and 1/16" for the layers.

The sentiment panel was diecut using my Big Shot and one of my Spellbinder Tags Trio dies.  I inked around the panel with Tea Leaves chalk ink.

The snowflake was diecut from white glitter cardstock and I only glued the centre down and bent up the points a little to give it some dimension.

The red and white twine I originally bought (several years ago now) from Sharon Johnson's online store (in the USA) and it is still available.  It is called Holiday Twisted Rope and comes in 2 colourways:  red/green and red/white - and you can find it HERE.  I have never seen it anywhere else - but if you do find it at a store in Australia, could you let me know?  I will say that although I love this rope and it is beautiful and soft, it does unravel easily and fray really badly and you must knot it at the end before you trim it as I have done on my card or you will WISH that you had (don't ask me how I know!).  It is also quite bulky on a layered card so it makes your card quite thick.

****************************

On a personal note, school finishes for the year for my 10 year old daughter today which is fantastic and now we have about 5 weeks break.  YAY!  We aren't going away on holidays so I will still be blogging inbetween a few hospital appointments for my loved one.  Birthdays in my extended family start from the 4th of January so I'll have to put away my Christmas hat very soon and put on my Birthday hat instead or the cards won't arrive until after their birthday!

I do still have some Christmas cards that I am just putting the finishing touches on to share on my blog - and some I can't share till they are opened on Christmas Day because the recipients read my blog - so I will share them post-Christmas (hope that's OK?). 

Thanks for stopping by!

Jocelyn


Card Recipe:

Stamps:  Penny Black After You 4093K wood-mount, Sentiment Penny Black from Christmas Friends 30-084 clear set

Ink:  Ranger Archival Jet Black ink, Versamagic Tea Leaves chalk

Designer paper:  Kaisercraft Santa's List 6-1/2" x 6-1/2" pad

Accessories:  Big Shot, Crafter's Companion Embossalicious Holly embossing folder, Spellbinders Tags Trio die set, Snowflake - Impression Obsession DIE100-F, 140lb watercolour paper, Tombow Pens, Faber-Castell + Albrecht Durer + Lyra watercolour pencils, paintbrush, Kindyglitz Crystalina glitter glue, Stampendous Cotton White Fun Flock mixed with fine Crystalina glitter, Tombow Mono Multi glue, Kaisercraft blue chalk, Kaisercraft rhinestones SB711 red + SB709 mint green, dimensionals, Perfect Layers Tools, red/white holiday twisted rope, cardstock - red, green, white, white glitter

Saturday, May 4, 2013

Wild Rose Studio - Teddy Topper birthday card

Hi blogging friends From Millan.Net

It's a chilly Saturday night here where I live in Australia and I am sitting in front of the slow-combustion fire whilst I type this and watching my AFL footy team Geelong Cats play Richmond on TV - and Geelong is winning so I am very happy!  We had a roast for dinner - yum - and now I am having a cup of tea.  Perhaps it doesn't sound very interesting - even boring - but compared to last year when I was spending much of my time at hospital with my loved one, it is bliss!   I didn't even notice the seasons last year because when you live at hospital, the seasons lose any meaning as it is always warm at the hospital and you are stuck inside.   Dealing with a life-threatening illness changes you and your outlook on life:  simple things bring so much joy to me and these days, I tend to live in the moment and don't worry about tomorrow.  It's been unseasonably warm this autumn and I am really hanging out for cold days and (hopefully) plenty of rain as I have had to water the garden alot recently because we haven't had the usual autumn rains.  Anyway, I shall stop chatting now and get on with my card........

Wild Rose Studio recently released some gorgeous stamps along with some pre-coloured toppers - and of course, being a lover of anything teddy bear, somehow a set of the Teddy Toppers found its way into my shopping basket....happy sigh..... 


The topper was square but I wanted it a bit more fancy so diecut it using my Lifestyle/Quickutz Nesting Frames dies and my Big Shot.

The side panel was embossed using my Crafter's Companion Embossalicious Die'sire 6" x 6" Floral Square embossing folder and my Big Shot.

The designer paper on the card base is by Prima - Meadow Lark - so pretty.  The side panel is from the other side of the designer paper.  I have been doing well using my stash of designer papers rather than buying new papers - one of my New Year resolutions for 2013.  Mind you, that may all change when I go to the Picture to Page Scrapbooking and Card Making Show at East Burwood on the weekend of the 18th/19th May, as I may be tempted by lots of pretty papers.......LOL!!    If you have never been to this show, I highly recommend it.  Parking is free and it is very well organised.  

Here is a close-up of the sweet image:


I added some Kindyglitz Crystalina glitter glue to the edges of the flower petals and the teddy's cheeks.  The glitteriness doesn't look as gaudy in real life. 

The pink organza ribbon was attached in 2 separate elements and the bow itself was made with my Bow Easy.  I added Fray Stop to the cut ends to stop them from fraying.  I sewed on a pink flower button to the bow then glued the bow on with fabric glue.  I really love the softness that the organza ribbon adds to the card.

I used my Perfect Layers Tools to edge the layers with a 1/8" border.

Lastly, I added 3 pink self-adhesive Sparklets to the bottom right-hand side:


I couldn't figure out where to add a sentiment and whatever I tried just didn't look right so I (obviously) left it off - and really, the Teddy Topper says it all with the present.  This card is going to my niece who is turning 11.

Challenges:

I am entering my card in the following challenge -

The ABC Challenge - M for Make It Sparkle

Thanks for stopping by.  Have a fab weekend!

Jocelyn


Card Recipe:

Stamps:  None

Ink:  None

Designer paper:  Prima Meadow Lark Windsong 12" x 12"

Accessories:  Pre-coloured Topper - Wild Rose Studio - Teddies, Lifestyle/Quickutz Nesting Frames 10, Big Shot, Perfect Layers Tools, Crafter's Companion Die-sire Embossalicious 6" x 6" EF6 Floral square embossing folder, Kindyglitz Crystalina glitter glue, pink organza ribbon, Fray Stop, pink flower button - Spotlight, pink sewing thread, fabric glue, Kaisercraft RS415 Princess sparklets, cardstock - pink, white

Sunday, March 10, 2013

Penny Black Bundle of Joy - baby girl card


Hi blogging friendsFrom Millan.Net

Did you notice that I made a new Blog Header?  I thought it was time to update my blog a little as I have had the same header for a couple of years - and thought it would be fun to have a few of my favourite cards included.  The first photo is a scene from Bright in north-east Victoria - one of my favourite holiday destinations.  What do you think of my new header?

Here is the baby girl card that I promised I would share after finally finishing it last night:


Apologies for the ribbon shadow.  I tried taking a photo with the sun directly on the card but it made the image all washed out so had to put the card at a slight angle instead.

The adorable little baby hedgie/flower frame is from the Penny Black clear set Bundle of Joy and was stamped with Memento Tuxedo Black ink and coloured with Prismacolor + Derwent Coloursoft pencils and Odourless Minerals Spirits.  I lightly chalked around the image with blue chalk.  I went to town with the glitter and added glitter to all the flowers as well as the frame - which you can a bit better on the photo below.  I corner punched this main panel and popped it onto pink cardstock that was diecut using one of my new Spellbinder Decorative Labels One dies and my Big Shot.  Oh my gosh - I LOVE these dies - they are so pretty and feminine.  I added a little pink gemstone in each corner then popped the panel up on dimensionals.

The embossed white panel was embossed using a Crafter's Companion Die'sire Embossalicious EF6 Floral square embossing folder then corner punched.

The pink base was made using a Martha Stewart Vintage Floral punch-around-the-page corner/edge punch.  I also added a pink gemstone to each corner.

I managed to take another photo when the sun went behind a cloud for a few minutes - it does make the pink look a bit different though and is probably closer to what it is in real life - but it makes the card look rather dull, lacking in texture and not so pretty.  You can see the gemstones and glitter a bit better in this photo.  Amazing how much different a photo can appear just with changing light conditions from one minute to the next!


Lastly, I made a pink bow with my Bow Easy and sewed on a pink heart button, added Fray Stop to the ribbon ends and glued the bow on with some Fabric Glue.

I did a quick little inside mirroring the pink cardstock Decorative Label panel on the card front.  I diecut the white sentiment panel using my Big Shot and Labels One Nestabilities die.  The sentiment is from the Nursery Necessities set by Stampin' Up and I added a tiny little pink heart at each end of the sentiment which I punched using my Arrows Border punch (they are the leftover punchies that look like tiny hearts to me).  I added some glitter to the hearts as well.


This card will be going to my neighbour who had a baby girl a couple of days ago.

Challenges:

I am entering my card in the following challenges -

Totally Papercrafts Challenge #157 - Punch it - must use dies and/or punches - I used both.

Splitcoaststampers - Free for All F4A156 - Go to your happy place - where you are to use the colours that make you happy for your cards eg: bright, muted, pastel.  Mine is pastel.

Thanks for stopping by!  Hope to see you again soon.  If you have any questions, please drop me an email - scroll down on the LH sidebar and click on the link. 

Jocelyn


Card Recipe:

Stamps:  Penny Black Bundle of Joy 30-043 clear stamp set, Stampin' Up Nursery Necessities

Ink:  Memento Tuxedo Black

Designer paper:  None

Accessories:  Big Shot, Spellbinder Decorative Labels One dies S4-379 + Labels One Nestabilities dies, Prismacolor + Derwent Coloursoft pencils, Odourless Mineral Spirits, paper stumps, Kindyglitz Crystalina glitter glue, Crafter's Companion Die'sire Embossalicious EF6 Floral 6" x 6" embossing folder, dimensionals, heart button, pink ribbon, Fray Stop, pink sewing thread, fabric glue, Bow Easy, Kaisercraft blue chalk, Kaisercraft pink gemstones, cardstock - Bazzill pink, KW Doggett Knight white

Punches:  Stampin' Up corner, Martha Stewart punch-around-the page Vintage Floral, EK Success Arrows border

Thursday, January 10, 2013

Lili of the Valley Topper birthday card


Hi blogging friends From Millan.Net

Edited to add:  This  card was featured by Lydia on the Splitcoaststampers Facebook page - WOW!  That sure made my day!  Thanks Lydia!!

My husband's family have alot of birthdays at the beginning of the year so I thought I would use one of my Lili of the Valley (UK) pre-coloured toppers which I bought in December when they had free postage (along with some stamps of course because I find them quite irresistible!) as an early Christmas present to myself. 

Am I cheating by using a pre-coloured image?  Even though using a topper saves you colouring an image, you do still need to plan out the rest of the card so from where I stand, I feel very comfortable using a topper.  And I put a lot of love in my cards and try and tailor it to suit the recipient.  I think you could use this topper for so many different occasions - Mother's Day, Friendship, Thank you, Thinking of you etc. - just stamp (or handwrite) a different sentiment on teddy's envelope.


As I wanted the topper to be round, I diecut it using my Cuttlebug and one of my Spellbinder Circle Nestabilities dies.  I couldn't really find the right colour cardstock to match the image so after a bit of a search through my designer papers, I found some old Cosmo Cricket Honey Pie 'Ella' papers and on the flip side of the flowers, was a nice, soft pink that toned beautifully with my card.  I decided to add a white diecut Scalloped Circle to the image as well and popped this panel up on dimensionals. 

I recommend that you use lots of dimensionals (or doublesided tape) if you are attaching something to a dry embossed panel as there is less surface area for the panel to stick to and in my experience, is more likely to fall off - which I learnt the hard way after handing one of my relatives a Christmas card one year which he popped on the window ledge, and whilst we were sharing our Christmas meal with family, two of the panels dropped off to my horror!  As I had already posted the same card to about 8 other people, I still wonder how many other panels dropped off!  Did they open the envelope and find a jumble of panels and thought it was some sort of weird Christmas jigsaw puzzle card?!  Oh dear........From Millan.Net

I added 2 pink hearts around the image which were punched from a Martha Stewart Lace Heart edge punch and the designer paper; I used the leftover punched hearts.  Just the right size for what I needed.

As another Christmas present for myself, I bought one of the new Die-sire Embossalicious 6" x 6" square embossing folders by Crafters Companion from Joanna Sheen's website.  I was so thrilled when Crafters Companion released some square folders to suit us cardmakers who love to make square cards and I do hope they release some more, in particular, some Christmas designs.  You know, I never cease to be excited when I emboss a white card with an embossing folder and see it come out all pretty and textured - and it can really 'lift' a card and give it that 'wow' factor.  I used the Floral EF6 folder which I ran through my Big Shot.

The bottom pink border was punched using an EK Success Abstract Flower punch with the same pink designer paper along one edge of the paper which had a bit of a lacey design printed on it - and I think it turned out a bit prettier than just using the plain pink colour.  I did add a Scor-Pal line just above the punching so I had a straight line to butt the border up against the white cardstock.

I went to town with Kindyglitz Crystalina glitter glue around the pink circle, the hearts on the image panel, the tiny hearts printed under the butterflies, the heart on the envelope and the teddy's cheeks. Here is a wee close-up:


The envelope that the teddy is holding was blank, so I rummaged through my stash and found a tiny little stamp from my Popcorn the Bear 'Someone Special' stamp set and stamped it with Versamagic Pink Petunia chalk ink.

Lastly, I tied on some button twine after winding it twice around the card and added some Fray Stop to the twine ends so they wouldn't unravel.

Challenges:

I am entering my card in the following challenges -

The ABC Challenge - E for Embossing - where you can use any sort of embossing such as embossing powders or folders

Incy Wincy Designs Challenge - Something New - show off your crafting goodies you got for Christmas - mine is the topper and the embossing folder.  This challenge blog is an Australian one which I was very pleased to discover as I don't know of many Aussie challenges.

Splitcoaststampers - Ways to Use it WT408 - New Year - make a card with your new toys - mine is as per above.

Thanks for stopping by!

Jocelyn


Card Recipe:

Stamps:  'For you' sentiment from Crafter's Companion 'Popcorn the Bear' Someone Special set

Designer paper:  Cosmo Cricket Honey Pie 'Ella'

Ink:  Versamagic Pink Petunia chalk

Accessories:  Image by Lili of the Valley from Cuddly Teddies diecut sheet, Cuttlebug, Spellbinder Circle + Petite Scalloped Circle Nestabilities, dimensionals, button twine - pink by May Arts, Crafters Companion Die-sire Embossalicious EF6 Floral square 6" x 6" embossing folder, Big Shot, Kindyglitz Crystalina glitter glue, Scor-Pal, white cardstock

Punches:  Martha Stewart Lace Heart edge punch, EK Success Abstract Flower border



