skip to main |
skip to sidebar
Hi blogging friends
Today I am sharing some Clean and Simple Christmas cards using my favourite snowflake die: Kate's Snowflake by Simon Says Stamp and a new embossing folder I picked up at a Craft Show in October.
These cards are also my entry for the following challenges:
Crafty Hazelnut's Christmas Challenge Extra - November - Anything Goes
Crafty Catz Challenge #255 - Christmas is coming
The embossing folder is by Nellie Snellen - Christmas Round and was just the right size for the snowflake die to fit inside - yay!
On Jennifer Maguire's blog, I had seen Jennifer diecut things then heat-emboss them and thought I would give it a try - and it worked really, really well.
For the gold snowflake: I smooched the diecut snowflake very thoroughly with Versamark Watermark ink and poured on Ranger fine detail Gold embossing powder and picked it up very carefully with my closed-point tweezers and heat-set it. As soon as the powder melted I poured on a 2nd coat of embossing powder and heat-set it. You really do need two coats of the embossing powder to get really smooth coverage - one just doesn't look as good:

For the silver snowflake: I used the same ink and did two coats of Ranger fine detail Silver embossing powder:
For the teal snowflake: I inked the diecut with Colorbox Sapphire Silk pigment ink and did two coats of Polysparkle clear embossing powder:

I adhered the snowflakes to my white cardstock using Tombow Mono Multi glue which gave me a little bit of time to line up the points perfectly. I cleaned up any stray bits of glue using my Xyron adhesive eraser.
I have also seen on Jennifer Maguire's blog how Jennifer had made matching embossed edges to her embossed diecuts so I did this same technique for the bottom matching borders. All you have to do is take a scrap of white cardstock and apply the same ink that you use for your diecuts to one edge and heat-set with two coats of embossing powder then trimmed it to size. Simple and quick! I attached mine to the card base using doublesided tape.
I tied on the twine/ribbon and added Fray Stop to the cut ends to stop them from fraying. I glued the tails down with Tombow Mono Multi glue to hold them in place because they kept blowing in the wind when I was trying to photograph them!
Lastly, I added rhinestones to the snowflake centres. The gold gem came on a sheet of different coloured rhinestones from Bellbird Paper Arts which cost about $2.50 (Bellbird Paper Arts are located in Blackburn, Victoria). The silver and teal rhinestones are by Kaisercraft. I couldn't figure out where to put a sentiment so left it off.
Please note it is REALLY hard to photograph silver and gold so the snowflakes look a bit brighter in real life.
Thanks for stopping by!
Jocelyn
Card Recipe:
Teal Snowflake -
Stamps: None
Ink: Colorbox Sapphire Silk pigment
Dies: Simon Says Stamp Kate's Snowflake SSSD111309
Accessories: Big Shot, Nellie Snellen Christmas Round-1 EFE003 embossing folder, Tombow Mono Multi glue, doublesided tape, Polysparkle embossing powder, heat-gun, Fray Stop, blue sparkle ribbon, Kaisercraft Ice Blue rhinestone (SB774) white cardstock
Gold Snowflake -
Stamps: None
Ink: Versamark Watermark
Dies: Simon Says Stamp Kate's Snowflake SSSD111309
Accessories: Big Shot, Nellie Snellen Christmas Round-1 EFE003 embossing folder, Tombow Mono Multi glue, doublesided tape, Fray Stop, gold cord, Gold gem (Bellbird Paper Arts), heat-gun, Ranger fine detail Gold embossing powder, white cardstock
Silver Snowflake -
Stamps: None
Ink: Versamark Watermark
Dies: Simon Says Stamp Kate's Snowflake SSSD111309
Accessories: Big Shot, Nellie Snellen Christmas Round-1 EFE003 embossing folder, Tombow Mono Multi glue, doublesided tape, Fray Stop, silver cord, Kaisercraft Silver rhinestone, heat-gun, Ranger fine detail Silver embossing powder, white cardstock
Hi blogging friends
I am finally getting back into the groove of making cards on a regular basis. Funny how when you have hardly made any cards for a while, it seems difficult to get everything flowing again. I haven't coloured anything much for ages and it was almost like I had forgotten how: I felt so rusty! But with Christmas fast-approaching, I need to get my skates on as I haven't made very many Christmas cards this year - and today I am sharing a card using a super-cute little penguin from Lawn Fawn which is my entry for the following challenges:
Papertake Weekly Challenge - Anything Goes
Christmas Stampin' All Year Long - Challenge 36 - Anything Goes
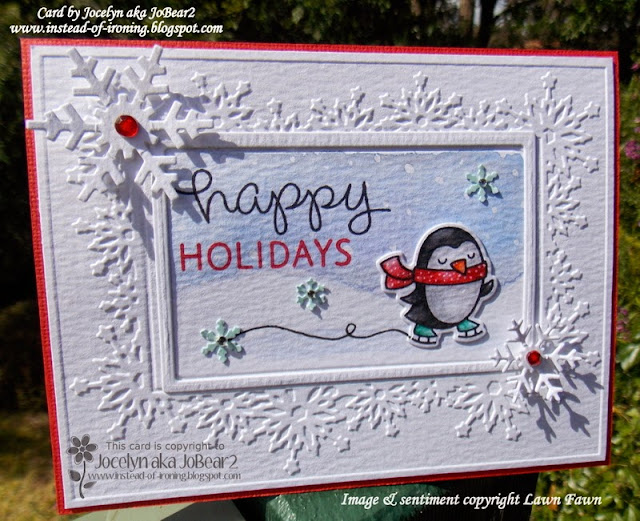
I dry-embossed a piece of Ranger Distress watercolour cardstock using my Big Shot and Ultimate Crafts Snowflake Frame embossing folder (which was a recent purchase at a Craft Show in October and is a 2014 release). I really love how this folder has a blank section in the middle for your image.
To do the background, I drew a wavy line with my pencil as a guide for where I wanted my skyline then used an old paintbrush to drop in dots of Masking Fluid where I wanted the snow to be. Once this was dry, I wet the cardstock with clear water using a flat paintbrush and dropped in some watered-down Winsor and Newton watercolour paints in blues, purple and a little bit of grey and just let them mingle together. I left it to dry and then used my finger to rub off the Masking Fluid which left white dots for snow. I also painted the area to the left of the penguin with watered-down Ultramarine watercolour paint. The sky looks quite a bit paler in the photo than in real life and you can see the detail a bit better in the close-up photo a bit further down.
I was a bit clumsy when I painted the sky and some colour leaked into the dry-embossed frame (next time I will mask off that section!) and it didn't look very good so I tried to sponge the colour out but just made it worse! I was getting very cheesed off and almost tossed the jolly thing out - but then came up with the idea of adding a diecut frame over the embossed frame to hide the mess and was lucky to find one that was almost the right size and figured it was near-enough so ran with it. I glued it on using Tombow Mono Multi glue. Phew! And you know, I actually preferred having a frame over the centre compared to no frame.
I stamped the penguin onto Distress watercolour cardstock using
Ranger Jet Black archival ink and coloured him with Festive Berries and
Peacock Feathers Distress Markers and Black Soot Distress ink. I added
some white dots on the scarf using a white gel pen then diecut the
penguin using the matching Lawn Fawn die.
The sentiment is also from the Winter Penguin stamp set and was stamped with RangerJet Black ink and Ancient Page Cardinal dye ink.
I drew in the black skating line using a Zig black pen then glued on the 3 x pale teal snowflakes around the image. The snowflakes are the leftover punchies from using a Martha Stewart Snow Flurry edge punch: I love these punchies because the snowflakes are so tiny and perfect for adding as little embellishments. I added silver rhinestones to the centres.
Here is a close-up of the main panel:

The white snowflakes are by My Favorite Things - and I used the smallest and 2nd smallest dies. I popped them up on dimensionals and added red rhinestones.
I layered the main panel onto red cardstock and trimmed the edges to 1/16" using my Perfect Layers Tools.
Lastly, I used a Clear Wink of Stella glitter pen to add some sparkle to the scarf, skates and the pale teal snowflakes and some Glossy Accents to the penguin's beak.
Before I go, I forgot to share on my last post the Halloween card that my daughter gave me:

Pretty cool, don't you think?!
And just a snippet of happy news: my Halloween card (see THIS blogpost) was picked as one of the favourites for the week on Splitcoaststampers - yay me! And my card was also showcased as one of the top 4 picks over at Diecutting Divas (you can see the details HERE - just scroll down till you see my card!) Oh my gosh, I can hardly believe it!!
Thanks for visiting my blog today.
Jocelyn
Card Recipe:
Stamps: Lawn Fawn Winter Penguin set
Ink: Ranger Jet Black Archival, Ancient Page Cardinal dye, Black Soot Distress Ink
Dies: Lawn Fawn Winter Penguin, My Favorite Things Die-namics Snowflakes Trio, Lifestyle Nesting Card Templates (rectangles)
Accessories: Big Shot, Ultimate Crafts Snowflake Frame embossing folder (from 2014 Feliz Navidad Collection), Perfect Layers Tools, dimensionals, Tombow Mono Multi glue, doublesided tape, Distress Markers - Peacock Feathers and Festive Berries, white gel pen, Zig black .03 pen, Winsor and Newton watercolour paints, 1/2" flat paintbrush, #2 round paintbrush, old round paintbrush, Masking Fluid, Papermania silver rhinestones PMA351103, Kaisercraft SB711 red rhinestones, Wink of Stella clear glitter pen, Glossy Accents, cardstock - red, pale teal, Ranger Distress watercolour
Punches: Martha Stewart Snow Flurry edge
Hi blogging friends
Sorry for my long absence: I have been helping out with preparing for a stall to sell loom band creations (which if you don't already know, are super-popular with kids at the moment!) at my daughter's School Fair (which was held last Sunday). My daughter made most of the loom band creations which has taken her about 5 months! We were running the stall to raise money for charity so attending to all the details was very time-consuming (plus I was making a few loom band creations too). Our stall ended up raising $121 - and when you add a few donations from other people and sales to family/friends, the total ended up being $181! Woo hoo! The weather was perfect for the occasion - around 25 deg C (77 deg F) and sunny - which was fantastic but also very lucky because at 2 am the following morning, the storms began and it was very wild with heavy rain and flash-flooding well into the next day. Soooo glad that we didn't have weather like that for the Fair - it would have been a disaster!
The card I am sharing today is a Halloween card which I made for my daughter and now that I have given to her, I can share it here on my blog. This is also my entry for the Die Cuttin Divas Challenge #189 of Happy Halloween where you must have at least one diecut on your creation.

I really enjoyed making this card as it gave me an opportunity to play with Distress Inks to make a sunset on Ranger watercolour paper which I have never done before. I had a great play as I tried different colour combinations and have plenty of leftovers to use for other cards. But first of all, I punched out a circle from a post-it-note to use as a mask so that when it was removed after
blending the inks, I had a moon.
I used a round Ranger Blending Tool which I like alot better than the rectangular one as I find that I get less lines. I used quite a few colours of Distress Inks (which are listed in the Card Recipe below) which you wouldn't probably realise from just looking at my card. I went from light to dark and just kept blending till I was happy. I tried to make it a little darker on the LHS and kept it lighter on the RHS where there would be more light from the moon. I removed the moon mask but decided to add a little watered down Squeezed Lemonade Distress Ink with a paintbrush to the moon to try and make it look more rounded and not quite as white.
The house, tree, pumpkin, tombstones, cat and bats are all from one die called Halloween Hill by Impression Obsession. I diecut 2 layers from the black cardstock and glued them together so there was a bit more depth. I used a small scrap of watercolour paper and coloured it yellow using Lemonade Distress ink then cut it to fit in behind the pumpkin face and the windows on the house. I used a sponge and Hero Arts White dye ink to sponge the edges of the diecut to look like the moon was shining on the various elements then attached the diecut to the inked watercolour paper. I added some Stampin' Up! Dazzling Diamonds glitter glue plus Kindyglitz Gold glitter glue to the pumpkin face and the windows on the house for a bit of sparkle.
The very front panel is a die by Memory Box - Graveyard Landscape and again, I diecut 2 layers and also sponged the edges with white ink.
The ghosts are also by Memory Box - Ghastly Ghosts which has 5 different ghosts in the set.
The sentiment is from Hero Arts and was stamped using Versamark Watermark ink and heat-set using Stampin' Up white embossing powder. I love this embossing powder because it is really white. I attached 2 Doodlebug brads which I have had in my stash forever.
I used some Mounting Tape to attach the scene to some orange glitter cardstock then attached that to black glitter cardstock using Ranger Wonder tape which is very strong and works really well with glitter cardstock.
Lastly, I attached some white cobweb across the sky using tiny dots of Tombow Mono Multi glue to look a bit like mist/fog. This cobweb is from my local supermarket (Woolworths) and comes in a big bag with black spiders and looks like cushion stuffing and costs about $3. It's really awful to work with as it catches on everything which nearly drove me bonkers - but I like how it looks on my card :-)
Happy Halloween for those of you who celebrate the occasion  We had ALOT more kids/parents visiting us tonight and it was great to catch up with neighbours who were all getting into the spirit of it and just having a happy time with nothing really scary or weird. I decorated the outside of our house and I noticed that there were alot more decorated houses around compared to previous years. Seems to be catching on in Australia but not in a creepy way.
Thanks for visiting my blog today! I have ALOT of blog reading to catch up on!
Jocelyn
Card Recipe:
Stamps: Sentiment from Hero Arts Happy Halloween CL353 clear set
Inks: Versamark Watermark, Hero Arts white dye, Ranger Distress - Squeezed Lemonade, Spice Marmalade, Scattered Straw, Rusty Hinge, Dusty Concord, Faded Jeans, Stormy Sky, Black Soot
Designer paper: None
Accessories: Big Shot, Impression Obsession Halloween Hill DIE029P, Memory Box Graveyard Landscape 98375 and Ghastly Ghosts 98701, Ranger round ink blending tool, Doodlebug 1974 Halloween Assortment boutique brads (2008), heat gun, Stampin' Up white embossing powder, Stampin' Up Dazzling details glitter glue, Kindyglitz gold glitter glue, cobweb (supermarket), sponge, 1 inch circle punch + post-it note (for masking moon), Ranger watercolour paper, paintbrush, X-Press It mounting tape, Tombow Mono Multi glue, Ranger doublesided Wonder tape, cardstock - orange glitter, black glitter, white, black
Hi blogging friends
I have felt very, very dry creative-wise in recent weeks and really only made a mess in my Craft Room with nothing to show for it. One of those phases where you try new techniques but they don't work; nothing appeals to you in your stash and you just get frustrated. Two of my extended family had birthdays during the past few weeks but I ended up buying cards for them as I just couldn't think of anything to make!
But, in the last week, I have finally found Mr Mojo and started creating
again....phew....I was starting to think I would never make any more
cards! Just as well as my mother's birthday is coming up this week and I wanted to make her an extra-special card as Mum is one of my biggest fans and always so enthusiastic about my cardmaking. There was no way I wanted to buy a card for my Mum - it wouldn't feel right - and here is what I came up with - which is also my entry for the Incy Wincy Designs Challenge of 'Anything Goes' as well as two Splitcoaststampers Challenges (details and links are near the end of my blog post):

The image is from Craft Creations and is called Birds in Blossom. I picked it up at the Paperific Show which was held during the last week in August at Ascot Vale (a suburb of Melbourne).
By the way, the show was fantastic and I just loved surrounding myself with other enthusiastic cardmakers and a huge array of cardmaking supplies......crafty heaven!! I met people who had flown over from Western Australia (which, for my overseas readers, is over 3,400 kilometres one way - more than 2000 miles!) and even some from New Zealand! It was great to meet my Stampin' Up Demonstrator for the first time and do a Christmas card workshop together. I came home with lots of goodies as I save up for nearly a year in anticipation of the show - but I do take cash rather than a credit card so I can keep a lid on my spending. Just to have some solo me-time where I am not thinking about anything medical in relation to my loved one is very soothing for my soul and I really enjoyed being able to have a whole day out. My husband was looking after our loved one and made dinner as well so when I arrived home about 5:30pm, all I had to do was sit down and have a cuppa and look through all my goodies: what a wonderful man he is! Anyway, back to my card.............
Once I had layered up the image using dimensionals (which was very time-consuming!), I was a little stuck with what to do with it as it is quite large. Then a light-bulb went off when I espied a Centre-Step Card die by Cheery Lynn in my stash which I bought from Fat Cat's Card Corner at the Paperific Show last year. I remember at the time, Kaaren (who owns the store) said that the die was no longer being made by Cheery Lynn as it was too expensive to manufacture and that once the die was sold out, that was it - there would be no more manufactured. I didn't pay alot for the die as it was being sold at cost.
Of course, you can make your own Centre-Step cards - you don't need a die - but boy, does the die make it easier because not only does this particular one cut the card base and score where the folds are, but you have separate dies that diecut the panels so your layers are perfectly matched. And I love that this type of card folds up flat. I am absolutely hopeless at measuring things correctly which is why most of my cards are just simple cards folded in the centre, so without a die, I personally wouldn't even try making this sort of card base! You need an extended platform for your Big Shot to use the die as the die is really long. You are extremely unlikely to find this particular Cheery Lynn die online but Crafts Too are releasing a Step Card die in October. You can also buy Centre Step Card blanks on EBay Australia as well as a few other places depending on where you live in the world.
I bought an 8" x 8" paper pad of Graphic 45 Botanical Tea at the Paperific Show which I absolutely adore - and they matched the image so perfectly that I did a happy dance Sometimes I can struggle to find matching papers to a Topper or Decoupage (paper tole) image but in this case, it was a match made in heaven.
The main image was taller than the actual diecut card centre panel but it didn't matter and the card still folds up flat (other than the layering sticking up a little of course). All the layers are from the Graphic 45 pad and I stuck them down onto a white cardstock diecut Step-Card base. Here is a slightly different angle so you can see the card shape a little better:

The sentiment was popped up on dimensionals and I added Stampin' Up! Dazzling Diamonds glitter glue to all the flower centres. Lastly, I added a pink heart Sparklet to the bottom right-hand side. I didn't really want to do anything more fancy as I just wanted to let the image shine. I did actually go around the blue panels with Polar Blue ink to hide any white cardstock that was showing and as the blue paper layer around the sentiment was handcut, the inking hid any imperfections in my cutting. Here is a close-up so you can see more details of the dimension:
I decorated the card inside using the same designer papers and diecut some white cardstock using a Spellbinder Floral Oval Nestabilities die (I used the largest die in the set) then added some Soft Pink rhinestones to the top, bottom, right and left sides in the centre of the flower. The floral designer paper was diecut using one of the Step-Card dies in the set.

Challenges:
I am entering my card in the following challenges -
Incy Wincy Designs - Anything Goes
Splitcoaststampers - Free for All Friday F4A239 - Birds - put a bird anywhere on your project
Splitcoaststampers - Technique Lover's Challenge - TLC190 - Stair Step Fold Card (which is from ages ago but there is no time limit on SCS Challenges)
Thanks for visiting my blog today and for any comments that you care to leave - they are so appreciated!
Jocelyn
Card Recipe:
Stamps: None
Ink: Versacolor Polar Blue pigment
Designer Paper: Graphic 45 Botanical Tea 8" x 8"
Accessories: Big Shot, Big Shot Extended Platform and Plates, Cheery Lynn Centre-Step card die (retired), Spellbinder Floral Oval Nestabilities S4-356, dimensionals, Stampin' Up Dazzling Diamonds glitter glue, Craft Creations Birds in Blossom diecut 3D decoupage sheet, Kaisercraft Heart Sparklet RS420, Kaisercraft Soft Pink SB701 rhinestones, white cardstock
Hi blogging friends
In Australia, we celebrate Father's Day on the 1st Sunday in September - and today I am sharing the card I made for my husband who is a FANTASTIC Dad to our daughter. This is also my entry for the Simon Says Challenge of 'Anything Goes' and to use Memory Box products if you have them - as well as the The Male Room Challenge of 'Seeing Stars'. More details and links on the challenges at the end of my blog post.
My husband loves the older-styles of planes so when I saw this Decoupage/Paper Tole image of a De Havilland Tiger Moth from Craft Creations, I thought it would be perfect for him. They have come out with some fantastic masculine diecut images in the past year or so and I find them really great for making those oh-so-hard-can't-think-of-what-to-make masculine cards.

The image came already diecut so I just popped out the pieces and trimmed off any daggy bits and put the pieces together with dimensionals. Easy peasy!
I did actually trim down the base image panel quite a lot because it was really large and wouldn't fit on my standard-size card front. This image panel is layered onto blue designer paper from my Fancy Pants Beach Bum 6" x 6" pad and trimmed to 1/16" using my Perfect Layers Tools.
The card base is kraft cardstock layered with the same blue paper as the main image plus some dotty paper from the same pad - and these were trimmed to 1/8" using my Perfect Layers Tools.
To make the stars, I cut two small pieces of Stampin' Up! Dazzling Diamonds glitter cardstock (which is white) and rubbed the cardstock with Versacolor Smoke Blue pigment ink, gave it a quick blast with my heat-gun to dry the ink, then diecut a star using my Big Shot and Memory Box Celestial Bodies die set which includes a couple of different sized stars. Likewise, for the reddish-orange stars, I rubbed a mix of Colorbox Warm Red and Blush Rose fluid chalk ink over the glitter cardstock, heat-set it and then diecut the stars. A GREAT way to match the glitter cardstock to the colours on your card - which was a fantastic tip I recently learned from my Stampin' Up! Demonstrator. The stars were popped up on dimensionals.
Here is a close-up of the main image so you can see a little of the dimension on the plane plus those glittery stars:

The sentiment is from my Docrafts Wellington Bear Ultimate Decoupage pack which was still sitting on my desk from my last couple of Wellington Bear cards and thought it matched perfectly. This was also popped up on dimensionals.
Did you know that The Twinery has brought out solid colours of twine to match their range of white/coloured twine? I couldn't WAIT to get my hands on some because I LOVE twine so I bought some from a USA Seller on Etsy: nope - couldn't wait till it was available in Australia! Ahh, the joys of the world-wide-web!! The twine I used on my card is Midnight Blue and I added Fray Stop to the cut-ends to stop them from fraying.
I think you could use this image for a birthday as well as Father's Day.
Challenges:
I am entering my card in the following challenges -
Simon Says Wednesday Challenge - Anything Goes - with the option of using Memory Box products. I used the Memory Box Celestial Bodies dies.
The Male Room - Seeing Stars
I am off to the Paperific Show on Saturday so I will really love having a whole day to myself looking at pretty things and spending time with like-minded crafters who get excited over ribbon and sequins like I do: I can't WAIT!! Thanks for stopping by!
Jocelyn
Card Recipe:
Stamps: None
Ink: Versacolor Smoke Blue pigment, Colorbox Fluid Chalk Warm Red and Blush Rose
Designer paper: Fancy Pants Beach Bum (2011) 6" x 6" pad
Accessories: Perfect Layers Tools, The Twinery Solid Midnight Blue twine, Fray Stop, Stampin' Up! Dazzling Diamonds glitter cardstock, dimensionals, Big Shot, Memory Box Celestial Bodies dies, heat-gun, Docrafts Wellington Bear Ultimate Diecut Decoupage pack (sentiment), Craft Creations De Havilland Tiger Moth DCD555 diecut Decoupage (paper tole), cardstock - kraft
Hi blogging friends
This is my entry for the Suzy Bee's Blooming' Challenge of Anything Goes - more details and links at the end of my blog-post.
Whilst I still had my Docrafts Wellington Bear Decoupage kit still on my desk after making my husband's birthday card, I thought I would make a birthday card for my girlfriend Y who lives in another State. Some of the images in the pack (although predominantly for men) are suitable for ladies too. And here is what I came up with:

I paired the image with some gorgeous Dovecraft First Edition - New Bloom papers. Ohhh, I adore these papers! Love, love, LOVE the colours! They were a recent purchase which I just couldn't resist as I love purple and teal - my favourite colours!
All the layers are from the pad and were trimmed to 1/8" using my Perfect Layers Tools. The sentiment is also from the Wellington Bear set and was popped up on dimensionals. I attached the organza ribbon in two separate elements and the bow was made with my Bow Easy then glued on using Fabric glue. I added Fray Stop to the cut ends to stop them from fraying.
Once I had done the card front, I attached it to a white cardstock base. I sewed some purple thread though a button then glued it on using Glossy Accents.
Can you see the tiny purple hearts on the top left-hand side? I used some Stampin' Up Dazzling Diamonds glitter cardstock (which is white) and rubbed some Versacolor Lilac pigment ink over it then punched out the hearts using my EK Success Arrows border punch (they are the leftover punchies that look like hearts which, if you are a follower of my blog, you know that I use them ALL the time!). My Stampin' Up Demonstrator said that I can rub ink over the Dazzling Diamonds glitter cardstock to change it to any colour that I want so I gave it a try and it worked brilliantly.
Here is another angle so you can see the dimension on the card:

I added some Stampin' Up Dazzling Details glitter glue to random spots on the daisies around the bear but you can't see that in the photo because the weather was really dull and dreary when I took the photo. I will be very happy when we have some sunny days to make photographing outside a little easier. I can sense that Spring is just around the corner as the Cherry Blossom trees are just starting to flower - yay!
Thanks for visiting my blog today!
Jocelyn
Card Recipe:
Stamps: None
Ink: Versacolor Lilac pigment
Designer paper: Dovecraft First Edition New Bloom 6" x 6" pad
Accessories: Docrafts Wellington Bear Ultimate A4 Diecut Decoupage pack, Dovecraft ribbon 1 cm - 3/8" wide, button from stash and matching sewing thread, Fray Stop, Bow Easy, Glossy Accents, dimensionals, Perfect Layers Tools, Stampin' Up Dazzling Details glitter glue, cardstock - white, Stampin' Up Dazzling Diamonds glitter
Punches: EK Success Arrows border, Stampin' Up corner
Hi blogging friends
Well, the nasty winds have finally abated after causing plenty of damage around our State but we got off lightly compared to Tasmania who received a battering. We had some bitterly cold days where there was snow down to low levels. No snow here but we had plenty of hail. And we had quite a run of 0 degree mornings as well so I have quite a few plants that have been burnt by the frost. We had the slow-combustion fire going almost non-stop which made it very cosy inside and made our cat Ruby very happy. I am just amazed at how much a cat can sleep when you have the fire going: cat's REALLY know how to relax, that's for sure!
Today I am sharing the birthday card I made for my daughter's 11th birthday at the beginning of July. I used a Penny Black stamp called "Well Wishers" and stamped it onto watercolour paper using Ranger Archival Jet Black ink and coloured it with various mediums: Lyra, Inktense and Albrecht Durer watercolour pencils, Tombow pens and Winsor and Newton watercolour paints.

The stamp just had the mouse holding one balloon but I thought it would be fun if the mouse held a bunch of balloons and decided to paper-piece each one. I repeatedly stamped just the balloon onto various designer papers from the Echo Park Hello Summer pad and fussy cut each one then popped them up on dimensionals. I popped some of the balloons up higher than others. I drew in the balloon strings using a Copic multiliner black pen. I did run around the left-hand edge of the balloons with a pale grey Tombow pen just to make the balloons look a little more rounded. I also paper-pieced the present that the hedgehog is carrying. Here is a close-up:-

It's a bit hard to see in the photo but I added Kindyglitz Crystalina glitter glue to the stars on the sentiment panel, around the pink icing on the cake and the candle flame, the highlights on the balloons, the ribbon on the present and the cheeks on all the animals.
The card base was trimmed to 1/8" using my Perfect Layers Tools and the main image panel was diecut using my Big Shot and Lifestyle Nesting Rectangle dies.
Because the image panel was quite large, I kept the rest of the card simple and just added the bottom panel and tied on some twine.
When I started this card in the 2nd week of June, they had posted the Splitcoaststampers Technique Lover's Challenge TLC485 of Paper-Piecing Revisited - so that was why I decided to do paper-piecing on my image. I always forget to do paper-piecing but I just love how it looks. Unfortunately, I couldn't share my card on my blog until after my daughter's birthday (some weeks after the challenge was first posted) because it would spoil the surprise - but with other things going on in my life, I am only finally getting around to blogging it. I am still popping it into the SCS Challenge as there is no time limit and I did specifically make it for the challenge. Obviously, I won't be entering any other non-SCS challenges as that defeats the purpose of entering a challenge! Click THIS LINK for more details on the TLC485 Challenge.
Thanks for visiting my blog today.
Jocelyn
Card Recipe:
Stamps: Penny Black 'Well-Wishers' 2884K wood mount, Sentiment from Penny Black clear set 'It's Your Day' 30-046
Ink: Ranger Archival Jet Black, Versacolor Sky Blue pigment
Designer paper: Echo Park Hello Summer 6" x 6" pad
Accessories: Big Shot, Lifestyle Nesting Rectangle dies, 1mm/2mm/3mm dimensionals, Kindyglitz Crystalina glitter glue, The Twinery 'Shore' twine, Fray Stop, Lyra + Derwent Inktense + Albrecht Durer watercolour pencils, Tombow pens, Winsor and Newton watercolour paints, #2 Kolinsky Sable paintbrush, Copic Multiliner waterproof 0.05 black pen, 140lb watercolour paper, Perfect Layers Tools, cardstock - light blue
Punches: Martha Stewart Lace Doily + Stars edge









.jpg)


