skip to main |
skip to sidebar
Hi blogging friends
Sorry for my long absence: one way or another life got in the way and I've been very unwell of late but things are starting to settle down now so hopefully, I should be able to post more often and get back on-track to visit your blogs.
And today, I am sharing a birthday card that I made for my beautiful daughter to celebrate her 12th birthday using some very cute Lawn Fawn stamps.
This is also my card for the following Challenges:
Lawnscaping Challenge #109 of Sparkle and Shine - anything that sparkles or shines eg: sequins, glossy accents, glitter, Wink of Stella glitter pens, bling etc.
Crafty Catz Challenge #286 of Anything Goes
Cute Card Thursday Challenge #380 of We Love Cake - any cards or projects that include cake
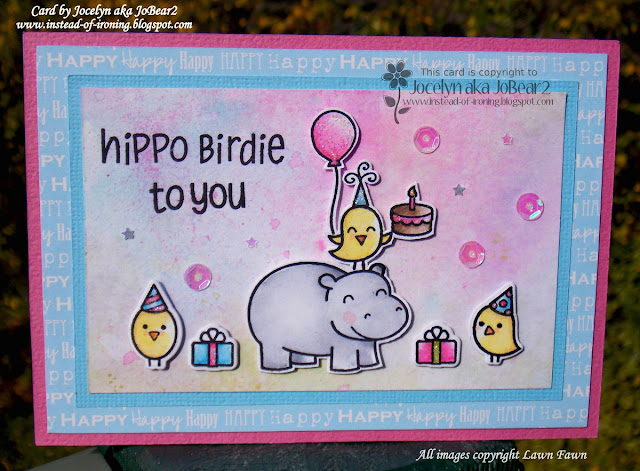
First of all, I made the background using Ranger Distress Inks. I smooshed Picked Raspberry, Tumbled Glass and Shabby Shutters Distress Inks onto my Craft Mat then sprayed them with water. I lay my piece of Ranger Distress Watercolour Cardstock into the colours and but made sure that I had the green colour along the bottom so it kind-of looked like grass where I would be placing my animals - and the blue and pink where the sky would be. I dried the cardstock off with my heat-gun then used an old toothbrush to splatter almost full-strength Picked Raspberry and Tumbled Glass over my panel. I did drip some clean water over the panel to create water spots (like Kristina Werner loves to do) but they are largely hidden by the splatters. Oh well!
The hippo, bird on his back, bird's party hat and balloon are all from the Lawn Fawn Year Four set - and the 2 birds on the ground, presents and the cake that the bird is holding are from the recently released Lawn Fawn Party Animal set. I stamped them using Ranger Archival Jet Black ink onto Ranger Distress Watercolour cardstock and coloured them using Faber-Castell watercolour pencils plus the same Distress Inks I used for my background. I fussy-cut the hippo + birdie etc. because I had layered/stamped the images together and diecut the presents and birds on the ground using the matching Party Animals dies.
All the animals are up on dimensionals and I added Stampin' Up Dazzling Details glitter glue to the balloon, pink icing and candle-flame on the cake, the party hats and the ribbons on the presents.
I must admit to being very taken with Lawn Fawn stamps: the critters are particularly adorable and I love how you can mix and match sets so easily.
Here is a close-up of those cute-as-a-button images:

I cut the sentiment from the Year Four set in half so I could have 2 lines which I think balances the card nicely. Lastly, I added blue and pink iridescent star sequins and clear iridescent round sequins here and there using Tombow Mono Multi glue. I buy most of my sequins from $2 shops here in Australia: most of them have a stand with a really good range of shapes and colours and they don't cost very much. Riot Art and Craft also stocks a good range of colours as does Spotlight but are a bit more expensive.
The Happy Birthday designer paper is an old one from my stash - the back side of the Jillibean Soup - Spotted Owl Soup. All the layers were trimmed to 1/8" using my Perfect Layers Tools.
Thanks for stopping by! Hope to see you again soon!
Jocelyn
Card Recipe:
Stamps: Lawn Fawn Party Animal and Year 4 clear sets
Dies: Lawn Fawn Party Animal
Inks: Ranger Archival Jet Black, Distress Inks - Picked Raspberry, Tumbled Glass and Shabby Shutters
Designer Paper: Happy Birthday script from Jillibean Soup - Spotted Owl Soup
Accessories: Big Shot, Stampin' Up Dazzling Details glitter glue, dimensionals, Faber-Castell watercolour pencils, #2 round paintbrush, Craft Mat, heat-gun, curved blade paper-tole scissors, old toothbrush, Tombow Mono Multi glue, Stampin' Up Fuse Fast adhesive, blue and pink star iridescent sequins, clear round iridescent sequins, cardstock - rose pink + light blue + Ranger Distress Watercolour
Hi blogging friends
Happy Easter! Here in Victoria, we are already half way through the 1st term school holidays and I am loving having my daughter at home. We have had quite a busy time with a few medical appointments but next week, we have none so we can relax a little. Yesterday, we saw the Shaun the Sheep movie which was brilliant and I highly recommend it! My husband and I will also be celebrating our 26th Wedding Anniversary in a couple of days - which reminds me that I need to make him a card!
Today I am sharing the Easter card that I made yesterday for my daughter. This is also my entry for the 4 Crafty Chicks Challenge #240 of Easter. You can find more details on the Challenge HERE.

The bunny image is from a Penny Black clear set - Garden Friends - which has alot of adorable images. I stamped the bunny onto Ranger Watercolour cardstock with Ranger Archival Jet Black ink. I coloured the image using Faber-Castell + Lyra watercolour pencils and a paintbrush. I chalked around the image using Kaisercraft blue chalk.
I added Stampin' Up Dazzling Details glitter glue to all the flowers, the butterflies and the bunny's cheeks. I used an EK Success Arrows border punch to add tiny little hearts from matching cardstock around the bunny (they are the leftover punchies that look like tiny hearts). They also got the glitter treatment :-) The circles and scalloped circles are Lifestyle dies.
The papers are from the Tatty Teddy 'Me to You' range - Spring Chic - which I picked up from a Craft Show last October. I adore the colours in this pad - so pretty.
The side panel was punched using a Martha Stewart Lace Doily edge punch. The silver-edged mauve ribbon is from my stash and I think it originally came from Spotlight a couple of years ago. As always, I added some Fray Stop to the cut ends to stop them from fraying. All the layers were trimmed using my Perfect Layers Tools.
Here is a close-up:

The sentiment panel was made up using sentiments from an Impression Obsession clear set WP-16 - Sentiments 1 - which has tons of sentiments that you can mix and match for pretty much any occasion. I have had this set for a really long time and it is still available - you can see it HERE at the Impression Obsession website. I diecut the sentiment using a Spellbinders Shapeabilities Labels Trio die then added some tiny pink rhinestones to each end.
Thanks for visiting my blog today. Hopefully, I should be back in a few days with my husband's Wedding Anniversary card. Thanks goodness he doesn't mind cute and cuddly images which makes the process alot easier and far more enjoyable :-)
Jocelyn
Card Recipe:
Stamps: Penny Black Garden Friends clear set 30-021, Impression Obsession Sentiments 1 WP16 clear set
Ink: Ranger Archival Jet Black
Designer Paper: Tatty Teddy 'Me to You' Spring Chic 6" x 6" paper pack
Dies: Spellbinder Shapeabilities Labels Trio S3-147, Lifestyle Nesting Circles + Nesting Scalloped Circles
Accessories: Big Shot, Perfect Layers Tools, silver-edged mauve ribbon, Fray Stop, Kaisercraft pink rhinestones, Ranger Distress Watercolor cardstock, Faber-Castell + Lyra Watercolour pencils, #2 round paintbrush, cardstock - light teal + mauve + magenta, Stampin' Up Fuse Fast adhesive, Stampin' Up Dazzling Details glitter glue, Kaisercraft blue chalk
Punches: Martha Stewart Lace Doily edge, EK Success Arrows border
Hi blogging friends
I have seen alot of gorgeous cards on Splitcoaststampers recently which uses the Bokeh technique - so I thought I would give the technique a try. It is super-easy and fun - and here is the result:

This is also my entry for the Cute Card Thursday Challenge #363 of Diecuts and Punches.
There is a tutorial for the Bokeh Technique on Splitcoaststampers HERE and I found another tutorial HERE on Shannon Lane's blog - I've got a Crush on Colour. If you don't know what bokeh means, it relates to photography and you can read more about it HERE on Wikipedia.
I used Ranger Distress Inks in Picked Raspberry and Salty Ocean for my background by smooshing my ink pads onto my Couture Creations non-stick Craft Mat, spraying the inks with water then lay the smooth side of my Ranger Distress watercolour cardstock on top. I let the cardstock sit in the inks for about 30 seconds then moved it around and lifted it up to check how the coverage was then kept dabbing the cardstock into the inks until I was happy with how it looked. I was too impatient to wait for my cardstock to air-dry so dried it off using my heat-gun.
I made a stencil of various sizes of circles using clear acetate and my Lifestyle Nesting Circle dies then used a finger dauber to pounce Hero Arts white dye ink circles all over my background using the stencil. At first my background looked pretty ordinary and I wondered whether it was going to look any good but the more circles that I added and the more that I overlapped, the better it started to look. I also went over some of the circles to make them brighter than others which really helped the effect look more realistic. The white circles on the blue part of my card don't show up quite as well in the photo compared to real life.
The decorative edge was made with all-time favourite edge punch: Martha Stewart Lace Doily. I attached the panel to white cardstock using Stampin' Up Fuse Fast adhesive then used my Perfect Layers Tools to trim the cardstock to 1/16".
I sponged two small pieces of Stampin' Up Dazzling Diamonds glimmer paper (which is sparkly white and as thick as cardstock) with the same Distress Inks that I used for my background then diecut them using my Big Shot and a Memory Box Pippi Butterfly die. I was a bit concerned that the colour might transfer to my butterfly die so I very carefully ran my heat-gun over the glitter paper before diecutting to make sure it was dry. I attached just the centres of the butterflies using Tombow Mono Multi glue.
The 'Hello' is a die from Mama Elephant and was diecut from the same glimmer paper and glued on using Tombow Mono Multi glue.
I rounded the corners on the bottom using the 1/8" size on my We R Memory Keepers Corner Chomper.
Lastly, I glued on some iridescent sequins using Ranger Multi Medium Matte which is a strong adhesive and dries clear. The card is a top folding card.
This card will be going to my Mum just to brighten her day. Mum's last remaining sibling passed away several weeks ago so it has been a difficult time for her.
Thanks for visiting my blog today!
Jocelyn
Card Recipe:
Stamps and Designer Paper: None
Ink: Ranger Distress - Picked Raspberry and Salty Ocean, Hero Arts White dye
Accessories: Big Shot, Couture Creations non-stick Craft Mat, Ranger Inkssentials Mister, finger dauber, sponges, Stampin' Up Dazzling Diamonds glimmer paper, white cardstock, Tombow Mono Multi glue, Ranger Multi Medium Matte, Stampin' Up Fuse Fast adhesive, iridescent sequins (from stash), acetate, heat-gun, Ranger Distress Watercolour Cardstock, Perfect Layers Tools, We R Memory Keepers Corner Chomper
Dies: Lifestyle Nesting Circles, Memory Box Pippi Butterfly #98508, Mama Elephant Hello Script Creative Cuts
Punches: Martha Stewart Lace Doily edge
Hi blogging friends
Today I am sharing two cards using the newly released Taylored Expressions Paw-some stamp and die set which I think is adorable. My brother-in-law and his wife have birthdays 4 days apart so I thought I would challenge myself to make a "His and Hers" card using the same image.
This is also my entry for the Crafting from the Heart Challenge and The Pink Elephant Challenge as well as the Splitcoaststampers CAS311 Challenge. Details and links are towards the end of my blog post.
First up is my BIL's card:

I stamped the image with onto Ranger watercolour cardstock using Ranger Archival Jet Black ink then coloured it using Faber-Castell + Lyra watercolour pencils and a paintbrush. I added the black patches myself then diecut the image using my Big Shot and popped it up on dimensionals. The sentiment is also from the same Taylored Expressions set.
I added some Glossy Accents to the dog's nose and once dry, added a dot of white acrylic paint for some highlight. I added a very fine line of Stampin' Up Dazzling Details glitter glue onto each side of the dog's hat which doesn't look too sparkly for my BIL. When I want to add an extremely fine line of glitter glue, I squirt some onto some scrap cardstock and use a pin to pick up tiny amounts and apply it to my image.
Here is a close-up:

The twine came free from Lawn Fawn with an order I received late last year (they wrapped my stamps in tissue paper and tied on the twine which I saved). I added Fray Stop to the cut ends to stop them from fraying.
Lastly, I added 2 blue brads and corner-punched the kraft cardstock using a We R Memory Keepers 1/2 inch Corner Chomper which my wonderful DH gave me for Christmas.
And now here is my SIL's card:
All the details are basically the same except that I added more Dazzling Details glitter glue to the image: gotta have more sparkle and shine on a feminine card :-) I also added tiny pink Molossi rhinestones to the dog's collar to make the collar look like one of those fancy diamante collars.
The twine came from my local Woolworths Supermarket and I added some iridescent sequins and stars which came from a $2 shop; they were glued on using Ranger Multi-Matt Medium.
Here is a close-up:

Here are the Challenge Details:
The Pink Elephant Challenge - TPE287 - Anything Goes
Splitcoaststampers Clean and Simple Challenge - CAS311 - Rainbow
Thanks so much for visiting my blog today.
Jocelyn
Card Recipe:
Stamps: Taylored Expressions Paw-some cling-mount set
Ink: Ranger Archival Jet Black
Designer Paper: None
Dies: Taylored Expressions Paw-some
Accessories: Big Shot, Faber-Castell + Lyra Watercolour pencils, #2 round paintbrush, Stampin' Up Dazzling Details glitter glue, dimensionals, JoSonja white acrylic paint, Ranger Multi-Matt Medium, twine (Woolworths and Lawn Fawn), Fray Stop, We R Memory Keepers 1/2" Corner Chomper, blue brads, Molossi tiny pink rhinestones, iridescent sequins and stars ($2 Shop), Glossy Accents, Ranger Watercolour cardstock, other cardstock - kraft and white
Hi blogging friends
Today I am sharing a Valentine's Day card that I made for my daughter. Even if you don't celebrate Valentine's Day per se, I think it is a great opportunity to send a card to someone to say how much you care about them. My daughter and I also celebrated the occasion by baking some chocolate cupcakes and iced them with pink strawberry icing and sprinkles - yum!

This card is also for the following Challenges:
Suzy Bee's Bloomin' Challenge 67 of Anything Goes with a Twist - add a bow
Craftyhazelnut's February Patterned Paper Challenge which is 'Anything Goes' but Hazel must be able to see that you have used patterned paper as the whole idea of the challenge is to use up your stash of patterned paper - and let's face it, many of us have enough to keep us going for 10 lifetimes (I know I do LOL!). And yet the lure of a fresh paper pad is so hard to resist........
I bought this adorable teddy bear stamp - James Big Heart - from Lili of the Valley UK just before Christmas but it hasn't seen ink till now. I stamped the teddy using Memento Tuxedo Black ink onto KW Doggett smooth white cardstock and coloured the teddy using Prismacolor + Derwent Coloursoft + Lyra coloured pencils and Odourless Mineral Spirits ie: the Magic Coloured Pencil technique aka Gamsol Magic - then coloured around the teddy using blue chalk.
I paper-pieced the heart and ran a soft grey Tombow pen around the outer edge to try and give it some 'roundness'.
I stamped the teddy again onto a scrap piece of cardstock and coloured the flower and the paws holding the heart - then cut them out and popped them up on dimensionals. I also went around all the edges of the paper pieces with a Copic black multiliner to hide the white of where I cut. You can see a little of the dimension in this close-up here:

Here is another angle to help you see the dimension:

I went over any areas that needed the blackness touched up especially around his eyes and nose with a Copic black multiliner then used a white gel pen to redo the white dots in the eyes and nose.
The sentiment is also from LOTV from their newly released set 'Happy Bears' which has lots of teddy bear images and sentiments - see HERE.
All the designer papers are by Crate Paper - Love Notes - which I picked up from Spotlight late last year. It is a gorgeous pad with soft reds and light teal colours - right up my alley!
I used a Wink of Stella clear glitter pen to add some subtle glimmer to the heart and rose which is very hard to see in the photo. The centre panel was trimmed to 1/8" using my Perfect Layers Tools.
The light teal organza bow was made using my Bow Easy and I added Fray Stop to the cut ends to stop them from fraying. I glued the bow on using Fabric glue.
I used an EK Success Arrows border punch to punch some tiny little hearts from the soft red cardstock (they are the leftover punchies that look like tiny hearts) and glued them around the teddy using Tombow Aqua glue. Here is a close-up of that sweet teddy bear:

Once I had layered up the card, I attached a white cardstock base which was diecut using a circle die except that I moved the die up so that I still had a fold at the top. The next photo explains what I mean if I am not making any sense:
I usually make my card fronts first then attach the front to a white cardstock base (unless it's a one-layer-card of course).
I think you could use this LOTV image for a Wedding Anniversary or Engagement too.
And now I thought I would share the gorgeous Boofle card that my daughter gave to me:

The papers and butterflies are by Kaisercraft from their Enchanted Garden collection. The twine was saved from a clothing tag and the rhinestones are also by Kaisercraft.
My daughter knows that I love Boofle so I received a Boofle Gift bag filled with lots of lovely goodies.
Thanks for visiting my blog today.
Jocelyn
Card Recipe:
Stamps: LOTV James - Big Heart ST483, sentiment from LOTV Happy Bears SET088
Ink: Memento Tuxedo Black
Designer Paper: Crate Paper Love Notes 6" x 6" pad (2013)
Dies: Lifestyle Nesting Circles and Nesting Scalloped Circles
Accessories: Big Shot, dimensionals, Prismacolor + Derwent Coloursoft + Lyra coloured pencils, Odourless Mineral Spirits, paper stumps, Kaisercolour blue chalk, light teal organza ribbon, Fray Stop, Bow Easy, cardstock - soft red, light teal + KW Doggett Smooth White, Perfect Layers Tools, Wink of Stella Clear glitter pen, Black Copic multiliner 0.05, white gel pen, soft grey Tombow pen, Tombow Aqua glue, Stampin' Up Fuse Fast adhesive, Fabric glue
Punches: EK Success Arrows border punch
Hi blogging friends
The summer school holidays are now over and my DD went back to school today (*sniff*) so the house seems very empty without her. I thought school started yesterday as my Diary and Calendar both said that Term 1 started then - so we turned up to find that only the staff were there and it was a Curriculum Day. OOPS!!! But I didn't feel so bad as on the way back to the car, we passed another family on their way in - and apparently, the office had a steady stream of people arriving thinking that it was a school day too. My DD was understandably a little dark on me having got up early for nothing but it was nice to have an "extra" day together :-) I guess it was better than turning up a day late; nevertheless, I do feel a little dumb.....LOL!
Today I am sharing a Sympathy card. Not an easy card to make of course and I tried to go for something very simple and understated which is what I prefer for my Sympathy cards - plus it needed to be very flat as I was posting it to the USA:

The dry embossing is an old folder by Cuttlebug - Grace's Frame - which is still widely available online. I think this embossing folder is very elegant and suitable for many different occasions.
The tree and sentiment are by Stampin' Up from their Thoughts and Prayers set and were stamped with Memento Gray Flannel dye ink which gave a lovely softness to the images as opposed to using black ink which can sometimes look a bit harsh.
I layered the main panel onto some dusky pink designer paper by Creativ which I bought from KMart (Australia). The paper has no particular name - just an Item No. - and comes in a set of 24 sheets - 6" x 6" and from memory, I think it cost about $2.50. It's a really nice set as there are some gorgeous burgundy, brown and dusky pink sheets - all very vintage in style. I trimmed the paper to 1/16" using my Perfect Layers Tools.
I punched a heart using a Carl CP-8 Heart punch from the same dusky pink paper and glued that next to the sentiment using Tombow Mono Multi glue.
Lastly, I adhered the main panel to a white card base using doublesided tape.
Thanks for visiting my blog today.
Jocelyn
Card Recipe:
Stamps: Stampin' Up Thoughts and Prayers
Ink: Memento Gray Flannel dye ink
Designer Paper: Creativ 6" x 6" Mini Paper Stack, item no. 720/171691 (KMart Aust)
Accessories: Big Shot, Cuttlebug Grace's Frame embossing folder, Perfect Layers Tools, Tombow Mono Multi glue, doublesided tape, white cardstock
Punches: Carl CP-8 Heart twin punch (I used the largest heart)
Hi blogging friends
Sheesh, I don't know what is up with Blogger! It has been publishing my posts when I have saved it as a Draft (which it did with my last post as well as this one) - so if you subscribe by email, you might get 2 emails now that I have re-published this post as I hadn't finished it before (sorry about that!). The first email will probably say that the "post doesn't exist" if you click on the link because I changed the post name. Just click on the latest email and it should take you to the right post. If you read my posts via a Reader, it may also say that the post doesn't exist until I re-publish this one. So annoying
I was doing some tidying up in my Craft Room and came across some gorgeous papers by Graphic45 from their Secret Garden Collection (2013) and thought I would make a Vintage-inspired birthday card. If you are a regular follower of my blog, you will already know that I am "too neat" to tear and rip edges like other cardmakers who are experts at Vintage-style cards - and I just can't add a gazillion embellishments and tizz up my card too much: I get brain-freeze! And whilst I am a little intimidated by making these sorts of cards, I have become comfortable with my own interpretation of that style. Maybe there is another name for my style of Vintage? Maybe it's Shabby-Chic (?). If you can enlighten me, please do so :-)
This is also my card for Craftyhazelnut's Patterned Paper January Challenge (see details and link below).

The main image is from the Springtime #4500650 sheet which already had the beige and green borders so all I had to do was cut it out and distress it using my Ranger round blending tool and Antique Linen Distress ink. I added some Summer Flowersoft to some of the flower centres using tacky glue and once dry, added some Stampin' Up Dazzling Details glitter glue for a bit of sparkle. This panel is attached to my card using 0.5mm dimensionals.
Here is a close-up:
And another close-up where hopefully you might see a little bit of the Flowersoft and sparkle (?):

The designer paper on the card base and panel is also from Graphic45 from their Baby 2 Bride Collection which I have had for ages and is from 2007 (how's that for hoarding?!!). I also distressed the paper using Antique Linen Distress ink. The green cardstock was trimmed to 1/8" using my Perfect Layers tools.
The bottom punched border is my all-time favourite: Martha Stewart Doily Lace.
I dyed the seam binding myself using a mix of paint colours: Skin Tone Base and Peach Cobbler plus Textile Medium in equal quantities. The seam binding and bow were added in 2 separate elements and the bow itself was made using my Bow Easy. I added Fray Stop to the cut ends to stop them from fraying
The paper rose was originally cream but I added some watered-down paint to match the seam binding then added a some Dazzling Details for sparkle. The green part underneath the ribbon was originally a bright green which didn't match the rest of my card so I trimmed it off then punched a star from the same green cardstock that I used on my card and glued it on.
I diecut 2 x Vintage Corners from green cardstock using my Cuttlebug, distressed them using Antique Linen Distress Ink then glued them to the top of the main image panel using Tombow Mono Multi glue. I punched a butterfly from some matching peachy coloured Secret Garden designer paper using a Carl CP-1 Butterfly-A punch, added 2 tiny pearls from my stash then added a little bit of Dazzling Details glitter glue.
Challenges:
I am entering my card in the following challenge -
Craftyhazelnut's Patterned Paper January Challenge - Anything Goes - but you must use patterned paper to cover your card base or project and Hazel must be able to see that you have used patterned paper for your project. The whole idea behind the challenge is to encourage you to use your stash of papers (and let's face it, most of us have enough to last 10 lifetimes!).
Thanks for visiting my blog today.
Jocelyn
Card Recipe:
Stamps: None
Ink: Ranger Antique Linen Distress
Designer Paper: Graphic45 Secret Garden Collection (2013) + Baby 2 Bride Collection - Unchained Melody #450023 (2007)
Dies: Provocraft Vintage set 37-1201
Accessories: Cuttlebug, Ranger round blending tool, Stampin' Up Dazzling Details glitter glue, Crafter's Pick Incredibly Tacky glue, Stampin' Up Fuse Fast adhesive, Tombow Mono Multi glue, cream seam binding, acrylic paints - JoSonja Skin Tone Base + Folk Art Peach Cobbler, JoSonja Textile Medium, Fray Stop, Bow Easy, Perfect Layers Tools, 0.5mm dimensionals, cream paper flower, cardstock - olive green, white cardstock base, tiny peach pearls from stash, Flowersoft Summer
Punches: Carl CP-1 Butterfly-A + CP-1 Star, Martha Stewart Lace Doily edge









.jpg)


