
Hi everyone
My Craft Room has been a real hive of activity lately and I am loving being able to have more time to create.
I made this card for my daughter for Easter:

This is also my card for the following Challenges (click on the underlined link to take you to the Challenge):
- Penny Black Saturday Challenge - PBSC April - Anything Goes with Optional Easter
- Shopping our Stash - SOS545 - Hippity Hop - Make an Easter Card or a Card featuring a Rabbit or Chick
- Critter Crazy Challenges #97 - Anything Goes Featured Critter Theme
The main image is by Penny Black - Garden Friends - and was stamped with Versafine Onyx Black Ink onto Ranger Watercolour Cardstock. I coloured the image with Watercolour Pencils then went over the black lines with a Black Copic Multi-liner to darken the lines up.
I diecut the panel using my Big Shot and Nesting Card Templates - and then things went awry! You see the square designer paper on the base? I measured my designer paper wrongly and cut it into a square instead of a rectangle as I was going to put the chicks onto a rectangular card. Oh well, I thought - I will just cut another piece of that designer paper - but I had none of that particular one left in the 6" x 6" pad - and I really, REALLY wanted to use that one. So, pivot I thought and don't waste the square of designer paper - use it instead and I did - but then couldn't figure out a good layout for my card. I know in the end, it is a simple layout but it just frustrated me no end and I couldn't figure out whether I wanted the blue cardstock or pink - or should I go yellow? I just kept changing my mind and couldn't settle on what I wanted so I left it on my desk until the next day.
The next day, I finally decided to go with the Blue Cardstock and then struggled with the layout again as I tried this and that and nothing seemed to look right. It was just one of those frustrating cards that just seems to be hard work! Eventually I settled on what other designer papers to add to my card so I had my main panel finished. Here is a close-up of those cute little chicks:

And then couldn't make up my mind whether I should put the finished panel on a plain white card base or not. In the end, I thought adding some dry embossing to the white card base looked better than plain so used my Crafter's Companion EF6 Embossalicious Embossing Folder and I like how it complemented the original square of the designer paper as well as the tiny flowers on the stamped image. Of course, my frustrations continued as the embossing folder slipped the first time when I put it through my Big Shot so it embossed all crooked and I had to get another card base and redo it.
I rounded the corners of the Kaisercraft White Card Base using my We R Memory Keepers 1/2" Corner Chomper. All the blue cardstock layers were trimmed to 1/8" using my Perfect Layers Guides.
And then the ribbon - ohhhh, that ribbon gave me so much grief. I struggled with what colour and type - and then eventually settled on the organza ribbon because it was so hard to match the blue colour with a solid blue coloured ribbon from my stash - I could not find the right shade. This particular organza ribbon seemed to have a mind of its own and I gave up tying a bow because it wouldn't sit flat and looked totally weird. Well, just knot it instead I told myself but do you think it would sit flat as well? Nope! It did NOT want to play nicely! And ultimately, I used a tiny glue dot to hold the RHS of the ribbon down because it insisted on sticking up at 90 degrees.
The sentiment is the same sentiment set I have used on my last couple of cards and I decided to cut out the sentiment and pop it up on dimensionals. Even trying to figure out where to put the sentiment was driving me bonkers! I added some Tiny Pink Cardstock Hearts around the main image panel by using my EK Success Arrows Border Punch (the leftover punchies look like tiny hearts). I glued them on using a Uniquely Creative Fine Glue Pen.
Of course, I had to add glitter to the hearts and flowers using Kindyglitz Crystalina Glitter Glue. I needed some sparkle to bring a bit of life to the card.
Ultimately, this card took 1000 times longer to make than it should have, however, I am happy with the end result. And I like the layout and will definitely store this layout in my Card Sketches Folder as it is great for smaller, more vertical images.
Sticking to my New Year's Resolution to try new crafty things, I decided to make an Easter Egg Holder which was certainly a challenge - but that's why I am trying new things that take me out of my comfort-zone. Here is what I came up with:


They retail for US$35 (although they are on special at the moment) so it really was an amazing free gift. Scrapbook.com are the only US Company that I buy from because their postage to Australia is very reasonable - but I don't buy from them all that often because when you factor in the exchange rate between Australia and the USA, it does start to add up.
I had this idea in my head when I was trying to get to sleep the other night that I might be able to diecut the bunny twice and have some cardstock at the bottom between the back and front to allow for the size of the egg. Here is a side view so you know what I mean:

I then came up with the idea to diecut the bunny's tummy with one of my Spellbinders Nested Eggs Dies to accommodate the Easter Egg - holding it in place. It took quite a bit of fiddling around and I did a prototype first to see if it would work - and then I realised that I would have to diecut the back of the bunny as well or the Easter Egg wouldn't stay in place:
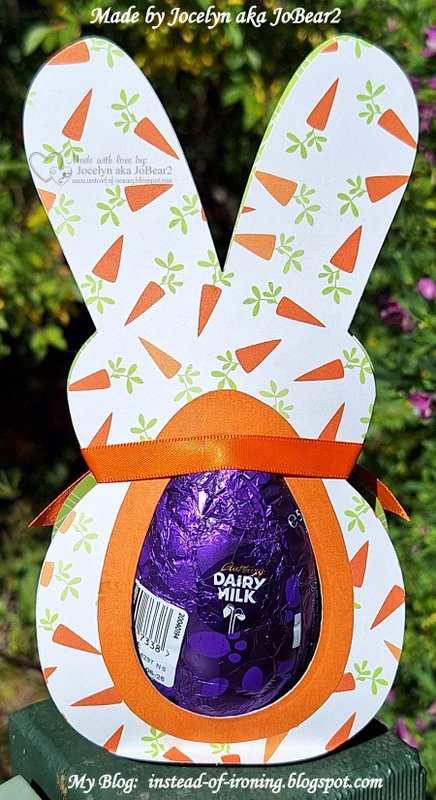
I used some older papers by Echo Park - Happy Easter 12" x 12" - first released in 2015. I diecut the Orange Cardstock using the Spellbinders Nested Eggs Nestabilities and then diecut the centre where the Easter Egg fitted it.
I used the same paper range to diecut the bunny to put on the inside just to pretty it up instead of just having the white cardstock. You can just see the paper from the side view photo but it is actually green in real life.
I tied some Orange Ribbon around the bunny's neck to hold it all together and added Fray Stop to the cut ends to stop them from fraying.
I was really happy with how it turned out and it was great to see it all come together as I envisioned it after struggling with the card so much!
Thanks for stopping by!
Jocelyn
Card Recipe:
Stamps: Penny Black Garden Friends 30-021 Clear Set, Impression Obsession Sentiments 1 WP16 (retired)
Ink: Versafine Onyx Black
Designer Paper: American Crafts Hello Spring #320548 (from 2016 - retired)
Accessories: Big Shot, Dimensionals, Watercolour Pencils, #4 Round Paintbrush, Kindyglitz Crystalina Glitter Glue, WRMK Perfect Layers Guides, Ranger Watercolour Cardstock, Black Copic Multi-liner, American Crafts Organza Ribbon 3/8" or 9mm wide, Fray Stop, Crafter's Companion Die'Sire Embossalicious EF6 Embossing Folder, Tombow Mono Multi Glue, Uniquely Creative Fine Glue Pen, Mini Glue Dot, Cardstock - Scrap of Pink + Blue, Kaisercraft White Card Base
Dies: Lifestyle Crafts Quickutz Nesting Card Templates DC0431
Punches: WRMK 1/2" Corner Chomper, EK Success Arrows Border
Easter Egg Holder Recipe:
Designer Paper: Echo Park Happy Easter 12" x 12" (from 2015 - retired)
Accessories: Big Shot, Orange Ribbon 3/8" or 9mm wide (stash), Fray Stop, Cardstock - White + Orange
Dies: Scrapbook.com Nesting Peeps sbc-shapes-19, Spellbinder Nested Eggs Nestabilities S4-264


.jpg)


2 comments:
Adorable!! Those chickies stacked up are just the cutest!! Way to go shopping your stash for our "hippity-hop" theme challenge!! We are so glad you joined the fun and played along with us at Shopping Our Stash!! Deb Horst, DT #SOS545
Such a lovely bright and colourful card. Thank you for sharing it with us at Critter Crazy Challenge.
Anne CCC-DT
Post a Comment