skip to main |
skip to sidebar
Hi everyone,
Apologies for my long absence. Blogging has taken a backseat this year unfortunately and now, suddenly, it is November and the Christmas decorations are in the stores! They say that time speeds up as you get older but I didn't think it would speed up this much! I also wonder whether people still visit blogs anymore or whether they just use different social platforms like Facebook or Instagram(?). Aside from my Gallery on Splitcoaststampers, I am part of a few Facebook Cardmaking Groups but also share the occasional card on Instagram which are quick and easy ways of doing it without doing a blog post - plus it is fun to see what others are creating with stamp sets that I have. And we only have so much time to look at various sharing platforms.
Anyhoo, I made this Halloween card for my daughter and it was super-easy to make: I made it in less than an hour which is probably a record for me!
This is also my card for the following Challenges. Click on the underlined links for more details about the Challenges:
Diecuttin' Divas Weekly Challenge - Challenge 393 - Anything Goes
Always Fun Challenge 82 - Halloween

The sky was made using Ranger Distress Inks in various colours. I wet my Ranger watercolour cardstock with water then smooshed my Distress inks onto an acrylic block and used a #8 flat paintbrush to paint strokes of each colour. I dried it with a heat tool then repeated the process to intensify the colour and I love how vibrant it turned out. The haunted house, tree, gravestones, pumpkin and bats are all one die by Impression Obsession - Halloween Hill and I diecut it out of black cardstock using my Big Shot - but I did cut off the far RHS of the diecut (which was a cat and 2 more gravestones) as I wanted to make a smaller card. I diecut the ghosts from white cardstock using the Memory Box Ghastly Ghosts 98701 dies and added Wink of Stella clear glitter to them to make them sparkle - alas not captured by the camera. I also added Wink of Stella to the windows in the house and the pumpkin face.
The greeting is by Hero Arts - Happy Halloween CL353 and was stamped using Versamark Watermark ink and heat embossed using Stampin' Up white embossing powder. I used a powder tool first so I wouldn't have any stray embossing powder that would really show up on the black cardstock. I attached the main panel onto some more black cardstock and trimmed the edges to 1/4" using my Perfect Layers Tools, then mounted that onto a white card base with edges trimmed to 1/16". Lastly, I used an old stiff bristled paintbrush and white acrylic paint to dry-brush highlights on the black elements on the card.
Thanks for visiting my blog today.
Jocelyn
Card Recipe:
Stamps: Hero Arts Happy Halloween CL353 clear set
Ink: Versamark Watermark, Ranger Distress inks
Dies: Impression Obsession Halloween Hill, Memory Box Ghastly Ghosts 98701
Accessories: Big Shot, Tombow Mono Multi glue, Stampin' Up white embossing powder, heat tool, white acrylic paint, #8 flat paintbrush, stiff bristle brush, Wink of Stella clear glitter brush, Perfect Layers Tools, powder tool, cardstock - Ranger watercolour, black, white, white cardstock base
Hi everyone
Just sharing another make from this Christmas season which I gave to my husband:

My husband doesn't mind cute and cuddly critters so it makes it a whole lot easier to make cards for him.
This is also my entry for the following Challenges:
Winter Wonderland - Anything Goes Christmas
Splitcoaststampers - Free for all Friday - F4A407 - Merry December - Happy ??? - Make a card to celebrate your favourite holiday in December. It could be Christmas, Hanukkah, Kwanzaa, Boxing Day...you decide but make sure you tell them what you are celebrating. Just for fun (optional, in no way mandatory), add sparkle to your card. I am (obviously) celebrating Christmas and I have loads of sparkle on my card - even on the plaid designer paper.
Craftyhazelnut's Christmas Challenge Extra - Anything Goes
Christmas Cards All Year 'Round - December - Anything Goes as long as it is holiday-related
The image is a Lili of the Valley Simply Print image called "A Snowy Hug" which you can find at this link HERE. I bought a bunch of their Simply Print images a little while ago and they print beautifully with no pixelation even on the largest size - plus I love that the images come in several sizes to suit your needs. Note that I have no connection to the company - just happy to tell you my experience of how well the images print. I printed the penguins onto smooth white cardstock with my Canon Pixma MG2965 wireless printer. This is my first wireless printer and boy, it is so nice to not have to fiddle with cords + I can print from my mobile phone just by using the Canon App. Printers sure have come a long way in recent years and mine is so much faster than my old one. Anyway, I am digressing.....back to my card......
I diecut the image using my Big Shot and Lifestyle Nesting Square dies. All the designer papers are by My Mind's Eye - Comfort and Joy from 2016. I really love how the dotted paper matches the image so well and echoes the snow on the main panel.
The black dotted paper on the side panel was punched using a Fiskars Threading Water border punch which I love to use for masculine cards. I tied on the ribbon, add Fray Stop to the cut ends then popped the panel up on dimensionals. I used a Kaisercraft Mini Snowflakes die set to diecut the white star from white glitter cardstock then glued the star onto the knot using Fabric Glue. Note that this die set comes with a bunch of different sized and shaped snowflakes plus stars. This has been my go-to set for snowflakes and stars this Christmas season and I can't recommend it enough!
Here is a close-up of that sweet image where hopefully you see the fluffiness and sparkle:

The sentiment is by Penny Black from their Holiday Snippets set which has tons of small sentiments that are perfect for adding to a card when you don't have much room for one. I stamped the sentiment using Versafine Onyx Black and diecut it using a Lawn Fawn Slide-on-over die which was the perfect size. I added a Couture Creations burgundy gemstone either side of the sentiment then glued it down using Tombow Mono Multi glue.
All the layers were trimmed to a 1/8" using my Perfect Layers Tools.
I glued the card front down to a white card base using Tombow Mono Multi glue which gave me a little bit of wriggle-time to get perfect placement with just a small white border showing.
Lastly, I added some Stampendous Cotton White Fun Flock mixed with a little bit of white glitter to the penguin's hats and the snow on the ground using Tombow Mono Aqua glue. I usually squirt a bit of the glue onto a scrap piece of cardstock then use an old small round paintbrush to spread it exactly where I want it.
I thought about adding some diecut snowflakes around the image but decided to leave things as they were so the card didn't look too fussy for a guy.
Thanks for stopping by!
Jocelyn
Card Recipe:
Stamps: Penny Black Holiday Snippets 30-307 clear set
Ink: Versafine Onyx Black
Designer Paper: My Mind's Eye Comfort and Joy 6" x 6" pad (2016)
Accessories: Lili of the Valley (UK) Simple Print image 'A Snowy Hug', printer, Big Shot, Stampendous Cotton White Fun Flock, fine white glitter, burgundy grosgrain ribbon, Fray Stop, Perfect Layers Tools, Tombow Mono Multi + Mono Aqua glue, Fabric glue, dimensionals, Couture Creations self-adhesive burgundy rhinestones, cardstock: smooth white, white card base, white glitter
Dies; Lifestyle Nesting Squares, Lawn Fawn Slide-on-over LF1202, Kaisercraft Mini Snowflakes set DD446
Punches: Fiskars Threading Water border
Hi everyone
Just stopping in to share a Christmas card that I made for my daughter which I started on the 23rd and finished Christmas Eve morning:

This is also my card for the following Challenges:
Winter Wonderland - Anything Goes Christmas
Crafty Hazelnut's Patterned Paper Challenge - December - Always Anything Goes and you may enter any creation on which patterned paper/card has been used. The idea of the challenge is to use up any of those papers we have been "collecting". My designer papers are from 2011 so I think that I am....ahem... 'well-qualified' for the challenge!
Splitcoaststampers - Free for all Friday - F4A407 - Merry December - Happy ??? - Make a card to celebrate your favorite holiday in December. It could be Christmas, Hanukkah, Kwanzaa, Boxing Day...you decide but make sure you tell them what you are celebrating. Just for fun (optional, in no way mandatory), add sparkle to your card. I am (obviously) celebrating Christmas and I have loads of sparkle on my card.
Splitcoaststampers - Ways to Use it - WT667 - Colouring is a perfect way to relax and get rid of all that stress, so take out your favorite colouring mediums....markers, coloured pencils, watercolours, chalks...anything you can use to color. To make this a little more challenging, you must use at least two different colouring mediums on your card or project. I used watercolour pencils, Tombow pens and chalks.
The image is by Lili of the Valley (UK) and is called 'James Bear in the Snow' which I bought as an unmounted rubber stamp quite some years ago. Although you can't get the rubber stamp any longer, you can purchase it from LOTV as a digi image or a pre-coloured printable image.
I stamped the image with Ranger Archival Potting Soil ink and coloured it with a mix of Faber-Castell + Lyra watercolour pencils and Tombow pens. I paper-pieced the scarf and hat using Bo Bunny Snowfall designer paper from their 6" x 6" pad and added a small amount of shading using a grey Tombow pen. After fussy-cutting the scarf and hat, I went around the edges with a Pitt Artist Walnut Brown pen to hide any imperfections in my cutting. I lightly coloured around the image using Kaisercraft blue chalk. The image and teal circle layers were diecut using my Big Shot and Lifestyle Nesting Circle dies.
The designer paper on the card base is also from the Bo Bunny Snowfall collection and is a 12" x 12" sheet called Blizzard. This collection is from 2011 and is therefore long-retired yet it still remains one of my most favourite all-time releases. The touches of glitter are so gorgeous! The teal cardstock on the card base was trimmed to a 1/8" using my Perfect Layers Tools. I glued the finished card to a white card base using Tombow Mono Multi glue which gave me enough wriggle-time to get the card exactly where I wanted leaving a very small white border.
The sentiment is from Penny Black from their Holiday Snippets set which has tons of very small sentiments that are easy to add to a card when you don't have alot of room for one. It was stamped using Versamagic Ocean Depth chalk ink and diecut using a Lawn Fawn Slide-on-Over die for the sentiment as it was the perfect size. I added a blue Couture Creations gemstone either side of the sentiment.
The snowflakes were diecut from white glitter cardstock using a Kaisercraft Mini Snowflakes die set which has 8 different-sized snowflakes and two different-sized 8-pointed stars. I added a blue Couture Creations gemstone to the snowflake centres. I glued just the centres of the snowflakes down using Tombow Mono Multi glue and bent the arms up a little to give the snowflakes some dimension.
I tied on a teal organza ribbon from my stash, added Fray Stop to the cut ends to stop them from fraying then added a diecut star using teal glitter cardstock from the Kaisercraft Mini Snowflakes die/star set and glued it on using Fabric Glue.
I glued some Stampendous Cotton White Fun Flock mixed with a little bit of white glitter to the teddy bear's hat plus the snow on the ground using Tombow Mono Aqua glue. The falling snow around the bear is Nuvo Glitter drops in White Blizzard which gave the snow a lovely sparkle and added a bit of dimension.
Here is a close-up of the sweet little teddy bear:
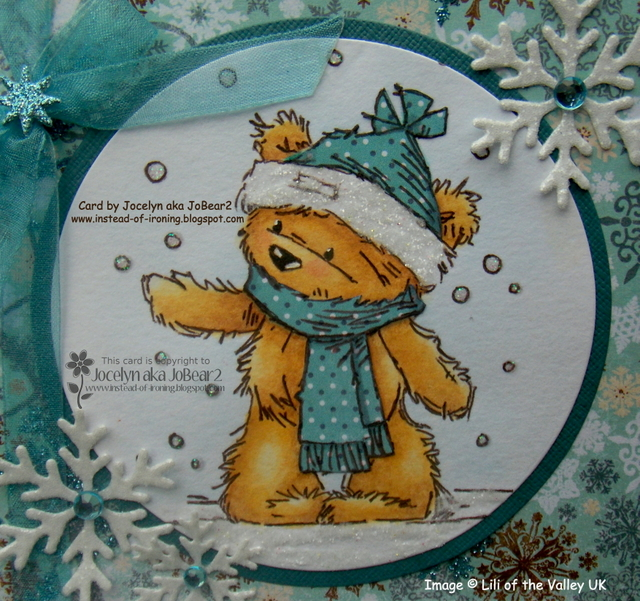
Lastly, I used a Pitt Artist Walnut Brown pen to go over the eyes and nose to darken them up a little then used a white gel pen to add some highlights.
Thanks for visiting my blog today!
Jocelyn
Card Recipe:
Stamps: Lili of the Valley - James Bear in the Snow unmounted rubber (retired*) - *available as a digi image or precoloured printable image from LOTV. Sentiment from Penny Black - Holiday Snippets 30-307 clear set
Ink: Ranger Archival Potting Soil, Versamagic Ocean Depth chalk
Designer Paper: Bo Bunny Snowfall 12" x 12" Blizzard + 6" x 6" paper pad (retired)
Accessories: Big Shot, Faber-Castell + Lyra watercolour pencils, Tombow pens, Kaisercraft blue chalk, Tombow Mono Multi + Aqua glue, Fabric Glue, Perfect Layers Tools, teal organza ribbon (stash), Fray Stop, Couture Creations self-adhesive gemstones, Stampendous Cotton White Fun Flock mixed with white glitter, Nuvo Glitter Drops - White Blizzard, Pitt Artist pen - Walnut Brown, Ranger Inkssentials white gel pen, cardstock: teal, white card base, teal glitter, white glitter
Dies: Kaisercraft Mini Snowflakes DD446, Lifestyle Nesting Circles, Lawn Fawn Slide-on-over LF1202
Hi everyone
Just stopping in to share the Halloween card that I gave to my daughter. It's not often that I start and finish a card on the same day - but I knew exactly what I wanted to do and CASEd the layout and basic design from THIS card that I originally saw on someone's blog but made a few changes:

I have been recently playing around with doing Galaxy Distress Ink backgrounds and thought I would try one using Halloween colours ie: orange, green, purple and black - so I chose Carved Pumpkin, Wilted Violet, Twisted Citron and Black Soot. I smooshed the inks onto my craft mat and sprayed them with water then dabbed them onto my Ranger watercolour cardstock with a large round paintbrush. I didn't want to dip the cardstock into the colours as I would normally do because I knew the colours would turn a muddy brown if they mixed too much together. I did several layers and dried each layer off with my heat gun.
I used my Ranger round ink blending tool and Black Soot Distress Ink and went over the whole piece then dried it off again with my heat tool. Galaxy backgrounds always look like a hot mess before you add the stars but you just have to keep going and not be tempted to bin it! I spritzed the cardstock with clean water and blotted it up with a paper towel then splattered the cardstock using watered-down white acrylic paint and an old toothbrush then dried the panel off again with my heat-gun.
All the images and the sentiment are from the Lawn Fawn stamp/die set 'Spooktacular'. I stamped the images onto Ranger watercolour cardstock using Ranger Archival Jet Black ink and coloured them with Derwent Inktense pencils and a #2 round paintbrush. I added Clear Wink of Stella to the ghost, fangs on the bat, the eyes and mouth on the pumpkin and the moon - alas, not captured by the camera.
The sentiment was stamped using Versamark Watermark ink and heat-set using Stampin' Up White embossing powder. The designer paper for the side panel is by Graphic 45 - Abracadabra from their 'An Eerie Tale Collection' from 2014 and was diecut using a My Favorite Things Stitched Interactive Window Trio die and my Big Shot. Because this die only diecuts 3 sides of the square and the 4th is just a crease line, I trimmed this line with my craft knife. The squares are meant to be like a peek-a-boo window that you open up. I like how the die cuts the stitching detail on the outside of the window for a bit of interest. I rounded the corners of the panel using a 1/8" Corner Chomper.
I tied on the Darice twine then glued the green panel and the moon to my galaxy background using Tombow Mono Multi glue then glued the images inside and just tucked them into the panel as the glue was still wet which made it easy.
Lastly, I glued the finished panel to a dark purple card base.
Thanks for stopping by!
Jocelyn
Card Recipe:
Stamps: Lawn Fawn Spooktacular LF698
Ink: Versamark Watermark, Ranger Archival Jet Black, Ranger Distress inks - Carved Pumpkin, Wilted Violet, Twisted Citron, Black Soot
Designer Paper: Graphic 45 Abracadabra - An Eerie Tale Collection (2014) 12" x 12"
Dies: Lawn Fawn Spooktacular LFT699, My Favorite Things Stitched Interactive Window Trio MFT-741
Accessories: Big Shot, Darice Hemp twine, Derwent Inktense pencils, paintbrushes, Tombow Mono Multi glue, heat-gun, Stampin' Up white embossing powder, embossing buddy, Couture Creations non-stick craft mat, JoSonja white acrylic paint, old toothbrush, WRMK Corner Chomper, Wink of Stella clear glitter brush, cardstock - deep purple, Ranger watercolour
Hi everyone
Thought I would stop in and share a card that I made for my husband:

The adorable teddy bear driving the vintage car is a Topper by Docrafts from their Wellington Bear collection which was released a few years ago. I have always loved this range for masculine cards and used the range many, many times over the last couple of years.
The designer papers are really old. I picked them up from my local Kaisercraft Clearance Centre a few years ago and they matched the image perfectly: love it when that happens :-)
This card is also my entry for the CraftyHazelnut's Patterned Paper Challenge for October. The challenge is all about using patterned papers that we have been "saving" and you can enter any creation on which patterned paper/card has been used. The challenge is open worldwide :-) Please see this link for more details on the challenge.
All the layers were trimmed to 1/16" using my Perfect Layers Tools.
The grey-brown cardstock on the side panel was dry embossed using my Big Shot and Cuttlebug (Provocraft) Argyle embossing folder which I thought tied in nicely with the design on the ribbon. I used my old favourite Fiskars Threading Water punch to punch the blue cardstock then tied on the ribbon which came from Riot Art and Craft. I added Fray Stop to the cut ends of the ribbon because it frays terribly even if you handle it carefully. The panel was popped up on dimensionals. The main image panel was also popped up on dimensionals.
The sentiment is also from the Wellington Bear collection and I added two tiny hearts by using my EK Success Arrows border punch (the leftover punchies look like tiny hearts) with some papers in the collection.
I added 3 blue buttons using Crafter's Pick Incredibly Tacky glue after first sewing some matching thread through the buttons (I don't like 'naked' buttons on my cards!). Lastly, I glued down the card front to a white card base using Tombow Mono Multi glue.
The finished size is 8-1/4" x 3-7/8" or 210mm x 98mm and fits into a standard (Australian) sized business envelope. It was nice to make a different sized card to the norm.
Thanks for visiting my blog today.
Jocelyn
Card Recipe:
Stamps and Ink: None
Designer Paper: Kaisercraft Pets Paradise 12" x 12" (retired)
Accessories: Docrafts Wellington Bear Topper and Sentiment (retired), Docrafts Mini Buttons - Blueberry Pie x 3, blue sewing thread, Multicraft Imports SR108J blue ribbon (Riot Art and Craft), Fray Stop, dimensionals, Crafter's Pick Incredibly Tacky blue, Tombow Mono Multi glue, Big Shot, Cuttlebug (Provocraft) Argyle embossing folder, Perfect Layers Tools, cardstock: grey-brown, mid-blue, white card base
Punches: Fiskars Threading Water border, EK Success Arrows border
Hi everyone
Today I am sharing a birthday card that I made for my daughter using a retired Elzybells stamp set called "Teddy Surprise" - but Penny Black brought out a set using all but one of the images on my card which is called "Wishes and Hugs" PNY-CS-30222 which is fantastic. I am super-happy that some of the Elzybells images are still available: I still adore them as much as I did when I first started cardmaking years ago 😁 The only image that is missing from the set is my first image ie: just the present.


This is also my card for the following Challenges:
Cute Card Thursday - Challenge 484 - Anything Goes
Crafty Catz - Challenge 377 - Anything Goes with an Optional Twist of Embossing - dry and/or heat. I used dry embossing.
Little Red Wagon - Challenge 400 - Three of a Kind - it can be three identical items or three items of a similar kind. My three items are the 3 images as well as the 3 presents.
I stamped the images using Ranger Archival Jet Black ink onto Ranger Watercolour cardstock and coloured them (other than the presents) using Derwent Inktense pencils + Faber-Castell watercolour pencils and a #2 round paintbrush. I went around the images with a light blue watercolour pencil and faded the colour out.
I inked up just the presents then restamped on my designer paper so I could paper-piece the presents. The paper came from Riot Art and Craft and is by My Memories and I used the flip-side to paper-piece the presents. I coloured the circles with a dark purple watercolour pencil. I also re-stamped the bear's paws on image #2 and popped them up on dimensionals so they were higher than the present and looked more realistic. I went around all the images with a black marker to hide any white lines/my uneven cutting. Here is a close-up of the 2nd image:

I thought it would be fun to have a "lift-up" panel on the card front as my take on the trendy interactive cards. The dry embossing is my old favourite Cuttlebug embossing folder called Swiss Dots which I embossed using my Big Shot.
Lawn Fawn recently came out with a stamp and die set called "Push Here" which has all that you need for when you make interactive cards and want to let the recipient know what to do with their card - so I used the "Open Here" stamp with the half-circle stitched die which you can see in the 1st photo.
I trimmed all the card layers to either 1/16" or 1/8" using my Perfect Layers Tools. I used my EK Success Arrows border punch to punch tiny little hearts (if you a regular reader of my blog, you know that the leftover punchies look like tiny hearts to me!) and popped them around the 2nd image and the image inside the card.
The inside dry embossing is also an old favourite Cuttlebug folder called Happy Birthday which is still readily available or there are several other brands of similar embossing folders.
I added the lilac organza ribbon in 2 separate elements and the bow itself was made using my Bow Easy. I added Fray Stop to the cut ends to stop them from fraying.
Of course, everything got the glitter-treatment from my Stampin' Up Dazzling Details glitter glue: the circles and bows on the presents, butterflies, tiny hearts, balloons, teddy's cheeks and confetti.
I went over parts of the images with a Copic black fine multiliner pen to darken some of the black lines especially the eyes, nose and mouth. Here is a close-up of the inside image:

Do you still visit blogs on a regular basis? With so many online sharing platforms these days such as Instagram, Flickr, Pinterest, Facebook, You-Tube etc., I sometimes wonder how much blogs have perhaps taken a back seat compared to years ago when I first started this blog. Perhaps people are more interested in seeing the finished product and not necessarily interested in the process of how it was made(?). I know my viewing habits have changed in the past couple of years and I watch more You-Tube than I do television. I also love to share my garden/nature/sky/cat photos on Instagram which I joined about 18 months ago. You just run out of time to look at everything otherwise you would be online 24/7 and never do anything else! Let me know your thoughts in a comment 😀
Thank you for visiting my blog today!
Jocelyn
Card Recipe:
Stamps: Elzybells Teddy Surprise 20-016-CC clear set (retired), Lawn Fawn Push Here
Ink: Ranger Archival Jet Black
Designer Paper: My Memories #169960 (Riot Art and Craft)
Accessories: Derwent Inktense + Faber Castell watercolour pencils, #2 round paintbrush, Cardstock - lilac, purple, Ranger Watercolour cardstock, Copic fine black multiliner pen, Perfect Layers Tools, Stampin' Up Dazzling Details glitter glue, Cuttlebug (Provocraft) Happy Birthday 37-1133 + Swiss Dots 37-1604 embossing folders, Big Shot, Scor-Pal, dimensionals, Kokuyo Dotliner 8.4mm tape runner, Tombow Mono Multi glue, lilac organza ribbon, Bow Easy, Fray Stop
Dies: Lawn Fawn Push Here
Punches: EK Success Arrows border
Hi everyone
Today I am sharing a card that I made for my daughter for Easter which I made on Easter Saturday.

This is also my card for the following Challenges:
Crafty Catz Challenge #366 - Anything goes with an optional twist of Animals
Splitcoaststampers - Free for All F4A369 - Think Spring
The adorable images (other than the butterfly) are by Memory Box from their Springtime Bunnies and Birthday Bunnies stamp sets. Specifically, the bow and the carrot are from the Birthday Bunnies set and the eggs, both bunnies, basket of eggs and sentiment are from Springtime Bunnies. I have had these 2 sets for a while and been itching to make a card with them. The butterfly and the trail are from the Lawn Fawn Chirpy Chirp Chirp set.
I stamped the images onto Ranger Watercolour cardstock using Ranger Archival Jet Black ink then coloured the images using Derwent Inktense pencils and a #2 round paintbrush. I have been very out-of-practice doing any colouring of late so I had a few attempts before I was happy with the final result. I diecut all the images with the matching dies.
The sky and lawn are from the latest release 6" x 6" pad by Lawn Fawn - Watercolour Wishes. I diecut the lawn using a Lawn Fawn Simple Stitched Hillside border die then attached it to the sky then ran it through my Bigshot using a Lawn Fawn Stitched Rectangle die.
I drew on a few extra lines of my butterfly trail with a Copic black multiliner pen as the stamped line wasn't quite long enough.
The rainbow paper is also by Lawn Fawn - Perfectly Plaid Rainbow from their 6" x 6" pad. I diecut the bottom using a Lawn Fawn Stitched Scallop borders die just to add a bit of interest.
The twine is from KMart (Australia) which came in a pack of 5 plain colours. It's very thin compared to other twines but I really like the colours Lastly, I added some sparkle using a Wink of Stella Clear glitter brush to all the eggs, bow, butterfly and the bunny cheeks - which as always, is very hard to see in the photo but looks really pretty in real life :-) The eggs are popped up on dimensionals.
Thanks for visiting my blog today!
Jocelyn
Card Recipe:
Stamps: Memory Box - Springtime Bunnies and Birthday Bunnies, Lawn Fawn - Chirpy Chirp Chirp
Ink: Ranger Archival Jet Black
Designer Paper: Lawn Fawn Watercolour Wishes and Perfectly Plaid Rainbow 6" x 6" pads
Accessories: Big Shot, Tombow Mono Multi glue, dimensionals, twine (KMart), Wink of Stella Clear Glitter brush, Copic black multiliner, Derwent Inktense pencils, #2 round paintbrush, Ranger watercolour cardstock
Dies: Memory Box - Springtime Bunnies and Birthday Bunnies, Lawn Fawn Chirpy Chirp Chirp, Lawn Fawn Simple Stitched Hillside Borders, Lawn Fawn Stitched Rectangle, Lawn Fawn Stitched Scallop Borders die









.jpg)


