Showing posts with label Gift Boxes. Show all posts
Friday, July 17, 2026
Kaisercraft Joyful Gift Box - Stocking Stuffers/Fillers
Hi everyone,
It's Christmas in July and I am sharing another of my Splitcoaststampers Fan Club Design Team Projects now that my 6 month term finished in May. You can start sharing your projects online 6 months from when they first went live on Splitcoaststampers. These Stocking Stuffers/Stocking Fillers were a suggested project for the December Central Theme of Stockings by the Fireplace.
Of course, you could also use these as a Mini Gift Box:
I bought a bunch of 3" x 3" White Gift Boxes from Amazon and got to work to decorate them. I bought 40 for $20 - which is 50 cents each - so very economical.
I used Kaisercraft's Joyful Designer Papers and Collectables which is a 2025 release plus matching Kaisercraft Cardstock.
For the Green Box, I diecut a circle from Jungle Cardstock using a My Favorite Things Pierced Circle STAX die and my Big Shot then glued on the wreath which is from the Collectables. The sentiment is from the back of the paper pad. Kaisercraft's paper pads have always have a bunch of sentiments at the back which I really love. I added some height by gluing on some scraps of white cardstock underneath the green circle.
Lastly, I added some Wink of Stella Clear Glitter Brush to the box and berries on the wreath.
For the Rose Box top, I glued on a wreath from the Collectables but popped it up on scraps of white cardstock, then added Wink of Stella Clear Glitter Brush to the berries and on the sentiment
On the inside of the boxes, I glued on a Collectable and added more Wink of Stella:
As you can see from the photo, the box is the perfect size for a set of earrings.
Finished size is 3" x 3" with a depth of 1-3/16" - or 76mm x 76mm with a depth of 30mm.
Thanks for stopping by!
Jocelyn
Green Stocking Stuffer/Filler - Gift Box Recipe:
Stamps and Ink: None
Designer Paper: Kaisercraft Joyful 6-1/2" x 6-1/2" Paper Pad + Joyful Collectables
Accessories: 3" x 3" Blank White Box, Big Shot, Tombow Mono Multi Glue, Wink of Stella Clear Glitter Brush, Scraps of White Cardstock, Kaisercraft Jungle Cardstock
Dies: My Favorite Things Die-namics Pierced Circle STAX
Rose Stocking Stuffer/Filler - Gift Box Recipe:
Stamps and Ink: None
Designer Paper: Kaisercraft Joyful 6-1/2" x 6-1/2" Paper Pad + Joyful Collectables
Accessories: 3" x 3" Blank White Box, Tombow Mono Multi Glue, Wink of Stella Clear Glitter Brush, Scraps of White Cardstock, Kaisercraft Rose Cardstock
Labels:
Christmas,
Die-namics dies by MFT,
Gift Boxes,
Kaisercraft,
Kaisercraft Collectables,
SCS Fan Club DT Cards,
Stocking Fillers,
Stocking Stuffers
Saturday, April 29, 2023
Stampin' Up Beautiful You 21st Birthday Card and Gift Box
Hi everyone 😊
Today I am sharing a card and gift box that I made for my niece's 21st birthday. My niece had a party in a restaurant which I thought was a great idea when there are alot of people invited. Much easier to cater for and you don't have to clean up afterwards LOL! My husband and daughter went along but I didn't due to my never-ending fatigue from long-COVID and I didn't want to be a wet blanket and ask to go home after just an hour of being there. I was disappointed that I couldn't go but at least people are understanding of how debilitating long-COVID can be.
The main image and sentiment are from a retired set by Stampin' Up called Beautiful You. I adore this stamp set and one that I will never part with. I stamped the image using Versafine Onyx Black ink onto Ranger watercolour cardstock and coloured it with Lyra watercolour pencils and a #2 round paintbrush. I think it took me about 3 minutes to colour it! I diecut the image using my Big Shot and a Lifestyle Nesting Circle die and layered it onto the peach designer paper then diecut a scalloped circle from the darker blue designer paper.
All the papers are my Mintay - Harmony. Aren't the colours gorgeous?!
For the LHS panel, I dry embossed the peach designer paper with a retired Cuttlebug Textile embossing folder. I have really been enjoying using my embossing folders again. They kind-of fell out-of-favour for quite a few years but with all the amazing 3D embossing folders now available, they are back on-trend. The blue designer paper was punched using a Martha Stewart Lace Doily edge punch. I tied on some peach organza ribbon then threaded some peach/gold twine through a gold heart charm and glued that underneath the organza ribbon using fabric glue. The twine came in a pack of 6 from KMart.
The sentiment panel was diecut using a retired Spellbinders Shapeabilities Labels Trio die and popped up on dimensionals.
The peach diamantes on the top RHS I bought on EBay ages ago. It was a bulk lot of all sorts of colours. I glued them on using Helmar 450 glue.
Once I had finished the card front, I glued it onto a white card base using Tombow Mono Multi glue.
I decorated the card inside too. Please excuse the quality of the image but I took it very late in the afternoon and the light was dreary and no amount of editing seemed to improve it much. Oh well!
The sentiment is also from the Beautiful You stamp set. I added a strip of leftover designer paper then added the stickers on the LHS from the Mintay Harmony Cardboard Sticker sheet.
Here is the gift box:
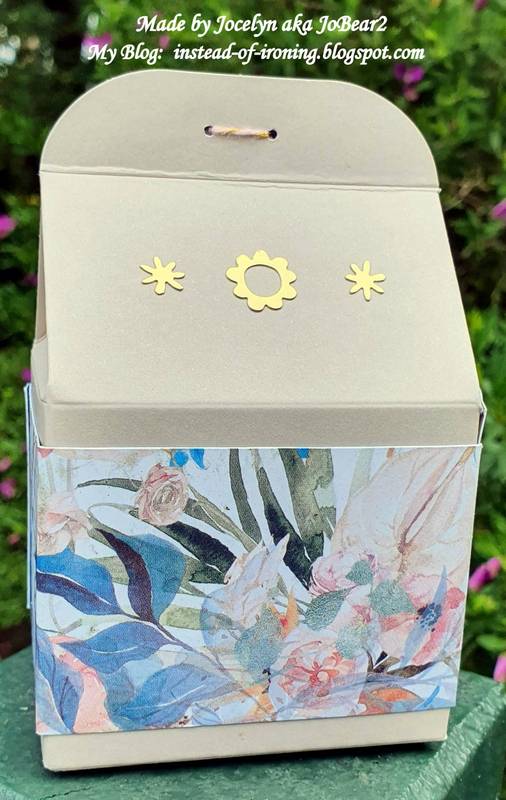
This was a last-minute make so by the time I finished it to photograph it, the light was terrible for photographing. The box is by Stampin' Up and has been in my stash forever and retired. I wrapped some designer paper around the box then punched two tiny holes using a retired Stampin' Up 1/16" Hole Punch. I bought this punch on clearance and it is very handy when you only want a tiny hole in something. I threaded the peach/gold twine through the holes. The sentiment is also from the Beautiful You stamp set. I diecut the sentiment using a Spellbinders Oval Nestabilities die and popped it up on dimensionals. I ended up stamping the sentiment 3 times after smearing it when I diecut it because I was too impatient to let it dry! Amazing how you just don't think when you are under time-pressure! The gold stickers are also from Stampin' Up but long retired.
Here is another photo of the box from the side:
And a photo of the back:
I popped a pair of earrings in a small organza bag into the box and nestled them in some gold tissue paper. I bought the earrings from my local Pharmacy which has some beautiful giftware but they didn't come in a box so I had to put my thinking cap on for how to wrap them and to make them look elegant. I was really pleased with how the box turned out and I love how the box matches the card.
Thanks for stopping by!
Jocelyn
Card Recipe:
Stamps: Stampin' Up Beautiful You (retired)
Ink: Versafine Onyx Black
Designer Paper: Mintay Harmony 6" x 6" paper pad + 12" x 12" papers + Sticker Sheet
Accessories: Big Shot, Cuttlebug Textile embossing folder (retired), gold heart charm (stash), 1" wide peach organza ribbon (stash), peach/gold twine - KMart, Lyra watercolour pencils, #2 round paintbrush, dimensionals, Helmar 450 glue, Tombow Mono Multi glue, fabric glue, peach diamantes, Wink of Stella clear glitter brush, white card base, Ranger watercolour cardstock
Dies: Spellbinder Shapeabilities S3-147 Labels Trio (retired), Lifestyle Nesting Circles + Scalloped Circles
Punches: Martha Stewart Doily Lace Edge
Gift Box Recipe:
Stamps: Stampin' Up Beautiful You (retired)
Ink: Versafine Onyx Black
Designer Paper: Mintay Harmony 6" x 6" paper pad
Accessories: Stampin' Up Kraft Gift Box (retired), Stampin' Up gold stickers (retired), Stampin' Up 1/16" hole punch (retired), Big Shot, doublesided tape, dimensionals, peach/gold twine - KMart, white cardstock scrap
Dies: Spellbinder Scalloped Oval Nestabilities
Labels:
21st Birthday,
Big Shot,
Birthday,
Cuttlebug,
Cuttlebug Embossing Folders,
Feminine,
Gift Boxes,
Lifestyle Dies,
Mintay,
Nestabilities,
Spellbinder,
Stampin' Up,
Watercolour pencils,
Watercolouring
Saturday, April 19, 2014
Happy Knitted Easter Wishes
Hi blogging friends
Happy Easter everyone!
I have been a busy little bee putting the finishing touches to some Easter gifts and an Easter card for my daughter. I have been knitting some ducklings after I go to bed at night so I could hide what I was knitting for her. It was sooooo hard to get decent photos today because the weather turned cold and it was so dull but I hope you like my creations.
First up, here is the yellow duckling:
The pattern is out of a book by Jane Bull called "Crafty Creatures" published in 2013 - which is meant to be a craft book for kids but I really love it. I originally borrowed the book out of my local Library but my daughter and I loved it so much that I bought the book. I have quite a number of books by Jane Bull and always found them detailed and well-written. Anyway, I have had my eye on the knitted ducklings in the book and thought they would be fun for Easter. It is simple garter stitch and knitted in one piece using 8 ply yarn and the pattern was very easy to follow and was quick.
Once you finish your knitting, you simply sew it up and stuff just the head but leave the rest of the duck because you put in your Easter egg through the bottom to fill the gap: a fun little surprise! I glued on the felt beak and the 4mm bead eyes with Fabric glue. Here is a pic of the bottom filled with an Easter egg:
Because my daughter loves rainbows, I knitted a duck with rainbow yarn as well just for a bit of fun:
Then all I had to do was decorate the baskets:
The baskets, little chicks, green and yellow shredded paper (and the Easter eggs which are at the bottom of the box) all came from Woolworths - the yellow ribbon is from my stash. Here is a pic of the closed box:
My daughter will get a nice little surprise when she opens her boxes tomorrow!
And now here is my knitted baby duckling:
Isn't he cute? The pattern came out of the Jean Greenhowe Knitted Animals booklet and was knitted in 8 ply yarn. This was my first time knitting from one of her patterns and it was really easy to follow and understand. I have already started knitting another project from the booklet as they are great little projects to do when I watch TV at night.
The little white bucket also came from Woolworths and is very tiny - about 3 inches or 7.5 cm high and again, I just filled it with some shredded tissue paper.
Because the bucket came in a set of 3, I decorated another one with Easter eggs and a cute little bunny bottom on one side - a CASE of one that Sue Nelson did way back in 2007 which you can see here at her gallery at Splitcoaststampers (please note if you are not a member of SCS, you may not be able to see Sue's sample).
I used a Lifestyle Nesting Circle die, a Spellbinders Nesting Oval die and heart punches to do mine. I did two layers of the hearts for mine and glued on a yarn pom-pom. Here is a side view:
Thanks for visiting my blog today! On my next post, I will be sharing the Easter card that I made for my daughter. Stay tuned!
Jocelyn
Knitted Duck Recipe:
Pattern: From Crafty Creatures book by Jane Bull
Yarn: 8 ply knitted with 4mm needles
Accessories: 4mm black beads, felt, fabric glue, wool needle, stuffing, Easter takeout boxes (Woolworths), green + yellow shredded tissue paper (Woolworths), ribbon (stash), coloured chicks (Woolworths)
Knitted Baby Duck Recipe:
Pattern: From Jean Greenhowe's Knitted Animals booklet
Yarn: 8 ply yellow and white yarn knitted with 3mm needles (makes a denser knitted finish than 4mm)
Accessories: black yarn (for eyes), wool needle, stuffing, white bucket (Woolworths), ribbon (stash), green + yellow shredded tissue paper (Woolworths)
White Bucket decorated with Bunny Bottom:
Accessories: white bucket (Woolworths), green + yellow shredded tissue paper (Woolworths), Big Shot, Lifestyle Nesting Circles die, Spellbinder Oval Nestabilities die, Carl CP-2 Heart duo punch, Carl CP-1 heart punch, yarn pom-pom (Riot Art and Craft), cardstock - white, pink
Happy Easter everyone!
I have been a busy little bee putting the finishing touches to some Easter gifts and an Easter card for my daughter. I have been knitting some ducklings after I go to bed at night so I could hide what I was knitting for her. It was sooooo hard to get decent photos today because the weather turned cold and it was so dull but I hope you like my creations.
First up, here is the yellow duckling:
The pattern is out of a book by Jane Bull called "Crafty Creatures" published in 2013 - which is meant to be a craft book for kids but I really love it. I originally borrowed the book out of my local Library but my daughter and I loved it so much that I bought the book. I have quite a number of books by Jane Bull and always found them detailed and well-written. Anyway, I have had my eye on the knitted ducklings in the book and thought they would be fun for Easter. It is simple garter stitch and knitted in one piece using 8 ply yarn and the pattern was very easy to follow and was quick.
Once you finish your knitting, you simply sew it up and stuff just the head but leave the rest of the duck because you put in your Easter egg through the bottom to fill the gap: a fun little surprise! I glued on the felt beak and the 4mm bead eyes with Fabric glue. Here is a pic of the bottom filled with an Easter egg:
Because my daughter loves rainbows, I knitted a duck with rainbow yarn as well just for a bit of fun:
Then all I had to do was decorate the baskets:
The baskets, little chicks, green and yellow shredded paper (and the Easter eggs which are at the bottom of the box) all came from Woolworths - the yellow ribbon is from my stash. Here is a pic of the closed box:
My daughter will get a nice little surprise when she opens her boxes tomorrow!
And now here is my knitted baby duckling:
Isn't he cute? The pattern came out of the Jean Greenhowe Knitted Animals booklet and was knitted in 8 ply yarn. This was my first time knitting from one of her patterns and it was really easy to follow and understand. I have already started knitting another project from the booklet as they are great little projects to do when I watch TV at night.
The little white bucket also came from Woolworths and is very tiny - about 3 inches or 7.5 cm high and again, I just filled it with some shredded tissue paper.
Because the bucket came in a set of 3, I decorated another one with Easter eggs and a cute little bunny bottom on one side - a CASE of one that Sue Nelson did way back in 2007 which you can see here at her gallery at Splitcoaststampers (please note if you are not a member of SCS, you may not be able to see Sue's sample).
I used a Lifestyle Nesting Circle die, a Spellbinders Nesting Oval die and heart punches to do mine. I did two layers of the hearts for mine and glued on a yarn pom-pom. Here is a side view:
Thanks for visiting my blog today! On my next post, I will be sharing the Easter card that I made for my daughter. Stay tuned!
Jocelyn
Knitted Duck Recipe:
Pattern: From Crafty Creatures book by Jane Bull
Yarn: 8 ply knitted with 4mm needles
Accessories: 4mm black beads, felt, fabric glue, wool needle, stuffing, Easter takeout boxes (Woolworths), green + yellow shredded tissue paper (Woolworths), ribbon (stash), coloured chicks (Woolworths)
Knitted Baby Duck Recipe:
Pattern: From Jean Greenhowe's Knitted Animals booklet
Yarn: 8 ply yellow and white yarn knitted with 3mm needles (makes a denser knitted finish than 4mm)
Accessories: black yarn (for eyes), wool needle, stuffing, white bucket (Woolworths), ribbon (stash), green + yellow shredded tissue paper (Woolworths)
White Bucket decorated with Bunny Bottom:
Accessories: white bucket (Woolworths), green + yellow shredded tissue paper (Woolworths), Big Shot, Lifestyle Nesting Circles die, Spellbinder Oval Nestabilities die, Carl CP-2 Heart duo punch, Carl CP-1 heart punch, yarn pom-pom (Riot Art and Craft), cardstock - white, pink
Labels:
Big Shot,
Easter,
Gift Boxes,
Knitting,
Lifestyle Dies,
Spellbinder
Subscribe to:
Posts (Atom)