Showing posts with label Impression Obsession. Show all posts

Sunday, September 13, 2026

Stamp-It Australia Windward Nautical Masculine Card

 
Hi everyone,

I am still making my Nautical Cards in-between other projects that I am working on.  I just love making nautical themed cards for men and really enjoy the process so much - and here is what I made:


Challenges

This is also my card for the following challenges - click on the underlined link to take you to the challenge:
  • Splitcoaststampers - USEIT2026 - Use something old or neglected from your stash
  • Crafty Catz - #719 - Anything Goes
  • Little Red Wagon - #875 - Use a Stamp
The main image is a very old Stamp-It Australia stamp called Windward which dates back to 1998.  I really miss Stamp-It Australia as they had such a large and diverse range of stamps.  They are still in business but no longer make stamps for cardmaking.

I stamped the ship using Versafine Vintage Sepia Ink onto Ranger Watercolour Cardstock.  The ship was coloured using a variety of mediums - Derwent Inktense Pencils, Lyra Watercolour Pencils and Zig Clean Color Real Brush Markers.  

I extended the sea further down because it looked weird when I diecut it to have a blank area.  I added whitecaps to the ocean using a White Gel Pen and smeared it a little with my finger to help it blend in.

I went over some of the brown lines using a Brown Copic Multiliner - mostly on the body of the ship and the mast to darken up the wood and give it a little more definition.

I layered the main image onto American Crafts Kraft Cardstock then Kaisercraft Shadow Cardstock, then ink blended around the panel using Hero Arts Soft Sand Shadow Ink - as are all the layers on my card.

The designer papers are by Kaisercraft Sandy Toes which was first released in 2014 so are old.

The Navy Blue Grosgrain Ribbon I saved from an old gift bag that was being thrown out.  It was added in 2 separate elements because it is easier for me that way so that it sits nicely on the card.  I added some Fray Stop to the cut ends to stop them from fraying.

The sentiment is from the back of the Sandy Toes Paper Pad and was popped up on scraps of white cardstock.

The red hearts were diecut from Red Cardstock using an Impression Obsession Heart of Hearts Die which I've had for many years.  I love it because it diecuts lots of different hearts:


I added some Uniquely Creative Clear Sparkle Brush to the hearts plus the red flags on the ship as well as the whitecaps on the ocean.

Once I had finished my card front, I glued it to a Kaisercraft White Card Base using Tombow Mono Multi Glue.

Finished size is 5-1/2" x 5-1/2" or 140mm x 140mm.

I think you could use this card for a Birthday or a Wedding Anniversary or Father's Day.

Thanks for visiting my blog today.

Jocelyn


Card Recipe:

Stamps:  Stamp-It Australia Windward 1073G Self-Cling Rubber Stamp (1998 & retired)

Ink:  Versafine Vintage Sepia, Hero Arts Soft Sand Shadow

Designer Paper:  Kaisercraft Sandy Toes PP957 6-1/2" x 6-1/2" Pad (2014)

Accessories:  Big Shot, Zig Clean Color Real Brush Markers, Derwent Inktense + Lyra Watercolour Pencils, #2 & #4 Round Paintbrushes, Copic Brown .005 Multiliner, Uniquely Creative Clear Sparkle Brush, White Gel Pen, Tombow Mono Multi Glue, Navy Blue Grosgrain Ribbon, Fray Stop, Ink Blending Tool with Domed Pad, Cardstock - Kaisercraft Shadow + American Crafts Kraft + Scraps of White & Red, Ranger Watercolour Cardstock, Kaisercraft White Card Base

Dies:  Impression Obsession Heart of Hearts DIE052-I (retired), Lifestyle Nesting Circles (retired)


Tuesday, June 16, 2026

Uniquely Creative Indigo Bloom Wedding Card

 
Hi everyone,

Today I am sharing a Wedding Card that I made for my daughter's friends.  I don't have alot of things in my stash for wedding cards and really didn't want to go for a white card as I didn't think it suited this couple.  The lady is so bright and bubbly and full of joy - she just glows - so I wanted to make something more colourful but was a little stumped.  Whilst looking through my stash, I realised that my Uniquely Creative Retailer Exclusive Kit would be perfect as the kit has two different cards and here is what I made:


I am popping this card into the Splitcoaststampers June Central Theme CT0626 Fan Club Challenge of 'A More Perfect Union'.  You have to be a member to play along in these challenges - but I highly recommend joining as you get loads of inspiration each month, suggested tutorials to spark your creativity, lots of support and encouragement and it's so nice to be a part of a fun group.  The central theme is open to your own interpretation so you can use it as a tool to jump-start your card.  I chose a Wedding Card as my interpretation but you could choose two colours that you love to create with or paper quilting - let your head go!

I based my layout on the suggested design from the Uniquely Creative Sheet but added quite a few touches of my own or altered some elements just to put my own spin on it.

The scalloped pink square on the card base was diecut using my Big Shot and Lifestyle Nesting Scalloped Squares Dies as I didn't have the Uniquely Creative Die listed in the instructions.  I also changed some of the flowers and added the Small Pink Paper Roses from my stash - plus more of the Uniquely Creative Delicate Lace Flowers.

I used my Uniquely Creative Fussy Cutting Scissors to fussy-cut some of the elements.  I LOVE these scissors because they are gentle on my arthritic hands.

I used a different sentiment from the kit because the one in the kit had the sentiment:  "lost in time" and used a Best Wishes Sentiment from a Uniquely Creative Cut-a-part Mini Sheet I found in my stash.

I used my Impression Obsession - Heart of Hearts Die to diecut some small hearts from Glitter Cardstock to dot around the card and thought that the blue and pink hearts next to the sentiment suited a Wedding Card.  I used Stampin' Up Dazzling Diamonds Glitter Cardstock and coloured it with Picked Raspberry Distress Ink to match the rest of the card.  The blue heart is from a scrap of Dark Blue Glitter Cardstock.

I had lots of fun layering all the elements together and learning along the way as this isn't a style of card I am used to making but gosh, I really enjoyed it.  I have been making myself get out of my comfort-zone whilst I have been on the Splitcoaststampers Dirty Dozen Design Team and it has really helped me be more brave and more creative.

I added some Uniquely Creative Clear Sparkle Brush to many areas of the card so it looks lovely and sparkly in real life - alas, not captured by the camera.

As a final touch, I glued on 3 x Clear Domed Gems around the card using Art Glitter Glue.  These were purchased from EBay Australia a few years ago.

Finished size is 135mm x 135mm or 5-5/16" x 5-5/16".

Thanks for visiting my blog today.

Jocelyn


Card Recipe:

Stamps:  None

Ink:  Ranger Distress Ink - Picked Raspberry

Designer Paper:  Uniquely Creative Indigo Bloom 12" x 12" + Cut-a-Part Sheet UCCS192

Accessories:  Big Shot, Stampin' Up Dazzling Diamonds Glitter Cardstock, Dark Blue Glitter Cardstock, UC Delicate Lace Flowers UCE1849, UC Delicate Layering Flowers UCE2112, UC Blue and Blush Flowers UCE2113, UC Pearl Posy Stickers - Pink UCE1968, UC Fussy Cutting Scissors, UC Foam Mounts, UC Clear Sparkle Brush, Sentiment - UC Cut-a-Part Sheet, Small Pink Paper Roses (stash), Tombow Mono Multi Glue, Art Glitter Glue, Helmar's 450 Quick Dry Adhesive, Domed Clear Gems (EBay)

Dies:  Uniquely Creative Stitched Nesting Hexagons UCD2199, Lifestyle Nesting Squares and Nesting Scalloped Squares (both retired), Impression Obsession Heart of Hearts DIE052-I (retired)


Friday, March 6, 2026

Penny Black Fetching Slippers Masculine Retirement Card


Hi everyone,

* I just found out that my card was Top 3 at Crafty Catz Challenge Blog*
** Woo hoo 😀 **
**My card was also picked by Becca over at Critter Crazy Challenges and offered a Guest Designer Role for May - Yippee!**


Last December, we adopted a beautiful 7 years 8 months old Groodle (Golden Retriever - Poodle cross) from a Council pound in a country town several hours away from where we live.  He had been surrendered by his family to the pound which is so incredibly sad and had been there for many months.  We saw his ad on a Pet Rescue website and I just had such a good feeling about him.  I get alot of strong senses about many things and have always been that way since I was little.  I guess they call it a sixth sense (?) but it is more than that - and interestingly, my late Father and his Mother (my Grandmother) were exactly the same.  My Father and I even used to sometimes have the same dream on the same night which used to be quite unnerving to say the least!  I even have senses about someone's imminent passing even when they aren't sick.  Anyway, I am digressing.......  

So we rang up the Council to find out more about the dog and they told us he was good with children and adults and other dogs and not aggressive in any way nor had separation anxiety.  So we made the trip up to see him and oh, he is just the LOVELIEST dog and we couldn't wait to bring him home with us.  Tucker is very gentle and has the sweetest nature - doesn't pull on the lead when you walk him - loves being brushed - honestly, we hit the jackpot.  He just wants to be cuddled and loved.  I also love that he doesn't shed because of the Poodle in him.   Here is a photo of Tucker rocking his bow tie:


Honestly, he is just like a teddy bear!  And who could resist that adorable face?!  We took him to the dog groomer for the first time yesterday and he was brilliant.  The lady who groomed him said he was so friendly and relaxed the entire time and made friends with her friend's dog that was already there and they sat on the mat together like they were besties.  

Now that we are retired, it means we have the time to put into having a dog plus it is good company for my husband when he is pottering around in the garden or garage - or when any of us is outside.  We just adore him and so happy that he now has a fur-ever home.  We are his 3rd family and I really can't imagine how sad he must have been when he was given up not just once, but twice 😢

So, I HAD to make a card to celebrate my husband's retirement with a dog on it - it just seemed so fitting for the occasion!


This is also my card for the following Challenges - click on the underlined link to take you to each challenge:
  • Crafty Catz - #708 - Anything Goes
  • Critter Crazy - #108 - Anything Goes with a featured critter (real or fantasy)
  • Ellibelle's Corner - I Spy with my Little Eye - Something You Love - I chose dogs
  • Splitcoaststampers - Ways to Use It WT1055 - Make it Masculine - this is from a while ago and there are no time limits to play their challenges
  • Crafty Animals - #103 - Anything Goes - Must include an animal but birds, bugs, bees and insects are all OK
The main image is an old stamp from Penny Black - Fetching Slippers - and was stamped onto Ranger Watercolour Cardstock using Versafine Onyx Black Ink.  I tried to colour the dog to look similar to Tucker and to also make the fur look curly.  I used a mix of Watercolour Pencils and Zig Clean Color Real Brush Markers + a Zig Blender Pen.  Check out those cute bunny slippers!  They sure put a smile on my husband's face!  Here is a close-up:


I still had my Basic Grey Max and Whiskers Designer Papers on my desk from a birthday card I made the other day for my BIL - see HERE - so I thought I would use them again.  I do love these papers - Basic Grey had such unique designs and I really miss them.

I went over the black lines on the main image using an Anko 0.05 Black Pigment Pen to darken up the lines after my colouring.  I diecut the image using a Quickutz Nesting Card Templates Die and my Big Shot - then layered it onto some Blue Designer Paper and then onto Dark Brown Cardstock from my stash.

I added the 1/4" wide Grosgrain Ribbon in two separate elements and glued the knot on using Helmar's Fabric Glue.  I find that attaching the ribbon elements separately saves some ribbon because I don't have to wrap it around my card and the knot sits flatter and just looks neater and better IMHO.

To do the sentiment, I stamped the banner which is from a very old WPlus9 Basic Banner and Die Set (2013) - and fussy-cut around it using my Uniquely Creative Fussy Cutting Scissors, which meant I could then diecut the banner from the Blue Designer Paper so I had a layer underneath it.  It just looked better that way instead of just having just the banner on white cardstock.  I went around the edges with my Anko Black Pigment Brush Pen to hide any imperfections in my fussy-cutting.  The sentiment is by Penny Black - a Bear of all Trades - and went perfectly with the image I thought.  I stamped it using Stampin' Up Chocolate Chip Ink which is a very dark brown and looked better than using black ink.  Yep, retirement is all about "taking it easy".   I diecut the banner again from white cardstock and glued that underneath so I could have a little bit of dimension for the sentiment panel.

The centre panel was popped up on scraps of white cardstock as is the main image panel.

The buttons on the RHS are also by Basic Grey from their Granola Collection released in 2008.  I sewed matching threads through each button then glued them on using Helmar's 450 Quick Dry Adhesive.

The hearts either side of the sentiment were diecut from a Reddish-Orange sheet of Designer Paper using an Impression Obsession - Heart of Hearts Die.  This is a well-used but retired die that has seen alot of love over the years because it diecuts many different sizes and styles of hearts - just perfect for anytime you need a heart:


Once I had finished my card front, I glued it to a Kaisercraft White Card Base using Tombow Mono Multi Glue.

As finishing touches, I added Uniquely Creative Clear Sparkle Pen to the dog collar plus the hearts.

Finished size is 6" x 4-1/8" or 153mm x 105mm.

Thanks for visiting my blog today.

Jocelyn


Card Recipe:

Stamps:  Penny Black Fetching Slippers 2085F + Bear of all Trades 30-108, WPlus9 Basic Banners (2013 - retired)

Ink:  Versafine Onyx Black, Stampin' Up Chocolate Chip (retired)

Designer Papers:  Basic Grey Max and Whiskers 6" x 6" (2009-retired)

Accessories:  Big Shot, 1/4" - 6.5mm wide Grosgrain Ribbon, Buttons - Basic Grey - Granola (2008-retired), Matching Sewing Thread, Needle, Kaisercraft Trimmer, Tombow Mono Multi Glue, Helmar's 450 Quick Dry Adhesive + Fabric Glue, Anko Black Pigment Pen - Brush + 0.05, Zig Clean Color Real Brush Markers + Blender Pen, Watercolour Pencils, #2 Round Paintbrush, Uniquely Creative Clear Sparkle Pen, Uniquely Creative Fussy Cutting Scissors, Cardstock - Ranger Watercolor + Scraps of White Cardstock + Dark Brown

Dies:  WPlus9 Basic Banner WP9D-059#-32557 (retired), Quickutz Nesting Card Templates DC0431 (retired), Impression Obsession Heart of Hearts DIE052-I (retired)

Wednesday, January 28, 2026

Kaisercraft Flower Shoppe Birthday Card

 
Hi everyone,

Well, January has started super-hot.  Yesterday it was 46 deg C here - 115 deg F - and quite a few plants looked bleached when we looked at them today.  We had 46 deg C the other week as well.   I feel sorry for those in the NW of Victoria where it was a record 48.9 deg C - 120 deg F.  I also feel sorry for the birds and other wildlife and wonder how they cope?  Sigh.....I can't WAIT for some cooler days - AND nights!

So, I have been very busy in my Craft Room over January keeping out of the heat and making some Fan Club Design Team Cards for Splitcoaststampers - and other cards for family members.  

One of my all-time favourite releases by Kaisercraft is Flower Shoppe which was released around January 2021.  I just adore the soft colours plus I love anything with flowers on it.  So I whipped up this Birthday Card which I will be giving to my niece:


Lately, I have been making smaller square cards - around 4 to 4-1/4" - spurred on by Ardyth Percy-Robb's small square cards.  If you don't know who Ardyth is, do a search on You-Tube for her Channel - and I have no doubt that you will be incredibly inspired by Ardyth's cards.  She is so clever and creative.

I am entering my card in the following Challenges - click on the underlined link to take you to the Challenge: 
  • Splitcoaststampers - Free for All Friday F4A831 of Feeling a Little Square where you can either make a square card or a card with square elements
  • Crafty Catz - #705 - Anything Goes
The main image is from the matching Flower Shoppe Collectables which I layered onto some matching designer paper, then onto Stampin' Up Crumb Cake Cardstock.  Both of these were diecut using my Big Shot and Nesting Arches Dies.

The hanging baskets just had grey and white flowers and I wanted them to have a bit more life - so coloured some of the flowers with a blue and a peachy coloured Pastel Ohuhu Alcohol Marker.  I bought a set of these Alcohol Markers in a Black Friday sale last year, and gosh, I do love them and the quality is amazing!

I fussy-cut the butterfly using my Uniquely Creative Fussy Cutting Scissors from one of the designer papers and glued down just the centre so I could bend the wings up.  I guess, in hindsight, the butterfly looks quite large compared to the rest of the scene - but I didn't think about it until after I had adhered it.

The sentiment is also from the Collectables.  I diecut some hearts from one of the designer papers using an Impression Obsession Heart of Hearts Die.  I added Wink of Stella Clear Glitter Brush to all the flowers, the butterfly and the hearts on the sentiment.  It's amazing how when you just add a bit of sparkle to your card, it really "lifts" the card.

The bottom panel was punched using an EK Success Scalloped Scallops Border Punch.  I added some White Twine from Stampin' Up then popped the panel up on scraps of white cardstock.

Finished size is:  4-1/8" x 4-1/8" or 104mm x 104mm.

Thanks for visiting my blog today!

Jocelyn


Card Recipe:

Stamps and Ink:  None

Designer Paper:  Kaisercraft Flower Shoppe 6-1/2" x 6-1/2" Paper Pad + matching Collectables

Accessories:  Big Shot, White Twine - Stampin' Up Baker's Twine Essentials Pack #155475, Wink of Stella Clear Glitter Brush, Ohuhu Pastel Alcohol Markers, Tombow Mono Multi Glue, Art Glitter Glue, Uniquely Creative Fussy Cutting Scissors, 1mm dimensionals, Cardstock - Scraps of White + Stampin' Up Crumb Cake

Punches:  EK Success Scalloped Scallops Border

Dies:  Nesting Arches, Impression Obsession Heart of Hearts DIE052-I (retired)


Tuesday, November 18, 2025

Stamperia The Owl's House Christmas Card

 
Hi everyone,

Today I am sharing a Christmas Card that I made using some gorgeous papers by Stamperia - The Owl's House:


Challenges:

This is also my card for the following Challenge -
  • Allsorts - #836 - Christmas or Anything Goes
No stamping on this card - just layering papers and some diecutting.

The main image was trimmed from the 8" x 8" paper pad then layered onto White Cardstock. 

The snowflake side border as well as the woodgrain paper on the card base are also from The Owl's House collection.

The Snowflakes were diecut from Silver Glitter Cardstock using my Big Shot and Impression Obsession Small Snowflake Set.  This is another set that I have had for years and one of my favourites.  I glued down the centres so I could bend up the snowflake arms for a bit of dimension, then added a Kaisercraft Silver Rhinestone to the centres.

The Silver and White Twine is from KMart (Australia) and came in a set but is no longer on their website.

Finishing touches were adding Wink of Stella Clear Glitter Brush to lots of areas on the card including the flames in the fireplace.  Shame it isn't visible in the photo - but it looks so pretty in real life.

Finished size is 4-15/16" x 4-15/16" or 125mm x 125mm.

Thanks for visiting my blog today.

Jocelyn


Card Recipe:

Stamps:  None

Designer Paper:  Stamperia The Owl's House 8" x 8" pad (2025 release)

Accessories:  Big Shot, Kaisercraft Trimmer, Silver and White Twine (KMart), Wink of Stella Clear Glitter Brush, Tombow Mono Multi Glue, Art Glitter Glue, Kaisercraft Silver Rhinestones, Silver Glitter Cardstock, White Cardstock, Kaisercraft White Card Base

Dies:  Impression Obsession Small Snowflake Set DIE 100-F (retired)


Monday, October 27, 2025

Impression Obsession Halloween Hill Mixed Media Card


Hi everyone 😊

Today I am sharing a Halloween Card:

ETA:  I just learned that I made the top 3 over at Craftycatz!  Woo hoo!

I really enjoy making Halloween Cards because it gives me the perfect excuse to play with inky backgrounds to create atmosphere for that type of card.

This is also my card for the following Challenges:
  • Crafty Catz Challenge #703 - Anything Goes with Optional Twist of Halloween
  • C.R.A.F.T. Challenge #766 - Halloween/Anything Goes
I love to blend inks on Bristol Smooth White Cardstock because they just blend like a dream.  First up, I created a mask for the moon from Mylar Film by diecutting a circle from it.  Mylar Film is what some stencils are made from and I bought a pack of sheets on EBay.  You can buy different weights and the one I bought was 190 micron.  I attached it to my cardstock using Repositionable Adhesive.  The good thing about the Mylar Film is that you can wipe off the ink and reuse it.   

The Ranger Distress Inks that I used are:  Dried Marigold, Mustard Seed, Spiced Marmalade, Rusty Hinge, Seedless Preserves, Hickory Smoke and Black Soot - making sure that the RHS was lighter where the moon was.  I removed the mask and used a Tim Holtz Layering Moon Mask and Hickory Smoke Ink to add some detail on the moon - then inked over it very lightly with Mustard Seed Ink.  I used my Heat-Gun to dry off the panel.

The back diecut is an old die by Impression Obsession called Halloween Hill.  I have had this die for many years and it has always been a favourite of mine.  I used Anko Black Cardstock which I bought in a pad of neutral tones from KMart (Australia).  I inked up some scrap white cardstock with Mustard Seed and added that to the windows of the house - then used Wild Honey for the pumpkin face. 

The front diecut is by Memory Box - Graveyard Landscape which dates back to 2012.  I popped the diecut up on several layers of scrap black cardstock so that it gave the illusion of depth.

The white ghosts are another die by Memory Box - Ghastly Ghosts - from 2013.  It's a really fun die because it diecuts 5 different sized ghosts.

The sentiment is by Hero Arts - Happy Halloween - and is from 2012.  I stamped it using Versamark Watermark Ink and heat-set it using Stampin' Up White Embossing Powder.  I used a Powder Tool on the Black Cardstock before stamping so that I didn't get any stray dots of embossing powder.  I popped the sentiment up on Stampin' Up Black Dimensionals.  These black dimensionals are so handy for adding underneath dark cardstock.  I added a tiny self-adhesive Pale Orange Molossi Rhinestone either side of the sentiment but added a dot of Art Glitter Glue to the rhinestone because this pack is old and the glue dot isn't all that sticky.

To add more atmosphere to my card, I used some White Cobweb to the sky and gravestones adding tiny dots here and there with my Art Glitter Glue to stick it down.  This glue dries clear so is perfect for when you use it for something that would otherwise be glaringly obvious!  I bought the White Cobweb from my local supermarket.

I used a White Pastel Pencil to add some white highlights to the bottom of the moon and on the black diecuts.

As final touches, I added some sparkle to the pumpkin, house and moon using a Uniquely Creative Clear Sparkle Brush, adding several layers for extra-sparkle.

I layered the scene onto Colormates Dark Terracotta Cardstock then onto Anko Black Cardstock - then glued my card front onto a Kaisercraft White Card Base using Tombow Mono Multi Glue.

Finished size is 5-5/16" x 4-1/4" or 151mm x 108mm

Hope you like my card!  I had so much fun creating it 😀

Jocelyn


Card Recipe:

Stamps:  Hero Arts Happy Halloween CL353 (2012-retired)

Ink:  Versamark Watermark, Ranger Distress - Dried Marigold, Fossilized Amber, Mustard Seed, Spiced Marmalade, Rusty Hinge, Hickory Smoke, Black Soot

Accessories:  Big Shot, Tombow Mono Multi Glue, Art Glitter Glue, Repositionable Adhesive Tape, Stampin' Up Black Dimensionals, White Cobweb (Woolworths), Uniquely Creative Clear Sparkle Brush, Mylar Film - 190 micron, Blending Tools + Foam Pads, White Pastel Pencil, Molossi Pale Orange Rhinestones, Heat-Gun, Powder Tool, Stampin' Up White Embossing Powder, Cardstock - Bristol Smooth White 250gsm/110lb + Colormates Dark Terracotta + Anko Black/White, Kaisercraft White Card Base

Stencils:  Tim Holtz Stampers Anonymous Layering Moon Mask THMSK01

Dies:  Impression Obsession Halloween Hill DIE029-P (retired), Memory Box Graveyard Landscape #98375 (2012-retired), Memory Box Ghastly Ghosts #98701 (2013-retired), Lifestyle Nesting Circles (retired)


Wednesday, July 2, 2025

Paper Tole Rose Thank You Card

 
Hi blogging friends,

This is my third Thank You Card that I've made to thank people for their support following my Mum's passing in June:


I am finding being in my Craft Room and creating is like a healing balm for my soul.  Even though Mum's passing at age 94 wasn't unexpected, it has been difficult because she would go downhill then rally, then go downhill then rally again - but she would just become more and more frail each time.  I have taken comfort in that she passed peacefully in her sleep.  

Challenges:

I am entering my card in the following Challenges - click on the underlined link to take you to the Challenge:

Crafty Catz Weekly Challenge #697 of Anything Goes

The Paper Players - Tic Tac Toe Challenge - PP744 - choose at least 3 elements across, down or diagonally.  I chose Flowers, Diecut and Embossing.


I again decided to use a Paper Tole or Diecut Decouage image by Reddy Creative Cards but did trim the image down a little.  I used 0.5mm Self-Adhesive Doublesided Foam Squares between each layer.  

The designer papers are by Uniquely Creative - Dear Diary - which were released in June this year.  These papers are so exquisitely beautiful - I adore them!

The cardstock layers are Dusty Rose and Sage - and the dark green layer is actually some designer paper called Elation P2607 from Kaisercraft's Peace and Joy Collection which was released about 2019.  I couldn't find the right shade of dark green cardstock in my stash so this fitted the bill perfectly.

The dry embossing across the middle is my old favourite:  Cuttlebug Textile Embossing Folder.  I have used this folder so many times over the years and still love it as much as when I first bought it.

The sentiment is by Kaisercraft - Banksia Rose Collectables - which is a recent release.  It matched so perfectly like it was just "meant to be".  I diecut some Dusty Rose Cardstock using my Big Shot and Spellbinders Petite Scalloped Circle Nestabilities and glued that underneath the sentiment using Tombow Mono Multi Glue.

Both the main image panel and sentiment are popped up on scraps of white cardstock.

I diecut 5 x Dusty Rose Cardstock Hearts using an Impression Obsession die called Heart of Hearts.  This particular die cuts out a myriad of different styles and sizes of hearts which comes in very handy.  I glued four around the main image and one on the sentiment panel.  I added some Wink of Stella Clear Glitter Brush to the hearts which added some subtle sparkle.  

Lastly, I glued on some Pale Green Sparklets using Helmar's 450 Quick Dry Adhesive then attached my card front to a Kaisercraft White Card Base.

Finished size is 5-5/8" x 5-5/8" or 143mm x 143mm.

And now here is a pic of the card inside:


I again used the Uniquely Creative Dear Diary Designer Papers for the main background.  I glued on some flowers and leaves from the Uniquely Creative Dear Diary Creative Cuts but also fussy-cut some flowers and leaves from the papers.

Thanks for visiting my blog today!

Jocelyn


Card Recipe:

Stamps and Ink:  None

Designer Paper:  Uniquely Creative Dear Diary 6" x 6" + 12" x 12" + Creative Cuts, Kaisercraft Peace and Joy - Elation P2607 12" x 12"

Accessories:  Reddy Creative Cards Diecut Decoupage #83873, Kaisercraft Trimmer, Pale Green Sparklets (EBay), 0.5mm Self-Adhesive Doublesided Foam Squares, Big Shot, Cuttlebug Textile Embossing Folder, Wink of Stella Clear Glitter Brush, Tombow Mono Multi Glue, Helmar's 450 Quick Dry Adhesive, Kaisercraft White Square Card Base, Cardstock - Dusty Rose + Sage + Scraps of White

Dies:  Spellbinders Petite Scalloped Circle Nestabilities, Impression Obsession Heart of Hearts DIE052-I


Friday, June 27, 2025

Kaisercraft Magnolia Grove Thank You Rose and Lace Card

 
Hi everyone,

My Mother passed away a couple of weeks ago, aged 94, and her Memorial Service was 8 days ago - so I have been in my Craft Room making some Thank You Cards for various people who have supported our family.

When I was planning out my card, I was thinking about how much my Mother loved roses and also how much she adored her wool and haberdashery business that she ran in the 1970s, and used this as my inspiration (read on for the explanation).


The rose is Paper Tole aka Diecut Decoupage - and is by Reddy Creative Cards.  I have had this particular sheet for some years so I don't know if it is still available or who stocks it.  I bought this sheet at a Craft Show here in Australia from a vendor who specialised in these types of products but I can't remember their name.

Once I popped out the images, I layered them together using 0.5mm Doublesided Foam Squares.  It was easy to put together and I just love how beautiful the rose is.  Here is a close-up:


I layered the rose panel onto some Dusty Rose Coloured Designer Paper then onto Oive Green Coloured Designer Paper which are both from the Kaisercraft - Magnolia collection.  My borders are 1/16". 

The bottom designer paper on the card base is also by Kaisercraft - Magnolia Grove.  The collection was first released in 2012 - so long retired.  The top designer paper is by Kaisercraft - English Rose - first released around 2010 - which I thought matched the rose so beautifully.

The strip of Cotton Lace across the middle originally came from my Mum's wool and haberdashery shop and is around 50 years old.  The colour of the lace was cream but I wanted it to look more aged, so sprayed it with some watered-down Parisian Essence then left it to dry.  Parisian essence aka Browning Agent is a flavourless browning agent that is usually used to add a rich, dark brown colour to gravies, soups, puddings, baked goods etc.  It is readily available from the supermarket and very cheap.  I have used it alot over the years in all sorts of projects when I want something to look old.  Years ago, when I went to the Stitches and Craft Show here in Melbourne, one of the exhibitors was using it to age some calico and it was a real "aha" moment - so I have used it ever since.

When I gave the Eulogy at Mum's Memorial Service, I talked about Mum's shop and how I started working in it on Saturday mornings when I was 12.  It was a great learning experience for me and I gained alot of knowledge about knitting and sewing.  I still have bits and pieces from the shop like buttons, lace, ribbons, yarn, dressmaking materials and embroidery floss.  I felt it was really important to include something on my card that connected that time to now.

I threaded some Dusty Rose Satin Ribbon through the lace just to tie in the colours from the rest of the card, then glued the lace/ribbon on using Helmar's Fabric Glue.

The circular sentiment is by Kaisercraft - Banksia Rose - from their Collectables.   I was so rapt that it matched the rest of my card so perfectly. This is a much more recent release and still readily available.  I diecut the Dusty Rose Designer Paper using my Big Shot and a Spellbinders Petite Scalloped Circle Nestabilities die and glued that underneath the sentiment.

Both the main image panel and sentiment are popped up on scraps of white cardstock.

I used an Impression Obsession die - Heart of Hearts - to diecut 3 x tiny hearts from the same Dusty Rose Designer Paper.  This die cuts out many different styles and sizes of hearts so it was perfect for what I needed.  I've had this die for many years so it is probably retired.  I glued two hearts around the rose and the third on the sentiment panel, then added some Wink of Stella Clear Glitter Brush to them just to add some subtle sparkle.

I attached the three Green Sparklets on the top RHS using Helmar's Quick Dry Adhesive - then glued my card front to a Cream Card Base using Tombow Mono Multi Glue.  Finished size is 145mm x 145mm which is about 5-3/4" x 5-3/4".

I will be sending this card to the Clergy who officiated at the Memorial Service. They were a great support to our family in our time of need.

Thanks for stopping by my blog today.

Jocelyn


Card Recipe:

Stamps and Ink:  None

Designer Paper:  Kaisercraft Magnolia Grove 12" x 12" (retired), Kaisercraft English Rose 12" x 12" (retired), Kaisercraft Banksia Rose Collectables

Accessories:  Big Shot, 0.5mm Doublesided Foam Squares, Wink of Stella Clear Glitter Brush, Helmar's Quick Dry Adhesive + Fabric Glue, Tombow Mono Multi Glue, Cream Cotton Lace, Parisian Essence, Dusty Rose Satin Ribbon, Reddy Creative Diecut Decoupage #83875, Kaisercraft Trimmer, 3 x Green Sparklets (EBay Australia), Square Cream Card, Scraps of White Cardstock

Dies:  Impression Obsession DIE052-I Heart of Hearts (retired), Spellbinders Petite Scalloped Circle Nestabilities Small S4-117 (retired)


Friday, April 18, 2025

Penny Black Garden Friends Easter Card + Easter Egg Holder

 
Hi everyone 

My Craft Room has been a real hive of activity lately and I am loving being able to have more time to create.

I made this card for my daughter for Easter:


This is also my card for the following Challenges (click on the underlined link to take you to the Challenge):
  • Penny Black Saturday Challenge - PBSC April - Anything Goes with Optional Easter
  • Shopping our Stash - SOS545 - Hippity Hop - Make an Easter Card or a Card featuring a Rabbit or Chick 
  • Critter Crazy Challenges #97 - Anything Goes Featured Critter Theme
The main image is by Penny Black - Garden Friends - and was stamped with Versafine Onyx Black Ink onto Ranger Watercolour Cardstock.  I coloured the image with Watercolour Pencils then went over the black lines with a Black Copic Multi-liner to darken the lines up.

I diecut the panel using my Big Shot and Nesting Card Templates - and then things went awry!  You see the square designer paper on the base?  I measured my designer paper wrongly and cut it into a square instead of a rectangle as I was going to put the chicks onto a rectangular card.  Oh well, I thought - I will just cut another piece of that designer paper - but I had none of that particular one left in the 6" x 6" pad - and I really, REALLY wanted to use that one.  So, pivot I thought and don't waste the square of designer paper - use it instead and I did - but then couldn't figure out a good layout for my card.  I know in the end, it is a simple layout but it just frustrated me no end and I couldn't figure out whether I wanted the blue cardstock or pink - or should I go yellow?  I just kept changing my mind and couldn't settle on what I wanted so I left it on my desk until the next day.

The next day, I finally decided to go with the Blue Cardstock and then struggled with the layout again as I tried this and that and nothing seemed to look right.  It was just one of those frustrating cards that just seems to be hard work!  Eventually I settled on what other designer papers to add to my card so I had my main panel finished.  Here is a close-up of those cute little chicks:


And then couldn't make up my mind whether I should put the finished panel on a plain white card base or not.  In the end, I thought adding some dry embossing to the white card base looked better than plain so used my Crafter's Companion EF6 Embossalicious Embossing Folder and I like how it complemented the original square of the designer paper as well as the tiny flowers on the stamped image.  Of course, my frustrations continued as the embossing folder slipped the first time when I put it through my Big Shot so it embossed all crooked and I had to get another card base and redo it.  

I rounded the corners of the Kaisercraft White Card Base using my We R Memory Keepers 1/2" Corner Chomper.  All the blue cardstock layers were trimmed to 1/8" using my Perfect Layers Guides.

And then the ribbon - ohhhh, that ribbon gave me so much grief.  I struggled with what colour and type - and then eventually settled on the organza ribbon because it was so hard to match the blue colour with a solid blue coloured ribbon from my stash - I could not find the right shade.  This particular organza ribbon seemed to have a mind of its own and I gave up tying a bow because it wouldn't sit flat and looked totally weird.  Well, just knot it instead I told myself but do you think it would sit flat as well?  Nope!  It did NOT want to play nicely!  And ultimately, I used a tiny glue dot to hold the RHS of the ribbon down because it insisted on sticking up at 90 degrees.  

The sentiment is the same sentiment set I have used on my last couple of cards and I decided to cut out the sentiment and pop it up on dimensionals.  Even trying to figure out where to put the sentiment was driving me bonkers!  I added some Tiny Pink Cardstock Hearts around the main image panel by using my EK Success Arrows Border Punch (the leftover punchies look like tiny hearts).  I glued them on using a Uniquely Creative Fine Glue Pen.

Of course, I had to add glitter to the hearts and flowers using Kindyglitz Crystalina Glitter Glue.  I needed some sparkle to bring a bit of life to the card.

Ultimately, this card took 1000 times longer to make than it should have, however, I am happy with the end result.  And I like the layout and will definitely store this layout in my Card Sketches Folder as it is great for smaller, more vertical images.  

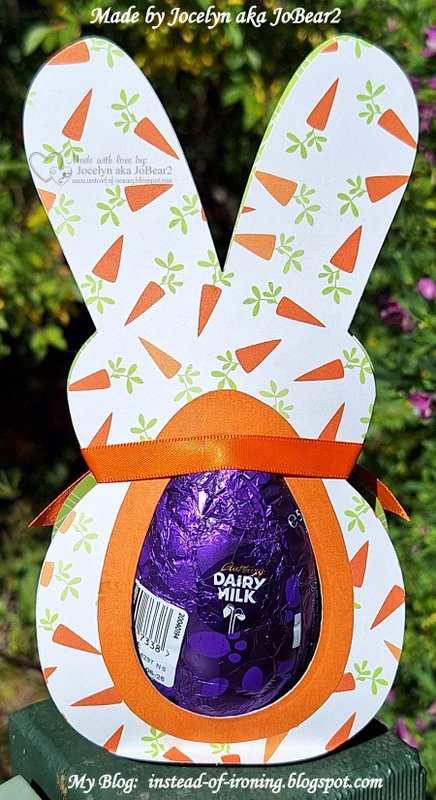
Sticking to my New Year's Resolution to try new crafty things, I decided to make an Easter Egg Holder which was certainly a challenge - but that's why I am trying new things that take me out of my comfort-zone.  Here is what I came up with:


Last year, I was doing an order with Scrapbook.Com (in the USA in case you don't know) and they always have free things you can add to your cart - and they had these really cute Nesting Bunnies which they call "Nested Peeps".  So when I received them, I was actually surprised how big the largest die was:

They retail for US$35 (although they are on special at the moment) so it really was an amazing free gift.  Scrapbook.com are the only US Company that I buy from because their postage to Australia is very reasonable - but I don't buy from them all that often because when you factor in the exchange rate between Australia and the USA, it does start to add up. 

I had this idea in my head when I was trying to get to sleep the other night that I might be able to diecut the bunny twice and have some cardstock at the bottom between the back and front to allow for the size of the egg.  Here is a side view so you know what I mean:


I then came up with the idea to diecut the bunny's tummy with one of my Spellbinders Nested Eggs Dies to accommodate the Easter Egg - holding it in place.  It took quite a bit of fiddling around and I did a prototype first to see if it would work - and then I realised that I would have to diecut the back of the bunny as well or the Easter Egg wouldn't stay in place:


I used some older papers by Echo Park - Happy Easter 12" x 12" - first released in 2015.  I diecut the Orange Cardstock using the Spellbinders Nested Eggs Nestabilities and then diecut the centre where the Easter Egg fitted it.

I used the same paper range to diecut the bunny to put on the inside just to pretty it up instead of just having the white cardstock.  You can just see the paper from the side view photo but it is actually green in real life.

I tied some Orange Ribbon around the bunny's neck to hold it all together and added Fray Stop to the cut ends to stop them from fraying.

I was really happy with how it turned out and it was great to see it all come together as I envisioned it after struggling with the card so much!

Thanks for stopping by!

Jocelyn


Card Recipe:

Stamps:  Penny Black Garden Friends 30-021 Clear Set, Impression Obsession Sentiments 1 WP16 (retired)

Ink:  Versafine Onyx Black

Designer Paper:  American Crafts Hello Spring #320548 (from 2016 - retired)

Accessories:  Big Shot, Dimensionals, Watercolour Pencils, #4 Round Paintbrush, Kindyglitz Crystalina Glitter Glue, WRMK Perfect Layers Guides, Ranger Watercolour Cardstock, Black Copic Multi-liner, American Crafts Organza Ribbon 3/8" or 9mm wide, Fray Stop, Crafter's Companion Die'Sire Embossalicious EF6 Embossing Folder, Tombow Mono Multi Glue, Uniquely Creative Fine Glue Pen, Mini Glue Dot, Cardstock - Scrap of Pink + Blue, Kaisercraft White Card Base

Dies:  Lifestyle Crafts Quickutz Nesting Card Templates DC0431

Punches:  WRMK 1/2" Corner Chomper, EK Success Arrows Border


Easter Egg Holder Recipe:

Designer Paper:  Echo Park Happy Easter 12" x 12" (from 2015 - retired)

Accessories:  Big Shot, Orange Ribbon 3/8" or 9mm wide (stash), Fray Stop, Cardstock - White + Orange

Dies:  Scrapbook.com Nesting Peeps sbc-shapes-19, Spellbinder Nested Eggs Nestabilities S4-264