Showing posts with label Painting. Show all posts

Saturday, December 26, 2015

Painted teddy bear ornament and a video of Ruby

Hi blogging friendsSmiley from Millan.Net

Please excuse my absence of blogging.  I became sick again during November (just when I thought I was almost back to being reasonably OK) so my cardmaking has been non-existent until just before Christmas.  I only made a couple of cards this year and will share them over the next week or so.

In the meantime, I thought I would share a teddy bear ornament that I painted for my brother and his family a while ago:
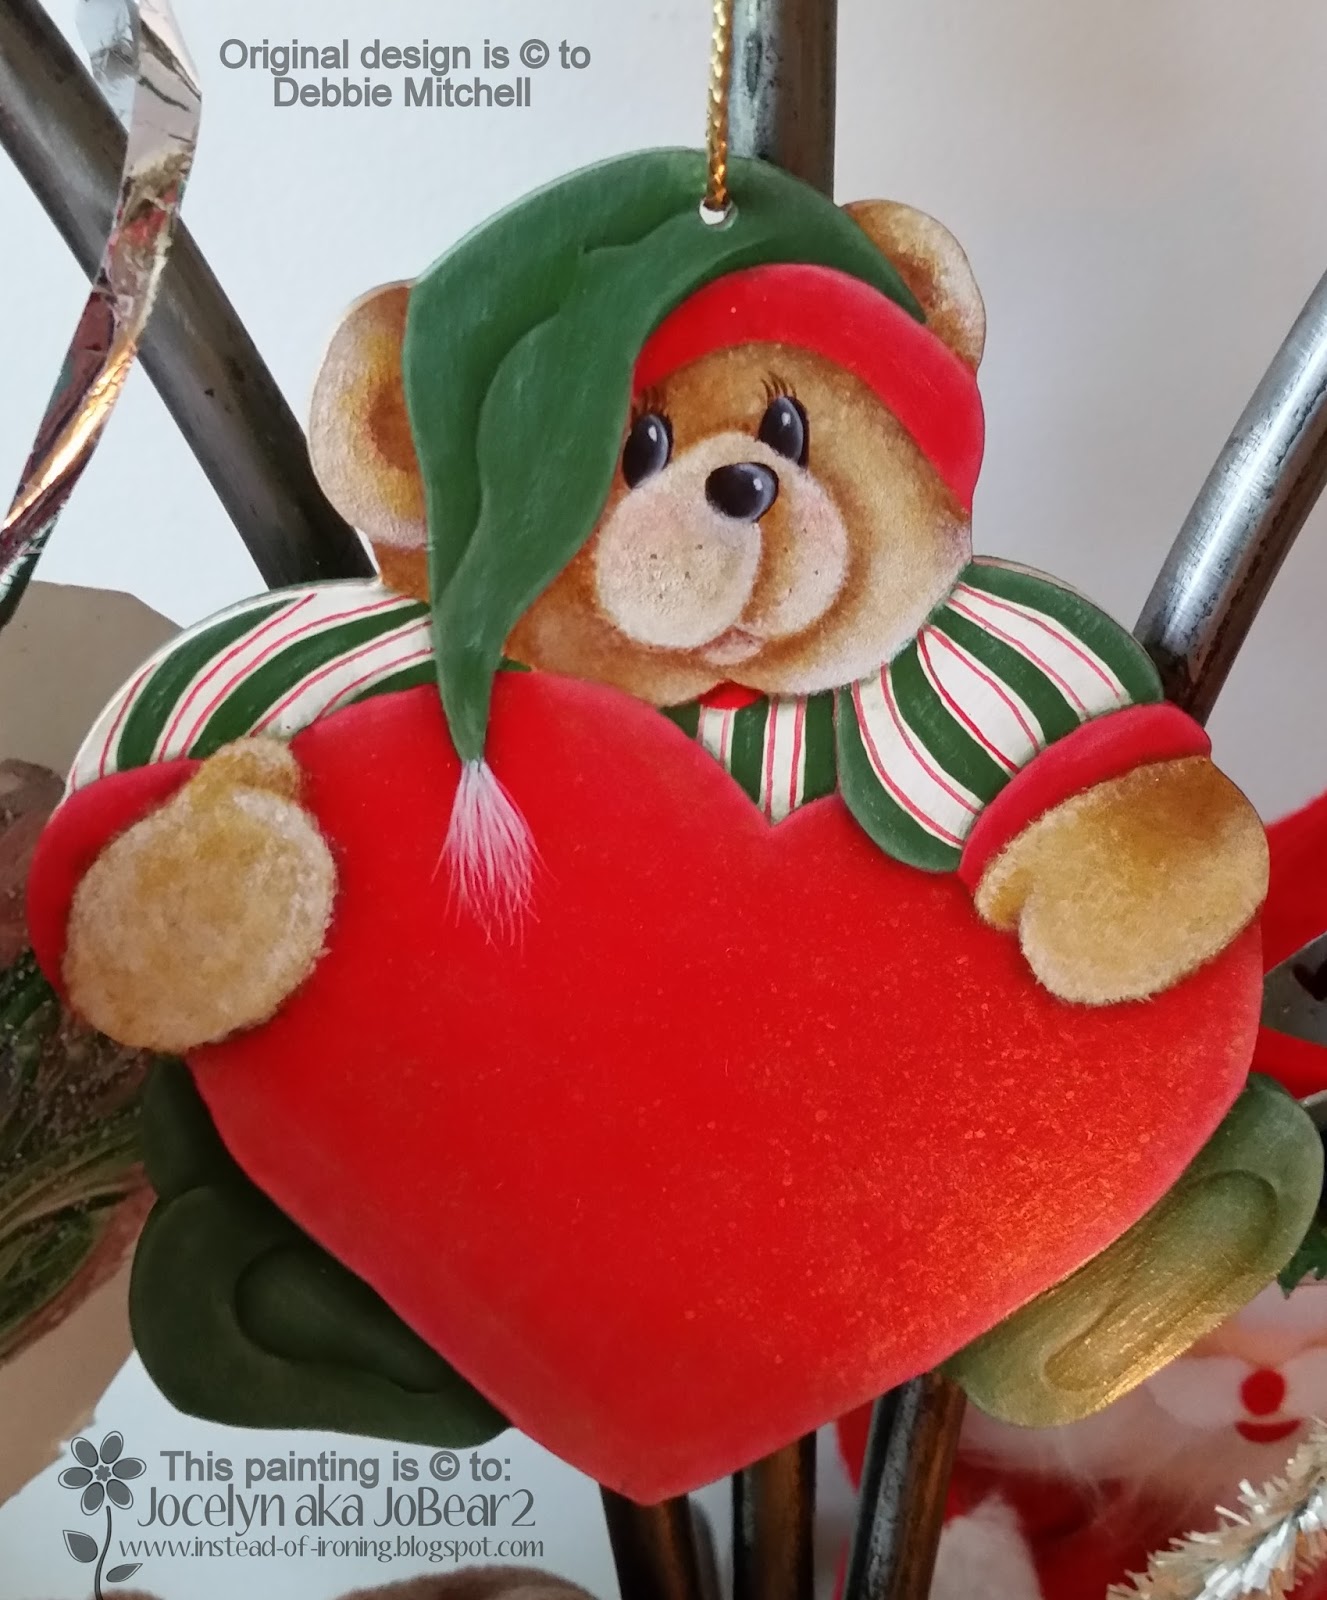

The original design is by Debbie Mitchell from one of her Cozy Cubby decorative painting books.  The craftwood cutout was sealed using Jo Sonja Clear Sealer then painted using Jo Sonja acrylic gouache.  I used a deer's foot brush to make the teddy bear's fur look fluffy and remainder of the design was painted using round, flat and liner brushes in various sizes.  The ornament is all one layer so I had to be careful to adding plenty of shading and highlighting to make the various elements look 3-dimensional.  The gold on the right foot is actually reflection from a candle which was lit close by.  The heart was splattered with gold paint which you can just see a little of on the RHS.  Once the painting had cured (around 2 weeks), the item was sealed using Jo Sonja waterbased varnish.  All I had to do then was add some gold cord for hanging up the ornament.

And just because I love my cat, I thought I would share a couple of pictures of Ruby enjoying the morning sun coming through our Dining Room window next to her scratching post:


And lastly, I wanted to share a video that I made of Ruby playing with her Catnip sausage which Santa gave to her last Christmas and that she still (surprisingly!) playing with.  If you want to see a larger picture, click through to the You-Tube link on the bottom RHS of the video.


For those of you who celebrate Christmas, I hope that this Christmas season will be everything that you would wish it to be - and may all your dreams come true in 2016.  Thank you for supporting my blog during 2015.

Jocelyn 

Tuesday, December 24, 2013

Teddy Bear painted ornament

Hi blogging friends From Millan.Net

As my last post before Christmas Day, I thought I would share a Teddy Bear Christmas ornament that I painted a little while ago:


The teddy bear is a flat piece of craftwood and the original pattern is by Debbie Mitchell from one of her Cozy Cubby Collection tole/decorative painting books.  I painted the teddy using JoSonja acrylic gouache and once cured, varnished using water-based varnish.  I tied on a gold cord so I can hang it on my Christmas tree.  Lastly, I added the green bell.

**********************
 
Wishing you all a very happy Christmas and may all your dreams come true in 2014.  For those of you who find Christmas difficult, my heart goes out to you.

Thank you for all your comments, emails, support and encouragement throughout this year.  I will be back in a few days sharing a couple more Christmas cards which I am giving to my daughter and husband tomorrow (can't spoil the surprise as they read my blog!).  

Jocelyn XO


Saturday, August 4, 2012

Some more of my decorative painting.......


Hi blogging friends Free Smiley Courtesy of www.millan.net

Just thought I would share an item that I painted at a Decorative Painting Workshop a while ago.  I grew up in the country so we had plenty of chickens and fresh eggs.  I have fond memories of collecting fresh eggs on the weekends (I was at school during the week of course) and our family would often sit down to a lunch of freshly cooked eggs, a crusty loaf of bread and homemade butter, and I would always have a glass of rich, creamy milk from our Jersey cow.  If you don't know about Jersey cows, they give milk that is super-rich and creamy (not so great for your cholesterol but we didn't know what cholesterol WAS when I was growing up LOL.....) - ahh, sweet memories of farm-life.

So, when I saw the chicken workshop advertised at my local Decorative Painting store, I thought it would be fun plus I rather liked the Trompe l'oeil effect of the chicken's head.  If you don't know what Trompe l'oeil means, you can read about HERE at Wikipedia; in essence (quoting directly from Wikipedia) - "It is an art technique involving extremely realistic imagery in order to create the optical illusion that the depicted objects exist in three dimensions."  Now my painting doesn't have a patch on other artists, but it was my first attempt and I was happy enough with my painting that I put it up on our kitchen wall.  We are always our own hardest critics, don't you think?  But as I get older, I tend to be more relaxed about these things and don't worry so much:  there are other more important things to worry about!  


The item was painted onto Craftwood (medium density fibreboard) using JoSonja acrylic gouache.  Once the painting was left to cure (ie: dry completely) for several weeks, the painting was covered with water-based matt varnish to protect it. 

Thanks so much for stopping by Free Smiley Courtesy of www.millan.net  

Jocelyn

Wednesday, September 8, 2010

Miss Molly Bear Stitchery - Artsmart Craft Cottage


Hi and thanks for stopping by :-)  This is another scheduled post whilst I can't access my computer for 2 weeks.

Today's post is another stitchery I made for my DD.  One of my other loves is embroidery and decorative (tole or folkart) painting, and I love projects which incorporate both these crafts.  I also LOVE the old-fashioned floral materials that you can get nowadays which I used on this stitchery.


This particular design is by Australian designer:  Libby Richardson from Artsmart Craft Cottage and comes as a printed panel on calico, full instructions and you get that gorgeous ceramic handbag that the Molly is holding plus the pearls around Molly's neck, but you supply all the embroidery threads, paints, materials for the panels, and hanger.  The bear was painted with acrylic paints and textile medium, then you simply embroider the bear using simple stitches like straight stitch and french knots - can you see the gold embroidery for ribbon on the hat?  You can always click on the photo for a bigger LOOK!     Lastly, I sewed on the panels and attached the wire hanger.   The finished size is around 22 cm x 28 cm (which is 8" x 11").

I've made 3 of them so far and given 2 away as gifts and the 3rd is on my DD's bedroom wall.

Hope you like it :-)  Thanks again for visiting!  Back soon with another post!

Jocelyn


Recipe:

Artsmart Craft Cottage pre-printed stitchery design 'Miss Molly', Jo Sonja acrylic paints, paint brushes, Jo Sonja Textile medium, Anchor stranded cotton in various colours including gold, embroidery needles, materials scraps for panels, wire hanger


Monday, August 30, 2010

Painted Teddy Christmas Brooch with Flowersoft


Hi and thanks for popping in for a visit :-)

I LOVE Teddy Bears - I am an Arctophile (which means "lover of" or "collector of" Teddy Bears).  I love Teddy Bear stamps, stuffed toys, pictures - anything with a cute teddy.  I think if Beanie Kids Bears were around when I was a little girl, I would have wanted every single one they made.  I also love to paint teddy bears which was my main reasons for starting Decorative (or Tole) Painting lessons some years ago now.

I recently painted this little Teddy Christmas Brooch and thought I would share it with you:
 

It came as a little kit from Artsmart Craft Cottage - sadly they don't sell any wooden products for painting anymore - they only do stitcheries and quilts - but they do have lots of Stockists around the world so you never know, you might be able to pick one up somewhere.  

The kit came as a wooden blank with the design for you to trace on plus the brooch pin for the back, but you supply the paints.  It was painted with JoSonja Acrylic paints.  After I painted it, I thought the little hat needed something "textured", so I reached for my white Flowersoft and glued it on, and I love how it turned out.  Here is a little close-up pic of the hat:


Hope you like my little teddy!  Finished length (from the top of the hat to the bottom of the stocking) is 10 cm or 4 inches.

Back in a few days with another one of those difficult masculine birthday cards!

Jocelyn


Recipe:  Artsmart Craft Cottage "Christmas Teddy in Stocking" No. B02 (retired) by Libby Richardson, tracing paper, JoSonja Acrylic paints, paint brushes, Folk Art Matte Sealer (varnish), Flowersoft Polar White, Aleen's Tacky glue (for Flowersoft)


Wednesday, July 7, 2010

Rose Topiary Stitchery


Hi and thanks for visiting my little Blog :-)

I thought I would show you one of my Stitcheries that I finished a little while ago.  The stitchery combines my "other two loves" which are decorative painting and embroidery.  


It comes as a kit designed by Libby Richardson from ArtSmart Craft Cottage (Australian company but there are stockists all over the world if you look at their website) and is called "Standard Rose Stitchery" - the design is printed on calico and you also receive the 3 ceramic rose buttons (for the topiary), but you supply the paints, stranded cotton embroidery threads, needles, hanger (I bought my hanger from EBay) and fabric and it comes with instructions on how to do the panels/borders. 

The images are painted with a mix of JoSonja acrylic paints and JoSonja Textile medium and is simple enough for a painter with limited experience to do, then you simply add the embroidery. The best thing about the embroidery is that it uses simple stitches like backstitch, french knots and lazy daisy so it is something you can do and watch TV at the same time and not mess it up!  I added a gold bee charm which didn't come with the kit - just needed a "little something" to finish it off.  I have no connection to ArtSmart Craft Cottage - but have been a regular customer over the years and did a fabulous workshop with Libby a long time ago at a Craft Show.

Hope you like it!  Don't forget you can click on the picture for a closer look.  See you again soon.....

Jocelyn


Stitchery Recipe:

Kit:  Standard Rose Stitchery by ArtSmart Craft Cottage

Your own supplies:  Anchor stranded cotton, embroidery needles, JoSonja Acrylic paints, JoSonja Textile medium, sewing thread, sewing machine, assorted co-ordinating material scraps, rotary cutter and cutting board (optional but it's easier than hand-cutting!), bee charm (optional), wire hanger

Saturday, March 27, 2010

Artsmart Craft Cottage: Rosie Bear Stitchery


Apart from cardmaking, I LOVE do Stitcheries and decorative painting.  Before I started cardmaking, I did decorative painting (ie: tole painting) for many years and had weekly lessons at my local Community Centre.   I made this Stitchery for my DD's bedroom a while ago and thought I would share it with you.  The Stitchery is called "Rosie Bear" by Australian designer - Libby Richardson from Artsmart Craft Cottage.   I have no connection to Artsmart Craft Cottage but have bought most of Libby's designs over the years - they are so adorable and I enjoy combining my love of painting with simple embroidery.    Plus I'm nuts about Teddy Bears!!   


The Rosie Bear kit came as a pre-printed panel on calico ready to paint plus you get the pattern for the roses and leaves and the instructions for painting, embroidery and how to attach the panels, but you use your own materials, embroidery threads and paints etc. to make up the kit.  Not sure if you can see in the photo, but there is a gorgeous ceramic rose button on the hat which came with the kit.

I painted the bear with JoSonja Acrylic Paints mixed with JoSonja Textile Medium and then embroidered around the outlines with stranded cotton.  I sewed on the various panels using my sewing machine then ironed on the roses and leaves using iron-on (fusible) applique, then embroidered the roses and leaves.  Once that was done, I added pellon to the back plus a calico backing, then machine-stitched around the panels and roses/leaves (much like quilting). 

I bought a nice frame from Target and removed the glass, then popped in the Stitchery - took a bit of fiddling to get it all straight - but it all worked out in the end.  Of course, you don't have to frame it - you can sew on a border (like you do with a quilt) and use a wire hanger instead.

Thanks for stopping by and hope you like my Rosie Bear!

P.S. If you want a close-up, click on the photo.

Jocelyn
