skip to main |
skip to sidebar
Hi everyone,
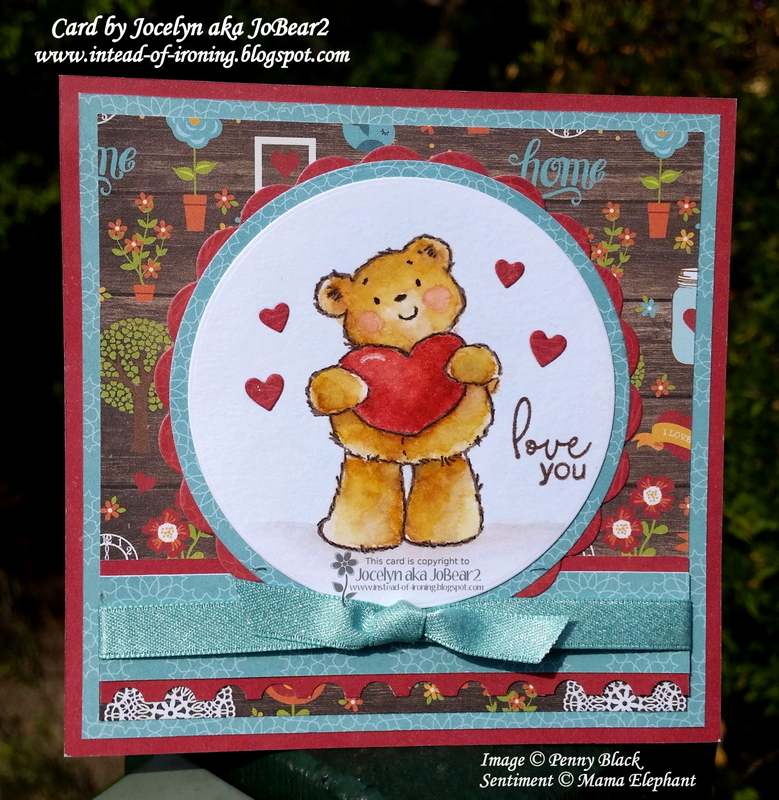
My husband and I have been married for 30 years and this is the card that I made for my husband. I can hardly believe it is 30 years as the time has passed so quickly! We don't usually do anything really fancy nor exchange gifts for our anniversaries and have never followed the traditional types of gifts either. We just had a quiet celebration with our daughter which was really lovely and had lunch at a local cafe and I cooked a roast for dinner that night. I am very lucky in that my husband doesn't mind cute and cuddly critters on his cards nor a bit of sparkle or glitter - so that makes it heaps easier to make cards for him.
This is also my card for the Penny Black Saturday Challenge for April - Anything Goes...Optional 'Fresh Spring Colours'. Please see THIS LINK for the details on the challenge.

The image is by Penny Black - Don't Break it - and was stamped onto Ranger watercolour cardstock using Versafine Vintage Sepia ink. I coloured the image using a mix of Zig Clean Color Real Brush Markers and Faber-Castell watercolour pencils. I added a white highlight on the heart using a Ranger Inkssentials white gel pen. I lightly chalked around the image using Kaisercraft blue chalk and the ground using brown and grey chalk.
The sentiment is by Mama Elephant - Mini Messages - and was stamped in the same Vintage Sepia ink. This is a great stamp set with a wide variety of sentiments for all year 'round and I love that they are really small so you can just add it around an image when you don't have alot of room or you don't want to add a separate sentiment panel.
I diecut the image panel using my Big Shot and Lifestyle Nesting Circle dies. The scalloped diecut is a Lifestyle Nesting Scalloped Circle die. The panel is popped up a little using 0.5mm dimensionals.
I used my Simon Says Stamp Mini Heart dies to diecut some hearts from the burgundy designer paper and added some sparkle using a Wink of Stella clear glitter brush which I also added to the heart that the teddy bear is holding. Here is a close-up:

I used a Fiskars Postage Stamp border punch to punch the border on the bottom panel. I have had this border punch forever and love to use it on masculine cards. The ribbon is from my stash.
The designer papers are by Echo Park - I Love Family - from their 6" x 6" pad. The layers were trimmed to 1/8" using my Perfect Layers Tools.
Lastly, I added my completed card front to a white card base.
Thanks for visiting my blog today.
Jocelyn
Card Recipe:
Stamps: Penny Black - Don't Break It - 3605F wood-mount, Mama Elephant - Mini Messages clear set
Ink: Versafine Vintage Sepia
Designer Paper: Echo Park - I Love Family 6" x 6" pad (2016)
Dies: Lifestyle Nesting Circles and Scalloped Circles, Simon Says Stamp Mini Hearts S142
Accessories: Big Shot, Ranger watercolor cardstock, Kaisercraft blue and brown chalk, Zig Clean Color Real Brush Markers, Faber-Castell watercolour pencils, #2 round paintbrush, ribbon (stash), Tombow Mono Multi glue, Kokuyo tape runner, Wink of Stella clear glitter brush, Perfect Layers Tools, 0.5mm dimensionals, Ranger Inkssentials white gel pen, white cardstock base
Punches: Fiskars Postage Stamp border
Hi blogging friends
Today I am sharing some Clean and Simple Christmas cards using my favourite snowflake die: Kate's Snowflake by Simon Says Stamp and a new embossing folder I picked up at a Craft Show in October.
These cards are also my entry for the following challenges:
Crafty Hazelnut's Christmas Challenge Extra - November - Anything Goes
Crafty Catz Challenge #255 - Christmas is coming
The embossing folder is by Nellie Snellen - Christmas Round and was just the right size for the snowflake die to fit inside - yay!
On Jennifer Maguire's blog, I had seen Jennifer diecut things then heat-emboss them and thought I would give it a try - and it worked really, really well.
For the gold snowflake: I smooched the diecut snowflake very thoroughly with Versamark Watermark ink and poured on Ranger fine detail Gold embossing powder and picked it up very carefully with my closed-point tweezers and heat-set it. As soon as the powder melted I poured on a 2nd coat of embossing powder and heat-set it. You really do need two coats of the embossing powder to get really smooth coverage - one just doesn't look as good:

For the silver snowflake: I used the same ink and did two coats of Ranger fine detail Silver embossing powder:
For the teal snowflake: I inked the diecut with Colorbox Sapphire Silk pigment ink and did two coats of Polysparkle clear embossing powder:

I adhered the snowflakes to my white cardstock using Tombow Mono Multi glue which gave me a little bit of time to line up the points perfectly. I cleaned up any stray bits of glue using my Xyron adhesive eraser.
I have also seen on Jennifer Maguire's blog how Jennifer had made matching embossed edges to her embossed diecuts so I did this same technique for the bottom matching borders. All you have to do is take a scrap of white cardstock and apply the same ink that you use for your diecuts to one edge and heat-set with two coats of embossing powder then trimmed it to size. Simple and quick! I attached mine to the card base using doublesided tape.
I tied on the twine/ribbon and added Fray Stop to the cut ends to stop them from fraying. I glued the tails down with Tombow Mono Multi glue to hold them in place because they kept blowing in the wind when I was trying to photograph them!
Lastly, I added rhinestones to the snowflake centres. The gold gem came on a sheet of different coloured rhinestones from Bellbird Paper Arts which cost about $2.50 (Bellbird Paper Arts are located in Blackburn, Victoria). The silver and teal rhinestones are by Kaisercraft. I couldn't figure out where to put a sentiment so left it off.
Please note it is REALLY hard to photograph silver and gold so the snowflakes look a bit brighter in real life.
Thanks for stopping by!
Jocelyn
Card Recipe:
Teal Snowflake -
Stamps: None
Ink: Colorbox Sapphire Silk pigment
Dies: Simon Says Stamp Kate's Snowflake SSSD111309
Accessories: Big Shot, Nellie Snellen Christmas Round-1 EFE003 embossing folder, Tombow Mono Multi glue, doublesided tape, Polysparkle embossing powder, heat-gun, Fray Stop, blue sparkle ribbon, Kaisercraft Ice Blue rhinestone (SB774) white cardstock
Gold Snowflake -
Stamps: None
Ink: Versamark Watermark
Dies: Simon Says Stamp Kate's Snowflake SSSD111309
Accessories: Big Shot, Nellie Snellen Christmas Round-1 EFE003 embossing folder, Tombow Mono Multi glue, doublesided tape, Fray Stop, gold cord, Gold gem (Bellbird Paper Arts), heat-gun, Ranger fine detail Gold embossing powder, white cardstock
Silver Snowflake -
Stamps: None
Ink: Versamark Watermark
Dies: Simon Says Stamp Kate's Snowflake SSSD111309
Accessories: Big Shot, Nellie Snellen Christmas Round-1 EFE003 embossing folder, Tombow Mono Multi glue, doublesided tape, Fray Stop, silver cord, Kaisercraft Silver rhinestone, heat-gun, Ranger fine detail Silver embossing powder, white cardstock
Hi blogging friends
Well, the summer school holidays are over and my daughter is back at school. The weather has been incredibly hot and dry and my garden looks brown. Many of my plants have been burnt from the fierce temperatures - and some plants look dead  I am heartily sick of the heat and will be glad when Autumn comes! We had a busy holiday time and saw a couple of kid's movies - Frozen was my favourite - and went to the beach on one day trip - we did shopping together and went out for lunch/afternoon tea and had lots of fun times. We also had some visits to hospital for my loved one (just routine appointments).
We also had a major upheaval at home as my daughter moved from her small bedroom into my Craft Room which is much bigger; I moved into the other spare bedroom which my husband was using as a Hobby Room; and, my husband has moved into my daughter's old bedroom. Talk about the house being upside down and a GIANT mess! I still haven't quite finished my Craft Room yet as I am still putting the finishing touches on making my space practical and usable. The built-in wardrobe is alot smaller than my old room so it has been a bit of a juggle to get things to fit but be easily accessible. I find that if I can't see something, I forget about it and don't use it.
And of course, if you are going to pull things out of the cupboards, you may as well go through them (even though I did that a year ago) and sort out what you want to keep or donate. Plus I thought I would try my hand at selling on EBay as I had a box full of different things that were still in pristine condition and wondered if I could turn them into a few $$$. I also had an antique Remington typewriter which needed some TLC and was so heavy that I think it would hold the house down in a cyclone - and listed that as well. My husband is a seasoned seller on EBay so he helped me alot. I was quite nervous about it but I am pleased to say that I have sold quite a few things - even the antique typewriter (which surprised me!). Anyway, I shall move onto my card............
I thought I would start off the year with a Christmas card for the Splitcoaststampers Christmas February Fan Club Challenge of "Red" which can be embellishments, ribbon, cardstock - anything you like. Now, my camera hates photographing red - it never comes out the right colour for some reason, so I went for a card that had some red in it and accented it with red rhinestones rather than using cardstock or papers with lots of red.

The papertole (or decoupage if you are in the UK) image and sentiment that I used - called 'Somebunny to Love' by artist Adam Pescott - came free with the UK Magazine Quick Cards Made Easy September 2013 edition. The set has quite a few images so you can make multiples of the same design and I think they are so sweet. And bonus that they were diecut too: although I did trim around the edges more because I thought the finished result would look better. The designer papers are from Lili of the Valley from their Frosty Christmas pad.
The snowflakes were diecut and I glued down just the centres and bent up the pointy bits (sorry, I don't know what they are called LOL!) a little to give the snowflakes some dimension then added red rhinestones to the centres. The large snowflake is by Simon Says Stamp and the small ones are by Impression Obsession.
Here is a close-up so you can see the dimension on the card:

Challenges:
Apart from the SCS Christmas February Fan Club Challenge, I am entering my card in the following challenges -
Crafty Hazelnut's Christmas Challenge Extra - February - Anything Goes
Thanks for stopping by - have a fab weekend!
Jocelyn
Card Recipe:
Stamps: None
Ink: None
Designer Paper: Lili of the Valley Frosty Christmas 8" x 8" pad
Accessories: Lifestyle Circle and Scalloped Circle dies, Big Shot, dimensionals, Kaisercraft red rhinestones, Papertole/Decoupage images from Quick Cards Made Easy - September 2013 edition, Simon Says Stamp Kate's Snowflake SSSD111309 die, Impression Obsession Die100-F snowflake die set, Perfect Layers Tools, cardstock - white
Hi blogging friends 
I am sharing another Christmas card which I sent to my friend Terese in Canada - and now that Terese has the card, I can share it here on my blog.
After using the My Favorite Things Merry Photo Card frame die alot recently for some Clean and Simple cards (see my two blog posts HERE and HERE), I decided to buy the "Joy" version and here is the result:

I LOVE this die - but then I probably say that about ALL my dies LOL!
The deer and trees are a die by Cottage Cutz - Snow Swept Border. The layers of snow were made using a set of 2 dies by MFT called Snow Drifts. The largest snowflake is by Simon Says Stamp and the smallest snowflake is by Impression Obsession. None of these layers are up on dimensionals - they have simply been adhered using doublesided tape. The shadows in the photograph may give you the impression that the layers are built up but in actual fact, the card is really flat.
The dry-embossed bottom panel is a retired Cuttlebug embossing folder: Kars Snowflake which is extremely difficult to find. A great alternative which is readily available is the Sizzix Dots embossing folder from the set: "Christmas Words and Dots" which you can see here:

Once I
had embossed my card front, I attached the scene/frame then just trimmed
up the edges of the white cardstock base so that I had a thin border
around the aqua frame although the angle of the photo makes it look a
little uneven. My white card bases are bigger than a Cuttlebug
embossing folder which means I can just have the dry embossing within
the scene and not spill over onto the card edges.
And here are the beautiful cards that my daughter and I received from Terese:
This first card was for my husband and me - and the second was for my daughter. The RHS bottom oval on the 2nd card had my daughter's name on it and I edited it out for privacy reasons. Aren't Terese's cards gorgeous?!!
Thanks for stopping by! Only 3 sleeps to go here in Australia.......
Jocelyn
Card Recipe:
Stamps and Ink: None
Designer Paper: Aqua glitter cardstock
Accessories: My
Favorite Things Die-namics Joy Photo Card Frame die + Snow Drifts dies,
Impression Obsession Die100-F snowflake die set, Simon Says Stamp Kate's Snowflake SSSD111309 die, Cottage Cutz Snow Swept border die, Big Shot, Cuttlebug
Kars Snowflakes embossing folder (RETIRED), Kaisercraft Ice Blue SB774
rhinestones, doublesided tape, cardstock - white (Paper Mill)
Hi blogging friends
I am typing up this post on a new (well, 2nd-hand re-furbished) laptop. I had been having a few problems with my old laptop as the socket on the back of my laptop where the charger/power cord plugs in was getting loose and my laptop wouldn't be running off the mains power some of the time and therefore running off the laptop battery. Now my battery has been crook for a while and only able to hold a small amount of charge - and in the past few weeks, it had worsened to the point where it would only hold about 5 minutes of charge. I had resisted spending the $70 to get a new one because, well $70 is alot of money and I had just spent $$ on replacing the keyboard. BIG mistake! Trouble was that when I was busy on my laptop, I wouldn't necessarily notice that the charger/power cord had moved slightly in the socket so my computer wasn't charging and then my laptop would suddenly shut down when the 5 minutes of battery back-up had run out which it did about 10 times over last weekend as the charger socket just seemed to get looser and looser.
The last time it shut down, it damaged the hard drive....OOOPS!! Computers do NOT like shutting down unless they are shut down properly! It took hours of work to get it up and running again - it wouldn't even turn on at one stage - but I can't use it unless I get a new battery and a new charging socket - and there are still some problems to fix. Sheesh, I was sooooo grumpy and annoyed: I love computers but when things go wrong, it is probably the one thing that puts me in such a bad temper as I am the "fix-it" person for all things computer in our house - and it can take up so much time to fix them sometimes to no avail.
Anyway, my lovely husband went out last week and bought me another laptop and if I can fix the old one completely, my husband will take it over as his laptop screen is covered in lines due to it wearing out and is really old now and so slow in comparison. I heartily recommend replacing a sick laptop battery and replacing the charger socket as you can easily buy them as long as your laptop isn't too old. I have definitely learned my lesson the hard way!
Anyway, I am still catching up on things and with Christmas on our doorstep, I am frantically whipping up cards. Today I am sharing some clean and simple Christmas cards which I have made for my Mum to post to her friends/family. Mum is frail and has difficulty using her hands so I had to have mail-friendly and flat cards that are easy for her to handle. If I had a ribbon on them and the ribbon came untied, she wouldn't be able to re-tie the ribbon. And they had to be easy for her to put in an envelope so too many layers that made the card difficult to put in just wasn't going to work for her. So here is what I came up with which I have made multiples of and had a little production line going in my Craft Room:

The gorgeous snowflake is a die by Simon Says Stamp - Eliza Snowflake - which I ran through my Big Shot using the glitter cardstock. I did run it through my Big Shot several times moving the die around each time as being such a detailed die and the glitter cardstock being quite thick meant it didn't cut cleanly on just one pass. I glued the snowflake on using Tombow Mono Multi-glue which I applied with a small paintbrush.
I glued on a glitter cardstock strip to the top of the white cardstock front, border punched the bottom then glued on the glitter cardstock strip underneath the white cardstock front (I hope that makes sense!). I thought I had better explain how I did it because you may think that I glued the white cardstock front to the glitter cardstock base instead as it's a little hard to tell from the photo.
Now here is the silver version:

The approximate sizes of my finished cards are as follows:
Card #1 - 4-11/16 inches wide x 4-9/16 inches long (120mm x 115mm)
Card #2 - 4-1/2 inches wide x 4-7/16 long (113mm x 112mm)
I really didn't think the cards needed a sentiment - and anyway, I am not sure where I would put one! Even though the cards were simple to make, they are quite fiddly as handling the snowflake with glue and trying to get it level and straight takes some time. I used my ruler to mark where the centre of the card was so that I could use the marks to line up the snowflake perfectly. I often think that when you make a clean and simple design, you need to put quite alot of thought into it to get it "balanced" and looking right because having one element askew really stands out compared to a layered card. Personally, I find them very challenging and I have some cards that I've made that just "don't look quite right": I don't know what's wrong with them, whether it's not balanced or something is missing (?), but they sit in my pile waiting for me to go back to them later on one day (we ALL have those cards, don't we LOL?!).
Challenges:
I am entering my card in the following challenges -
Craftyhazelnut's Christmas Challenge Extra - December - Anything Goes
Splitcoaststampers - Free for All F4A197 - Let it Snow
Thanks for stopping by! Have a great weekend!
Jocelyn
Card Recipe:
Card #1 -
Stamps, Ink and Designer paper: None
Accessories: Simon Says Stamp Eliza Snowflake SSSD111308, Big Shot, Tombow Mono Multi glue, EK Success Scallop Diamond border punch, cardstock - white, aqua glitter
Card #2 -
Stamps, Ink and Designer paper: None
Accessories: Simon Says Stamp Eliza Snowflake SSSD111308, Big Shot, Tombow Mono Multi glue, EK Success Scalloped Scallop border punch, cardstock - white, silver glitter
Hi blogging friends
If you read my last post, you will have seen 2 Christmas cards that I made using the newly released My Favorite Things Die-namics Photo Card frame die. Today, I am sharing another two cards which are very similar - the only differences being the dies and the colour of the glitter cardstock. I finally had some time in my craft room inbetween medical appointments to put the elements together. I must admit, I really LOVE the aqua glitter cardstock one - but I do love any colour that is in the aqua/turquoise range.

My first card uses the Memory Box Country Landscape die for the main panel. The top RHS snowflake is a Simon Says Stamp Kate's Snowflake die and the bottom LHS is a My Favorite Things Die-namics snowflake die from the Snowflake Trio set. I added an Ice Blue Rhinestone to the centres.
The dry embossing is a Cuttlebug Kars Snowflake embossing folder which is RETIRED and virtually impossible to find online. You can substitute the Sizzix Dots embossing folder from their set: Christmas Words and Dots, Item #658285, which is readily available online. Here is a pic of the set:
And now, the gold glitter cardstock version:

For this version, I used the Cottage Cutz Winter Wonderland border die for the main panel and then added another layer of snow using a My Favorite Things Die-namics Snow Drifts die. Instead of adding white snowflakes, I decided to add gold glitter cardstock snowflakes instead. The gold glitter cardstock is a lot brighter and paler in real life - looks a little dark in the photo but is really hard to photograph glitter cardstock and find the right balance of showing some glitteriness yet not over-exposing the white portions in the process. You often end up with a lovely glittery frame and a washed out image! Wish my camera could see what I actually see with my eye - maybe that will happen one day with better technology (?).
For in-depth details on how I made the card, please see my post from a few days ago HERE where I shared my silver glitter cardstock and red glitter cardstock versions.
Challenges:
I am entering my card in the following challenges -
Christmas Cards All Year Round - November Challenge - Winter Wonderland - card must have a winter theme. Snow, snowflakes etc.
ABC Christmas Challenge - W for Winter Wishes
Splitcoaststampers - Fan Club November Christmas Challenge - Window In/Out - where you need to create a Christmas view either in through a window eg: Christmas tree, decorations or out through a window eg: snowy scene. Now technically I don't see a wintry scene out my window at Christmas but I have lots of friends and/or relatives in the UK, USA and Canada who tell me that all they see is snow - and these cards will be going to them. Please note that you have to be a (paid) Fan Club Member of SCS to be able to play these challenges.
Splitcoaststampers - Clean and Simple Challenge CAS247 - Inspired by Music. My cards are inspired by the song: Winter Wonderland - which I used to sing in my All Girls Group which I was part of for over 10 years before my loved one became ill. I am singing it now as I type this: "Sleigh bells ring, are you listening? In the lane, snow is glistening. A beautiful sight, we're happy tonight, walking in a Winter Wonderland." LOVE it - one of my favs! We would visit Nursing Homes/Hostels in the area where we live at Christmas-time and sing a huge range of Christmas songs which the residents really loved.
It was amazing to see how even the residents who could no longer communicate and would often appear to be asleep or just not looking at you nor appear interested, would have little finger or their foot tapping away at the beat of the music. We used to sing at school fetes, charity functions and local events but I used to love singing at the Nursing Homes the most. We would visit them at other times of the year too - and they appreciated so much that people would come to sing to them!
I can't believe it is only about a month to Christmas! Yikes! I had better high-tail it to my craft room and get cracking on some more cards!
Thanks for stopping by. Have a fab weekend.
Jocelyn
Card Recipe - Card No. 1:
Stamps and Ink: None
Designer paper: Aqua glitter cardstock
Accessories: My
Favorite Things Die-namics Photo Card Frame die + Snow Drifts die + Snowflake Trio die set, Simon Says Stamp Kate's Snowflake SSSD111309 die, Big Shot, Cuttlebug
Kars Snowflakes embossing folder (RETIRED), Kaisercraft Ice Blue SB774
rhinestones, doublesided tape, cardstock - white (Paper Mill)
Card No. 2:
Stamps and Ink: None
Designer paper: Gold glitter cardstock
Accessories: My
Favorite Things Die-namics Photo Card Frame die + Snow Drifts die, Cottage Cutz Winter Wonderland border die, Impression Obsession Die100-F snowflake die set, Big Shot, Cuttlebug
Kars Snowflakes embossing folder (RETIRED), doublesided tape, cardstock - white (Paper Mill)
Hi blogging friends
I can't believe how quickly November is flying by: I am sure the year speeds up once November hits! It sure seems like it every year. I have been beavering away in my Craft Room in-between alot of medical appointments this month with my loved one. Thankfully, they are doing well even if their recovery is long and slow and challenging - and I am so grateful for the times that we can cherish together no matter whether we are travelling in peak-hour traffic coming home from hospital or just sitting for ages in a medical waiting room. Life is so fragile and you have to make the most of these moments together no matter where you are because you don't know what is around the corner.
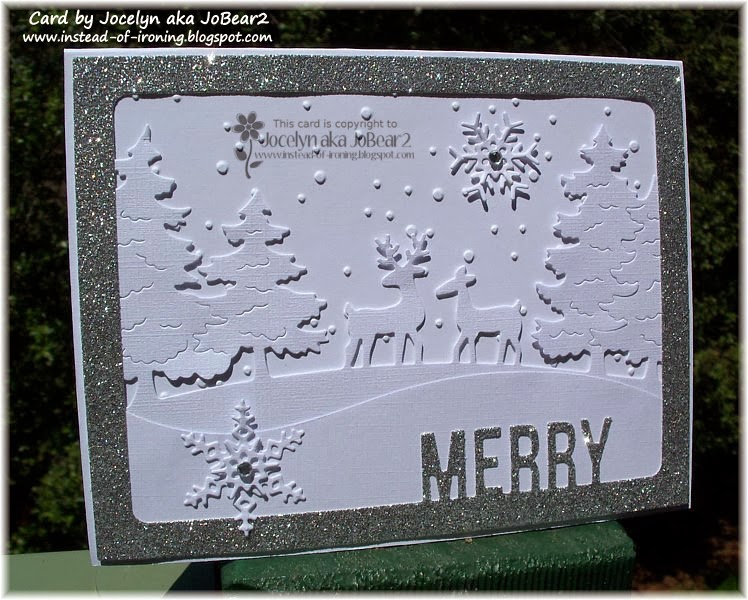
The card I am sharing today is a clean and simple design based around a new My Favorite Things die called Photo Card Frame. When I first set my eyes on this die, I had all sorts of ideas running through my head. I think the main idea behind the die is to take a Christmas photograph of your family, pets or something Christmassy and pop it into the frame - but I had other ideas of using dies to make a simple scene within the frame - and here is the result:

I diecut the frame out of silver glitter cardstock then attached the diecut elements to that before attaching the finished frame to my card front. I used my Cottage Cutz Snow Swept border die for the main part of the scene and a My Favorite Things Snow Drifts die to add the extra layer of snow. None of the layers are up on dimensionals - they are just layered together with doublesided tape. Even though the Snow Swept border diecut looks like it is up on dimensionals, it just merely the dry embossing that it is on top of that bumps it up a little to look that way. The snowflakes are by Impression Obsession. I glued down just the snowflake centres and bent the tips up a little to add a little dimension to them and added a silver rhinestone to the centre.
I ran my white cardstock card front through my Big Shot using the (retired) Cuttlebug Kars Snowflake embossing folder. If you do not have this folder - plus it is virtually impossible to find online - you can substitute the Sizzix Dots embossing folder from the set Merry Christmas Words and Dots Item #658285 which is readily available. You can see a little pic of it here:

Once I had embossed my card front, I attached the scene/frame then just trimmed up the edges of the white cardstock base so that I had a thin border around the silver frame although the angle of the photo makes it look a little uneven. My white card bases are bigger than a Cuttlebug embossing folder which means I can just have the dry embossing within the scene and not spill over onto the cards edges.
While I was on a roll, I made another scene, this time using red glitter cardstock:

Again, I used the same embossing folder for the background snow - just a different die for the scene which in this case, is the Memory Box Deer Trio die. The top right-hand snowflake is by Simon Says Stamp: Kate's Snowflake and the bottom left-hand snowflake is the smallest of the 3 dies in the My Favorite Things Die-namics Snowflake Trio set. Again, I glued down the snowflake centres and bent the points up a little and added a red rhinestone to each centre. The white cardstock base edges (again!) look uneven in the photo but they are perfectly even in real life: just the angle of the photo trying to capture a little of the red glitteriness plus the embossing which make it look a little weird.
I can see myself using this Photo Frame die ALOT - and you could even just cut off the words if you didn't want them and stamp a different Christmas sentiment - or use the frame for another occasion. Yep, one of those really useful dies which I will definitely get my money's worth out of.
I have a couple of other scenes in the pipelines - watch this space!
Challenges:
I am entering my cards in the following challenges -
Christmas Card Weekly Challenges (by Sparkle Creations) - Challenge #51 - Sparkle and Bling. My sparkle and bling is the glitter cardstock and rhinestones.
Totally Papercrafts Friday Challenge #193 - Clean and Simple
Splitcoaststampers Fan Club Christmas Card November Challenge - Window In/Out into Christmas. Create a window scene at Christmas time eg: something you see when you look out your window at Christmas such a snow covered trees, snowmen, streets lined with snow - or when you are looking inside a window such as table decorations, tree, presents. Now of course, being Australian, we don't have snow at Christmas-time because it is summer so I am not looking out my window at snowy scenes but I have friends and/or relatives in Canada, USA and the UK and I send them cards depicting their snowy winters - so my card depicts what THEY see out their window instead LOL! Please note you have to be a (paid) Fan Club Member of SCS to be able to play in these challenges.
Thanks for stopping by! Hope to see you again soon.
Jocelyn
Card Recipe - Card No. 1:
Stamps and Ink: None
Designer paper: Silver glitter cardstock
Accessories: My Favorite Things Die-namics Photo Card Frame die + Snow Drifts die, Impression Obsession Die100-F snowflake die set, Cottage Cutz Snow Swept Border die, Big Shot, Cuttlebug Kars Snowflakes embossing folder (RETIRED), Kaisercraft silver SB700 rhinestones, doublesided tape, cardstock - white (Paper Mill)
Card No. 2:
Stamps and Ink: None
Designer paper: Red glitter cardstock
Accessories: My Favorite Things Die-namics Photo Card Frame die + Snowflake Trio set (smallest snowflake die), Memory Box Deer Trio die, Simon Says Stamp Kate's Snowflake SSSD111309 die, Big Shot, Cuttlebug Kars Snowflake embossing folder (RETIRED), Kaisercraft red SB711 rhinestones, doublesided tape, cardstock - white (Paper Mill)







 This license requires that reusers give credit to the creator. It allows reusers to copy and distribute the material in any medium or format in unadapted form and for noncommercial purposes only.
BY Credit must be given to you, the creator.
NC Only noncommercial use of your work is permitted. Noncommercial means not primarily intended for or directed towards commercial advantage or monetary compensation.
ND No derivatives or adaptations of your work are permitted.
In other words, none of my Blog content can be copied or reproduced in any form whatsoever without asking permission as it is protected by law. Please ask first as a matter of courtesy! I can be contacted via the following email address for any queries - click on:
This license requires that reusers give credit to the creator. It allows reusers to copy and distribute the material in any medium or format in unadapted form and for noncommercial purposes only.
BY Credit must be given to you, the creator.
NC Only noncommercial use of your work is permitted. Noncommercial means not primarily intended for or directed towards commercial advantage or monetary compensation.
ND No derivatives or adaptations of your work are permitted.
In other words, none of my Blog content can be copied or reproduced in any form whatsoever without asking permission as it is protected by law. Please ask first as a matter of courtesy! I can be contacted via the following email address for any queries - click on: 






.jpg)


