Showing posts with label Mintay. Show all posts

Thursday, June 11, 2026

Docrafts Papermania - Lucy Cromwell Home Toppers Thank You Card

 
Hi everyone,

Edited to Add:  I just learned that this card was a Design Team Favourite over at the A Perfect Time to Craft Challenge.  Thank you so much!


Today I am sharing a Thank You Card that I made for my grown-up daughter to say thank you for all the baking that she has been doing for me.  About 6 months ago, I had to make some dietary changes due to some newly discovered food intolerances.  I am feeling so much better - but it has been a steep learning curve and quite frustrating (at times) to learn how to modify recipes to accommodate those intolerances.  My daughter has always done alot of baking (which I instilled into her from a very young age because I have always baked just like my late Mother) and was up for the challenge - and she has been amazing at always making sure I have something yummy to eat.  So, I wanted to acknowledge my appreciation with a card:


Sorry the photo is a little dull.  It is Winter here and foggy so it is hard to take a decent photo when it is like that.  When I tried to brighten my card in my photo editing program, it made it look even more washed out.  Oh well!

Challenges

I am entering my card in the following Challenges - click on the underlined link to take you to each Challenge:
  • Splitcoaststampers - Free for All F4A820 - Food/Recipes/Cooking
  • A Perfect Time to Craft - June - Open Challenge and Anything Goes
  • Neglected Stuff Challenge - June - Using OLD supplies that you forgot about.  Mine is the Card Topper which is more than 10 years old which I definitely forgot about it.  I found it when I was looking for something else which was serendipitous because I had it in the back of my mind to make a thank you card for my daughter for all her baking.
The main image is a topper by Docrafts - Papermania - Lucy Cromwell called 'Home'.  I bought this sheet of toppers years ago from a Craft Show so you probably can't get it anymore and I couldn't find this particular sheet in my online search.  All the toppers have some glittery elements on them and are just so pretty.  The image was just so perfect for what I needed.

I used to love going to Craft Shows and picking up the latest Docrafts range.  They had such amazing collections and my all-time favourite was the Wellington Bear range because it was fantastic for masculine cards.  I still use this collection because I stocked up and I am so glad that I did.  I am not sure what happened to Docrafts and haven't seen anything by them for a REALLY long time.  I think the whole cardmaking industry seems to be shrinking with many companies no longer around like My Favorite Things, Avery Elle and Impression Obsession to name a few: it's so sad 😞 Anyway, I am digressing.......back to my card........

All the designer papers are by Mintay - Elodie which were first released in February 2023.  I love how well they matched the topper.

The bottom panel Pink Cardstock was punched using a Martha Stewart Doily Lace Edge Punch.  I still adore this punch as much as the day I bought it.  It is so pretty and feminine.

The Silver-edged Pink Ribbon is from my stash.  I attached it in two separate elements and glued the bow on using Helmar's Fabric Glue.  I find it easier to do my ribbons that way because it isn't as fiddly and it looks alot neater.

The sentiment is by Crafter's Companion - Popcorn the Bear - Someone Special Stamp Set.  This is another old set released in the early 2010s and was bare rubber.  This is one of my favourites that I have used alot over the years.  I stamped the sentiment using Stampin' Up Gray Granite Ink as I didn't want to use black ink because it was too stark - and the Gray Granite Ink matched the rest of the card much better.

I used my EK Success Arrows Border Punch to punch some tiny hearts from Blue and Pink Cardstock - they are the leftover punches that look like tiny hearts to me - then added some Uniquely Creative Clear Glitter Brush to them for some sparkle.

The sentiment was diecut from White Cardstock using my Big Shot and a Cuttlebug Tiny Tag Die but trimmed it down.  These dies were first released in 2007 so very old now but one of my most-used dies.  You can still pick them up second-hand in my searches online - mostly on EBay.

When I had finished my card front, I glued it to a Kaisercraft White Card Base using Tombow Mono Multi Glue.

Finished size is:  152 x 107mm or 6-1/8 x 4-1/4".

Thanks for visiting my blog today.

Jocelyn


Card Recipe:

Stamps:  Crafter's Companion Popcorn the Bear - Someone Special PST-SPC

Ink:  Stampin' Up Gray Granite

Designer Paper:  Mintay Elodie 6" x 6" Pad

Accessories:  Big Shot, Tombow Mono Multi Glue, Helmar's Fabric Glue, Art Glitter Glue, Uniquely Creative Clear Sparkle Brush, Silver Edged Pink Ribbon 1/8"-3.5mm wide (stash), Docrafts Papermania Lucy Cromwell A4 Diecut Glitter Toppers - Home PMA157128, Kaisercraft White Card Base, Cardstock - Powder Blue, Pale Pink + White

Dies:  Cuttlebug Tiny Tags 37-1222 (retired)

Punches:  Martha Stewart Doily Lace Edge, EK Success Arrows Border


Saturday, February 7, 2026

Stamperia Hortensia Birthday Card

 
Hi everyone,

Today I am sharing a Birthday Card that I made for my sister-in-law:


I used some gorgeous Stamperia Hortensia Designer Papers for my card.  These papers were released in 2020.  On one of the 12" x 12" sheets, there are four 6" x 6" individual card fronts and I simply trimmed one of them out but did cut it down a bit so that I could have some cardstock layers and then pop it onto a white card base.  I needed the finished card to be able to fit in my square envelope.

I used Versamark Watermark Ink to stamp the sentiment which is from the Stampin' Up Layering Leaves Stamp Set, then heat-set it using Ranger Detail Gold Embossing Powder.  I went around the edge of the designer paper using a Versamark Watermark Pen fairly roughly so that when I heat-set it with the Gold Embossing Powder, it looked a little distressed.  

I layered the image panel onto Pale Pink then Rose Pink Cardstock.  I watered down some Jo Sonja Pale Gold Acrylic Paint then used my Fan Brush to splatter the panel.  It looks so gorgeous in real life.

The Pink Organza Ribbon was attached in two separate elements, and the bow itself was made using my Bow Easy.  I glued the bow on using Helmar's Fabric Glue.  I added Fray Stop to the cut ends to stop them from fraying.

The pink butterfly above the sentiment is by Mintay - Lilac Garden - from their paper diecuts.  I glued down just the centre so I could bend the wings up a little.  The colours on the diecut matched the pinks in the designer papers so perfectly, it was just meant-to-be.  I added some Uniquely Creative Clear Sparkle Pen to the pink butterfly, the white butterfly and a little on the hydrangeas.

I glued the panel onto a White Card Base.

As a finishing touch, I added 3 x Kaisercraft Rose Pearls but added a dot of Art Glitter Glue underneath so they didn't slip down like they seem to over time (for me anyway).

Finished size is 5-11/16" x 5-11/16" or 143mm x 143mm.

Thanks for stopping by!

Jocelyn


Card Recipe:

Stamps:  Stampin' Up Layering Leaves #161277 (retired)

Ink:  Versamark Watermark Ink Pad + Pen

Designer Paper:  Stamperia Hortensia 12" x 12", Mintay Lilac Garden Paper Diecuts MT-LIL-LSC

Accessories:  Heat-gun, Powder Tool, Fan Brush, Jo Sonja Pale Gold Acrylic Paint, Bow Easy, Pink Organza Ribbon 3/8" / 9mm wide, Fray Stop, Tombow Mono Multi Glue, Art Glitter Glue, Helmar's Fabric Glue, Kaisercraft Rose Pearl SB786, Uniquely Creative Clear Sparkle Pen, White Card Base, Cardstock - Pale Pink + Rose Pink


Wednesday, August 16, 2023

Mintay Garage Birthday Card No. 2

 
Hi everyone 😀

As I mentioned on my previous post, we have four masculine birthdays in August so I my Craft Room has been a whirlwind of activity.  Here is another Birthday Card using the awesome Mintay Garage Collection:


This is also my card for the following Challenges:

The Male Room - Challenge #177 - Dots and/or Stripes - my dots are the holes in the punched border, the Candi dots and the dots on the stars - and the stripes are the tartan designer paper.  This is my 2nd entry for their Challenge.
  

Ellibelle's Crafty Wednesday Challenge - August - Anything Goes 

The main image was trimmed from one of the Mintay 12" x 12" papers which has 12 images on it so it makes life easy when you don't need to stamp and colour an image.  I chose this particular image as my husband plays electric guitar in two bands so having the guitar and amplifier was just a match made in heaven.  I fussy cut the stars from the Mintay Garage 6" x 8" Add-on Paper Pack and popped them up on dimensionals.  I did add some Wink of Stella Clear Glitter brush to the stars but you can't tell in the photo.  

The tartan designer paper is from the Mintay Garage 12" x 12" Paper Pack and the distressed brown designer paper is from the Mintay Garage 6" x 8" Add-on Paper Pack  All the layers were trimmed to 1/8" using my Perfect Layers Tools.  The cardstock is by Kaisercraft.  

The sentiment is by Uniquely Creative from their Essential Birthday Sentiments Mini Cut-a-part Sheet and was popped up on dimensionals.

The beige cardstock border on the bottom was punched using my Fiskars Threading Water border punch which I use alot for masculine cards.  I added a score line next to it using my Martha Stewart Score Board.   The ribbon is from my stash and was added in 2 separate elements which I find easier and neater.

I added some Candi Dots on the top RHS with dimensionals.  I have had these Candi Dots in my stash for years.  They are like faux brads and so easy to pop onto your card. 

Once I had finished the card front, I glued it to an Anko Kraft card base using my Tombow Mono Multi glue.

Finished size is 5-1/2" x 5-1/2" or 140mm x 140mm.

Thanks for visiting my Blog today!

Jocelyn


Card Recipe:

Stamps and Ink:  None

Designer Papers:  Mintay Garage 12" x 12" Paper Pack + 6" x 8" Add-on Paper Pack

Accessories:  Candi Dots - Craftwork Cards (retired), dimensionals, Perfect Layers Tools, Ribbon - stash, Uniquely Creative Essential Birthday Sentiments Mini Cut-a-part Sheet, Wink of Stella Clear Glitter Brush, Martha Stewart Score Board, Tombow Mono Multi glue, Anko Kraft Card Base (K-Mart Australia), Other Cardstock - Kaisercraft

Punches:  Fiskars Threading Water border

Saturday, August 12, 2023

Mintay Garage Birthday Card No. 1

 
Hi everyone 😀

Today I am sharing a Birthday Card that I made for my brother-in-law's birthday using the awesome Mintay Garage Collection.  Our family has 4 masculine birthdays in August so I have been busy, busy, busy!


This is also my card for the following Challenges:

The Male Room - Challenge #177 - Dots and/or Stripes - my dots are the holes in the punched border, the Candi dots and the stripes are the tartan designer paper

Ellibelle's Crafty Wednesday Challenge - August - Anything Goes 

Splitcoaststampers - Free for All Friday - F4A155 - Blues and Browns 

The main image was trimmed from one of the Mintay 12" x 12" papers which has 12 images on it so it makes life easy when you don't need to stamp and colour an image.  My brother-in-law spends alot of his time working in his tool shed and is always fixing things and very talented with his woodwork - so I thought this image was absolutely perfect for him.  

I added another toolbox image on top with dimensionals which is from the accompanying Mintay Paper Diecuts collection.  You can see a closeup of the dimension here:


The tartan and grid plate designer papers are from the Mintay Garage 12" x 12" paper pack.  All the layers were trimmed to 1/8" using my Perfect Layers Tools.  The cardstock is by Kaisercraft.  

The sentiment is by Uniquely Creative from their Essential Birthday Sentiments Mini Cut-a-part Sheet and was popped up on dimensionals.

The beige cardstock border on the LHS was punched using my Fiskars Threading Water border punch which I use alot for masculine cards.  I added a score line next to it using my Martha Stewart Score Board.   The ribbon is from my stash and was added in 2 separate elements which I find easier and neater.

I added some Candi Dots on the top RHS with dimensionals.  I thought the colour matched the cover on the tape measure so perfectly.   I have had these Candi Dots in my stash for years.  They are like faux brads and so easy to pop on your card. 

Once I had finished the card front, I glued it to an Anko Kraft card base using my Tombow Mono Multi glue.

Finished size is 5-1/2" x 5-1/2" or 140mm x 140mm.

Thanks for visiting my Blog today!

Jocelyn


Card Recipe:

Stamps and Ink:  None

Designer Papers:  Mintay Garage 12" x 12" paper pack + Paper Diecuts MT-GAG-LSC

Accessories:  Candi Dots - Craftwork Cards (retired), dimensionals, Perfect Layers Tools, Ribbon - stash, Uniquely Creative Essential Birthday Sentiments Mini Cut-a-part Sheet, Martha Stewart Score Board, Tombow Mono Multi glue, Anko Kraft Card Base (K-Mart Australia), Other Cardstock - Kaisercraft

Punches:  Fiskars Threading Water border


Saturday, April 29, 2023

Stampin' Up Beautiful You 21st Birthday Card and Gift Box

 
Hi everyone 😊

Today I am sharing a card and gift box that I made for my niece's 21st birthday.  My niece had a party in a restaurant which I thought was a great idea when there are alot of people invited.  Much easier to cater for and you don't have to clean up afterwards LOL!  My husband and daughter went along but I didn't due to my never-ending fatigue from long-COVID and I didn't want to be a wet blanket and ask to go home after just an hour of being there.  I was disappointed that I couldn't go but at least people are understanding of how debilitating long-COVID can be.


The main image and sentiment are from a retired set by Stampin' Up called Beautiful You.  I adore this stamp set and one that I will never part with.  I stamped the image using Versafine Onyx Black ink onto Ranger watercolour cardstock and coloured it with Lyra watercolour pencils and a #2 round paintbrush.  I think it took me about 3 minutes to colour it!  I diecut the image using my Big Shot and a Lifestyle Nesting Circle die and layered it onto the peach designer paper then diecut a scalloped circle from the darker blue designer paper.

All the papers are my Mintay - Harmony.  Aren't the colours gorgeous?!  

For the LHS panel, I dry embossed the peach designer paper with a retired Cuttlebug Textile embossing folder.   I have really been enjoying using my embossing folders again.  They kind-of fell out-of-favour for quite a few years but with all the amazing 3D embossing folders now available, they are back on-trend.  The blue designer paper was punched using a Martha Stewart Lace Doily edge punch.  I tied on some peach organza ribbon then threaded some peach/gold twine through a gold heart charm and glued that underneath the organza ribbon using fabric glue.  The twine came in a pack of 6 from KMart.  

The sentiment panel was diecut using a retired Spellbinders Shapeabilities Labels Trio die and popped up on dimensionals.  

The peach diamantes on the top RHS I bought on EBay ages ago.  It was a bulk lot of all sorts of colours.  I glued them on using Helmar 450 glue.

Once I had finished the card front, I glued it onto a white card base using Tombow Mono Multi glue.

I decorated the card inside too.  Please excuse the quality of the image but I took it very late in the afternoon and the light was dreary and no amount of editing seemed to improve it much.  Oh well!


The sentiment is also from the Beautiful You stamp set.  I added a strip of leftover designer paper then added the stickers on the LHS from the Mintay Harmony Cardboard Sticker sheet.  

Here is the gift box:


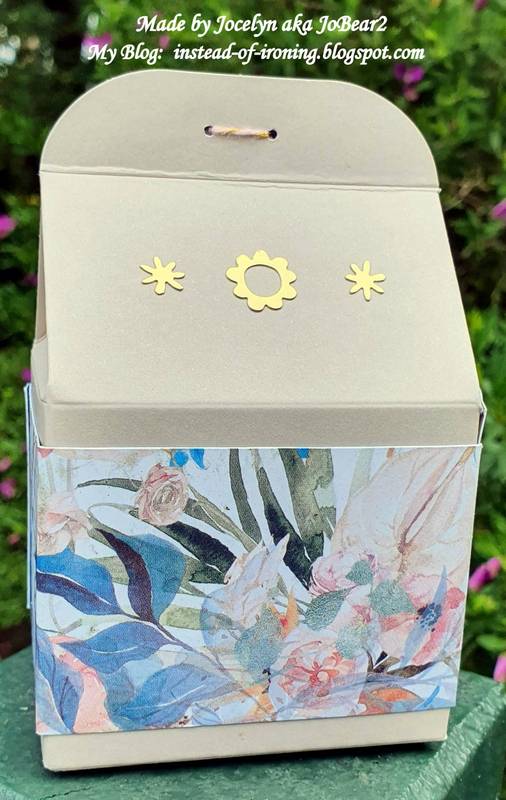
This was a last-minute make so by the time I finished it to photograph it, the light was terrible for photographing.  The box is by Stampin' Up and has been in my stash forever and retired.   I wrapped some designer paper around the box then punched two tiny holes using a retired Stampin' Up 1/16" Hole Punch.  I bought this punch on clearance and it is very handy when you only want a tiny hole in something.  I threaded the peach/gold twine through the holes.  The sentiment is also from the Beautiful You stamp set.  I diecut the sentiment using a Spellbinders Oval Nestabilities die and popped it up on dimensionals.   I ended up stamping the sentiment 3 times after smearing it when I diecut it because I was too impatient to let it dry!  Amazing how you just don't think when you are under time-pressure!   The gold stickers are also from Stampin' Up but long retired.

Here is another photo of the box from the side:


And a photo of the back:  


I popped a pair of earrings in a small organza bag into the box and nestled them in some gold tissue paper.  I bought the earrings from my local Pharmacy which has some beautiful giftware but they didn't come in a box so I had to put my thinking cap on for how to wrap them and to make them look elegant.  I was really pleased with how the box turned out and I love how the box matches the card.

Thanks for stopping by!

Jocelyn


Card Recipe:

Stamps:  Stampin' Up Beautiful You (retired)

Ink:  Versafine Onyx Black

Designer Paper:  Mintay Harmony 6" x 6" paper pad + 12" x 12" papers + Sticker Sheet

Accessories:  Big Shot, Cuttlebug Textile embossing folder (retired), gold heart charm (stash), 1" wide peach organza ribbon (stash), peach/gold twine - KMart, Lyra watercolour pencils, #2 round paintbrush, dimensionals, Helmar 450 glue, Tombow Mono Multi glue, fabric glue, peach diamantes, Wink of Stella clear glitter brush, white card base, Ranger watercolour cardstock

Dies:  Spellbinder Shapeabilities S3-147 Labels Trio (retired), Lifestyle Nesting Circles + Scalloped Circles

Punches:  Martha Stewart Doily Lace Edge


Gift Box Recipe:

Stamps:  Stampin' Up Beautiful You (retired)

Ink:  Versafine Onyx Black

Designer Paper:  Mintay Harmony 6" x 6" paper pad

Accessories:  Stampin' Up Kraft Gift Box (retired), Stampin' Up gold stickers (retired), Stampin' Up 1/16" hole punch (retired), Big Shot, doublesided tape, dimensionals, peach/gold twine - KMart, white cardstock scrap

Dies:  Spellbinder Scalloped Oval Nestabilities