skip to main |
skip to sidebar
Hi blogging friends 
Today I am sharing a couple of masculine cards using the same technique of 'Embossing Folder Stamping' that I have shared on my last couple of blog posts. In my immediate and extended family, we have a ton of birthdays in August and most are masculine - so I was looking for some quick and simple cards that I could make multiples of - and here is my first card:
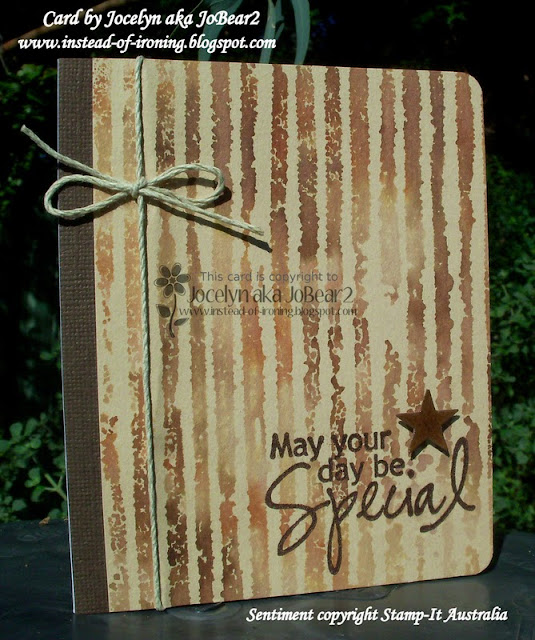
For my first card, I used a Cuttlebug Distressed Stripes embossing folder and inked the folder with Antique Linen, Vintage Photo and Walnut Stain Distress Inks then sprayed the folder with water using my Ranger Mini Mister. I made sure that where I wanted to stamp my sentiment that I had more of the lighter coloured ink so the sentiment stood out a little. I lay my kraft cardstock on top and let it sit there for about a minute and pressed down to smoosh the ink around then lifted the cardstock off and let it dry naturally.
I rubbed my embossing buddy over the sentiment area then stamped the sentiment with Pearlescent Chocolate pigment ink and heat-set it using clear embossing powder. I diecut a star from dark brown cardstock and popped it up on a 3mm dimensional then added Glossy Accents to make it all shiny to match the sentiment (bit hard to see in my photo).
Lastly, I added the dark brown cardstock strip and tied on some Darice Hemp cord. I added Fray Stop to the cut ends to stop them from fraying.
Now, here is my 2nd card:

This time I used a Darice Woodgrain embossing folder and used the same inks as my first card. Once my kraft cardstock was dry, I ran it through my Big Shot with the same Woodgrain folder as I wanted the card to have some texture but I was very careful to match up the pattern perfectly by using removable tape to hold the cardstock in place so it didn't move at all.
I stamped the sentiment using Gingerbread chalk ink then diecut it using a die from a set that I originally purchased on Joanna Sheen's (UK) website. There is no brand name on the set and I can't find the set on Joanna's website anymore so I have no clue who makes it. All I remember is that they were very cheap and cut beautifully! I inked around the edges using Gingerbread ink then popped the sentiment panel up on dimensionals.
I wanted the Hemp cord to match the card so rubbed the Gingerbread ink pad over the cord then heat-set it with my heat-gun it to dry the ink thoroughly then tied it on.
I am sure that you could use these cards for Father's Day as well (which we celebrate in September in Australia) or simply change the sentiment for a Get Well card. I have made about 6 of them so I have a nice little pile of cards for my stash which makes me uber-happy ----> see: this is me 
Challenges -
I made my cards for the following challenges -
Papertake Weekly Challenge - For the Boys - anything male
Cute Card Thursday - Challenge #325 - So Macho - any male themed cards/projects
Splitcoaststampers - Clean and Simple Challenge CAS275 - Quick and Stackable - cards that you can make multiples of
Splitcoaststampers - Technique Lover's Challenge TLC482 - To Emboss or to Stamp - which is specifically for Embossed Folder Stamping
Thanks for stopping by! It's mid-afternoon on Friday here in Australia so I am really happy that it's almost the weekend. I haven't been well this week so I'm looking forward to relaxing and having some time-out.
Jocelyn
Card Recipe:
Card No. 1 -
Stamps: Stamp-It Australia siset-014 sentiment set
Ink: Brilliance Pearlescent Chocolate pigment; Ranger Antique Linen, Walnut Stain and Vintage Photo Distress
Accessories: Big Shot, Cuttlebug Distressed Stripes embossing folder, My Favorite Things Stacking Stars Die-namics dies, Ranger Mini Mister, Glossy Accents, 3mm dimensional, clear embossing powder, heat-gun, Darice Hemp Cord (Riot Art and Craft), Fray Stop, embossing buddy, Stamp Positioner, cardstock - kraft, dark brown
Punches: Stampin' Up corner
Card No. 2 -
Stamps: Wendy Irving Expressions clear set J6412.02
Ink: Versamagic Gingerbread chalk, Ranger Antique Linen, Walnut Stain and Vintage Photo Distress
Accessories: Big Shot, Darice Woodgrain embossing folder, Unknown brand die (for sentiment panel), Ranger Mini Mister, Darice Hemp Cord (Riot Art and Craft), Fray Stop, heat-gun, dimensionals, cardstock - kraft, chocolate
Punches: Stampin' Up corner
Hi blogging friends
Hot on the heels of my last post where I shared my first card using the Embossing Folder Stamping technique, here is another card that I made with this same technique but with a few extra things thrown in:

I used a Die-sire Floral Embossalicious embossing folder for the stamping and scribbled on various colours of Tombow pens - numbers 723, 090, 993, 991, 673. The good thing about Tombow pens is that it doesn't matter if you get another colour on the nib because you just scribble it out on a sheet of scrap paper. I sprayed on some water using my Ranger Mini Mister then lay my watercolour paper on top. I recently purchased some Tim Holtz Distress Watercolour cardstock and I love it because it is really white and has a smooth and a rough side. In this instance, I used the smooth side.
I left my watercolour paper on top for about a minute and pressed down with my fingers to make sure I had good coverage on the paper, then lifted it off. I dried off the paper very thoroughly with my heat-gun and put it aside for a little while. In the meantime, I scribbled the same colour Tombow Pens onto my Craft Mat, sprayed on some water and used another sheet of watercolour cardstock to smooch the colours around so that I had matching cardstock for diecutting the butterflies and for adding the top and bottom borders.
I decided to run the stamped background through my Big Shot using the same embossing folder to add some texture but had to be extremely careful to match up the stamping with the embossing folder and added plenty of removable tape to secure it in place so the cardstock didn't move. In fact, my first attempt was a fail because I didn't quite line things up so had to start all over again.......unhappy sigh...... but we learn from our mistakes, don't we?!
What I discovered is that the watercolour cardstock tends to stretch a little in the Big shot because the embossing is pressing into what you have stamped so when your folder is very detailed like the one I used, you do end up with one end matching well and the other end goes a bit 'out' as the cardstock stretches. Anyway, I do love how pretty and lacy it turned out with the added embossing/texture.
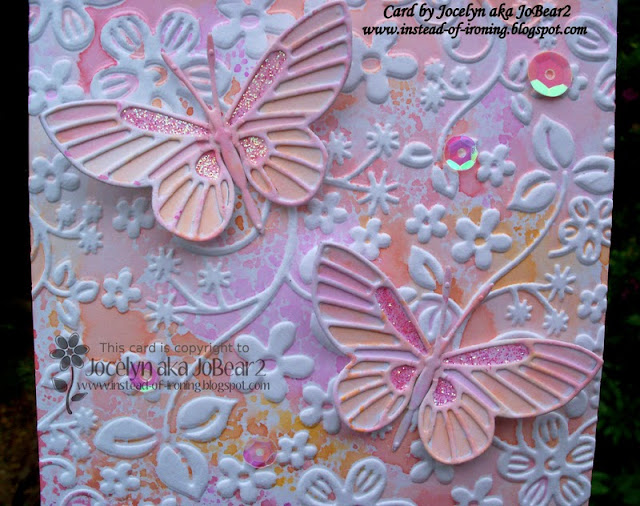
The butterflies are dies by Memory Box - Moonlight Butterfly (which is the butterfly base) and the matching Kaleidoscope die (which is the detailed butterfly top). The body/antennae is a separate die from the Kaleidoscope set. The Moonlight Butterfly die comes with a body/antennae die too but it is slightly different to the Kaleidoscope one.
I glued down just the centre of the butterflies using Tombow Mono Multi glue so I could bend the wings up a little. The bottom border was punched with a Martha Stewart Lace Doily edge punch which was difficult because the cardstock was a bit too thick and it jammed! Fortunately, after a few moments of choice words, I was able to finally get it to punch right through but I won't use the watercolour cardstock in it again - I have learned my lesson! I only just replaced this punch a few weeks ago so hopefully I haven't shortened its life!
I added some Pink Kindyglitz glitter glue to the butterflies and used Glossy Accents to add some pink 8mm sequins and some clear 5mm sequins. The clear ones are fantastic because they pick up the colours around them so they look like pink ones! Here is a close-up:
Lastly, I tied on the pink ribbon and added Fray Stop to the cut ends. I wondered if I should add a sentiment but really didn't want to cover up the pretty background so left it off.
My niece and her partner recently became engaged so this card will be going to the happy couple but I think you could use the card for alot of different occasions and not just for an engagement.
Challenges:
I am linking my card up to the following challenges -
Papertake Weekly Challenge - Anything Goes - with the optional extra of adding something that reminds you of summer or has a summery theme (I didn't do that bit as it is winter here and can't get my head around summery things 'cos my little feet are like ice-blocks)
Crafty Catz Challenge #233 - Anything Goes
Splitcoaststampers - Technique Lovers Challenge TLC482 - To Emboss or to Stamp (specifically for Embossing Folder stamping), and
Splitcoaststampers - Free for All Friday F4A223 - Use that Stash - where we have to use our Crafty Stash. For me, it is the butterfly dies. I have a lovely stash (which is continually growing) of butterfly dies - all brands - I love them 'cos they're just so pretty (especially the Memory Box ones!) but keep forgetting to use them on projects - and, because I don't embellish my cards alot, they don't seem to "fit" anywhere. This time, I made a huge effort to use them and I am so glad I did!
Thanks for visiting my blog today!
Jocelyn
Card Recipe:
Stamps, Ink, Designer Paper: None
Accessories: Tim Holtz Distress watercolor cardstock, Big Shot, Die'sire Embossalicious EF-6 Floral embossing folder, Tombow pens - 723, 090, 993, 991, 673, Craft Sheet, Ranger Mini Mister, sequins - 8mm pink and 5mm clear, Kindyglitz pink glitter glue, Glossy Accents, Memory Box dies Moonlight Butterfly #98260 and Kaleidoscope Butterfly and body/antennae #98261, pink ribbon, Fray Stop, Tombow Mono Multi glue, heat-gun
Punches: Martha Stewart Lace Doily edge punch
Hi blogging friends
A short while ago, I came across a card that was stamped with an embossing folder and I really, really loved how it looked but had no clue how it was done because there was no information with the card. Fortunately, Splitcoaststampers recently uploaded a tutorial including a video HERE so I have spent alot of time playing in my Craft Room trying to learn the technique.
My initial attempts were quite frustrating because I wasn't sure how much water to spray on the folder. I found that if I sprayed too much water, the pattern was lost - and then if I didn't spray enough water, I wouldn't get a lovely graduation of colour. I also played with different mediums such as Tombow Pens and Distress Inks and tried different colour combinations plus I experimented with different embossing folders and found some worked better than others. I also tried watercolour paper and smooth white cardstock and they both gave very different results but worked really well. I also learned to let the cardstock dry before thinking that it looks terrible because it looks different after drying.
I was so fortunate that yesterday someone else was caring for my loved one all day so I spent a large part of the day with no interruptions where I could really get stuck in. And it was great because the day before, we had been at the hospital for appointments for a good deal of the day so I appreciated having a day off after the appointments. It is very, very rare that I get a whole day to myself at home where I not only have a physical break from being a Carer but also a complete emotional break. I felt on-top-of-the world at the end of the day and so excited to learn a new technique. And I didn't even need to make dinner that evening - that was made for me as well - ahhhh, bliss!!
So, without further ado, here is my card:

I used a Cuttlebug Victoria embossing folder and randomly applied Antique Linen, Tumbled Glass, Bundled Sage and Faded Jeans Distress Inks then sprayed the water onto the folder using a Ranger Mini Mister and lay my smooth white cardstock down on top. I left the cardstock there for almost a minute and pressed down with my fingers so all areas of the cardstock received the ink then lifted it off. Where there was a darker pool of colour that stood out a bit too much, I simply used a tiny piece of paper towel to blot it up a little. I left the cardstock to dry by itself but I guess you could dry it with a heat-gun if you were in a hurry. I was a little afraid that I would spread the ink into the white areas and spoil the effect so I just waited patiently for it to dry because this was my favourite one out of all the ones I had done and believe me, I did tons of them LOL! Ohhh, I just love how the colours mixed - so pretty don't you think?!
I added the teal cardstock strip then stamped the sentiment using Colorbox Peacock pigment ink and heat-set it using Satin Pearl embossing powder. I diecut a heart from teal cardstock from the Memory Box Hearts and Stars die set and popped it up on a 3mm dimensional. Lastly, I corner-punched the RHS of the main panel then tied on the twine. It really is a simple card even if it took a loooooong time to get to that point but I am so glad that I persevered!
Challenges:
I am entering my card in the following challenges -
Splitcoaststampers Technique Lovers Challenge - TLC482 - To Emboss or To Stamp which is specifically for Embossing Folder Stamping
Simon Says Stamp Wednesday Challenge Blog - Anything Goes
Cute Card Thursday - Challenge #323 - Blues and Hues
Thanks for taking the time to visit my blog today - I appreciate it very much.
Jocelyn
Card Recipe:
Stamps: Sentiment from Stamp-It Australia self-cling rubber sentiment set siset014
Designer paper: None
Ink: Ranger Distress Inks - Antique Linen, Tumbled Glass, Faded Jeans and Bundled Sage; Colorbox Peacock pigment
Accessories: Cuttlebug Victoria embossing folder, Darice Hemp cord (Riot Art and Craft), 3mm dimensional, Memory Box Hearts and Stars die set, Big Shot, Ranger Mini Mister, heat-gun, Satin Pearl embossing powder, cardstock - teal, white
Punches: Stampin' Up corner punch








.jpg)


