Showing posts with label Spellbinders. Show all posts

Thursday, July 9, 2026

Stampin' Up Gift Tags Teddy Bear Birthday Card


Hi blogging friends,

EDITED TO ADD:  I just learned my card was picked by Anne from the Design Team as a favourite over at the Critter Crazy Challenge.  Thank you Anne!

******************

Today I am sharing a cute little Birthday Card that I made for a young lady who attends our monthly Stampin' Up Class:


This is also my card for the following challenges - click on the underlined link to take you to the challenge:
  • Critter Crazy Challenge - #112 - Anything Goes with a Featured Critter Real or Fantasy
  • Crafty Catz Challenge - #717 - Anything Goes
  • Splitcoaststampers - Free for All Friday F4A854 - Nursery Rhymes/Children's Song - I chose Teddy Bear's Birthday Party Song.  You can find it on You-Tube HERE.  It goes like this:
It's a special day, a time for cheer,
Teddy bear's birthday is finally here!
Friends are coming from far and near,
With laughter, love, and joy sincere.
Happy birthday, Teddy Bear!
Let's cut the cake, and share.
Balloons and presents fall all around,
Let's celebrate with joy and sound!
A chocolate cake with candles bright,
Teddy bear blows them out tonight.
Wishes are made, the party's begun,
Dancing and games for everyone!
Happy birthday, Teddy Bear!
I thought I would bring out one of my VERY old Stampin' Up Sets called Gift Tags.  Technically, the stamps are meant just for gift tags, but I love this sweet little teddy bear and I think it is perfect for a quick and easy card.  This set was released in the year 2000 and I managed to pick it up second-hand over 10 years ago.  It is such a sweet little set which has seen plenty of use over the years.  Stampin' Up currently have their Silly Old Bear Suite - but it is frustratingly not available in Australia.  I would LOVE to have another Teddy Bear Stamp Set like Button Bear. which was released in 1995.  The last teddy bear stamp that I remember Stampin' Up releasing was Baby Bear from 2016 so it has been far too long between bear releases!
I stamped the image (which already includes the sentiment) using Versafine Onyx Black Ink onto Ranger Watercolour Cardstock.  It was coloured using Zig Clean Color Real Brush Markers and a Zig Blender Pen.

I pulled out some retired Stampin' Up Designer Series Papers called 'A Cherry on Top' which was first released in June 2015.  I paired them with two now-retired colours:  Watermelon Wonder and Bermuda Bay.  I wanted my card to look very bright and cheery.  I wish I had bought more of these Designer Series Papers and are now down to just a few sheets 😞

I diecut the main image panel using my Big Shot and Stampin' Up Stylish Shapes Circle Die, then layered that onto a Spellbinders Petite Nesting Scalloped Circle Die.  

I tied on some Caribbean Twine then added 3 x Uniquely Creative Enamel Dots from their Choose Your Own Adventure which was released May 2021.  I added a dot of Art Glitter Glue underneath the enamel dots so they were more secure.  I am posting this card so those dots ain't going anywhere!

I used my EK Success Arrows Border Punch to punch some tiny hearts from Watermelon Cardstock - they are the leftover punchies that look like tiny hearts to me - then glued one either side of the sentiment.  

I added some Glossy Accents to the bear's heart

Final touches were Uniquely Creative Clear Sparkle Brush to the hearts beside the sentiment, teddy's bow and the present.

Once I had finished my card front, I glued it to a White Card Base using Tombow Mono Multi Glue.  I added some scraps of white cardstock underneath so the panel had a little bit of height.  I find this easier (and cheaper) then using foam pads - plus the glue gives me a little bit of wriggle time so I can get the panel exactly where I want it.  I can never get things straight when I use foam pads!

Finished size is:  4-1/2" x 4-1/2" or 114mm x 114mm.

Thanks for stopping by!

Jocelyn


Card Recipe:

Stamps:  Stampin' Up Gift Tags (released 2000 - retired)

Ink:  Versafine Onyx Black

Designer Paper:  Stampin' Up A Cherry on Top (released 2015 - retired)

Accessories:  Big Shot, Uniquely Creative Clear Sparkle Brush, Zig Clean Color Real Brush Markers, Zig Blender Pen, Caribbean Twine by The Twinery, Uniquely Creative Enamel Shapes - Dots - UCE1821, Glossy Accents, Tombow Mono Multi Glue, Art Glitter Glue, House of Paper - White Square Card Base, Cardstock - Stampin' Up Watermelon Wonder (retired) + Bermuda Bay (retired) + Scraps of White + Ranger Watercolor

Dies:  Stampin' Up Stylish Shapes #159183, Spellbinders Petite Nesting Scalloped Circles (retired)

Punches:   EK Success Arrows Border


Sunday, March 15, 2026

Stampin' Up Leaf Collection Hello Card

 
Hi everyone,

Today I am sharing a card that I made for one of the lovely ladies in our Stampin' Up Class that we attend once a month:

 
I wanted to brighten my friend's day with a card plus a surprise gift that I am including.  I do love to send "happy mail" when someone least expects it.  Sure, it's lovely to get a birthday card (not that I get very many nowadays) - but it's so nice to receive a handmade card in the mail when you aren't expecting it.  I think it's sad that people just send a message on Facebook when it's your birthday.  It's like it's a cookie cutter social media task.  And to me, it feels so impersonal, robotic and obligatory rather than heartfelt.  I have been making a point in the last year to send out Thank You Cards and people really appreciate them.

This is also my card for the following Challenges - click on the underlined link to take you to each challenge:
  • Splitcoaststampers - Free for All Friday F4A838 - 3 of a Kind - mine is the 3 ink colours as well as the 3 different sized clear gems
  • Splitcoaststampers - Technique Lover's TLC1004 - Joseph's Coat
  • Crafty Catz - #709 - Anything Goes
  • Cardz for Galz - #271 - Embossing Heat or Dry 

I used the Joseph's Coat Technique which I only learned how to do last year - but it has been around for quite a long time.  First, I took a sheet of White Cardstock and randomly coloured splotches of ink all over it using my Ink Blending Tools fitted with a Domed Pad.  I used all Stampin' Up Inks in the colours Watermelon Wonder + Delightful Dijon (both retired) and Garden Green (still current).  I was really going for an Autumn feel because it is Autumn here where I live in Australia and the leaves are just starting to turn.  You don't have to be neat nor blend colours.  This is what the panel looked like after adding the inks - and doesn't it look like a hot mess?!!

I then heat-set the panel to make sure it was completely dry before moving onto the next step. 

I used a Powder Tool all over the panel then stamped my leaves using Versamark Watermark Ink.  The image is called Stampin' Up - Leaf Collection and is one solid stamp.  This a retired stamp, but one I absolutely LOVE.  I poured on Ranger Clear Detail Embossing Powder and heat-set it.  I went over all the panel with Versafine Clair Nocturne Ink and the embossed image resists the black ink.  I would definitely recommend disposable gloves for that part unless you like having black ink all over your hands!  

You then wipe over the panel using a piece of paper towel to remove the excess black ink off the embossed image.  And then the colourful image seems to magically appear which is why it is called Joseph's Coat.   It really amazes me how the ink colours change quite a bit.  You would not believe that it was Garden Green Ink as it looks more teal.  

I layered the panel onto Stampin' Up Crushed Curry Cardstock with a 1/16" border, then onto Black Cardstock with a 1/8" border which were done using my We R Memory Keepers Perfect Layer Guides.

The sentiment is also by Stampin' Up - Fabulous Sayings - which you could get for $9 in January once your order was over a certain amount - but it is actually still available when I checked tonight even though it is March.  I guess it will be available until sold out.  This is a really, really great set and definitely worth getting:

I stamped the sentiment using
Versafine Onyx Black Ink onto Stampin' Up Very Vanilla Cardstock, then diecut it using my Big Shot and a Spellbinders Oval Nestabilities Die.  I layered this onto Crushed Curry Cardstock that was diecut using a Spellbinders Scalloped Oval Nestabilities Die.  I popped the panel up on scraps of cardstock.  

I added 5 x Clear Gems in 3 different sizes around the sentiment - 3 on the top RHS and 2 on the bottom LHS.  I used Art Glitter Glue to attach them because this glue dries completely clear.  I love how the clear gems look like drops of rain.

Lastly, I attached my card front to a Kaisercraft White Card Base using Tombow Mono Multi Glue.

I think you could use this card for lots of different occasions.

Thanks for stopping by!

Jocelyn


Card Recipe:

Stamps:  Stampin' Up Leaf Collection #163610 (retired) + Fabulous Sayings #167972

Ink:  Stampin' Up Watermelon Wonder + Delightful Dijon (both retired) + Garden Green, Versafine Clair Nocturne, Versafine Onyx Black

Designer Paper:  None

Accessories:  Big Shot, Ink Blending Tool with Domed Pads, Heat-Gun, Powder Tool, Ranger Clear Detail Embossing Powder, WRMK Perfect Layers Guides,  Disposable Gloves, Paperartz Clear Gems, Art Glitter Glue, Tombow Mono Multi Glue, Cardstock - Stampin' Up Crushed Curry + Very Vanilla + White + Black, Kaisercraft White Card Base

Dies:  Spellbinders Oval Nestabilities + Scalloped Oval Nestabilities


Sunday, February 15, 2026

Penny Black Love Tail Valentine's Day Card

 
Hi everyone,

Today I am sharing a Valentine's Day Card that I made for my daughter:


This is also my card for the following Challenges:
  • Penny Black Saturday Challenge - February - Anything Goes or Romance
  • Splitcoaststampers - Free for All Friday F4A833 - Valentine
  • Critter Crazy Challenge #107 - Anything Goes - with a Featured Critter (real or fantasy)
  • We Love Stamping - February - Hearts or Anything Goes
The main image is by Penny Black - Love Tail - which is from 2006.  I still love this image as much as the day I bought it!  I stamped it using Versafine Onyx Black Ink onto Ranger Watercolour Cardstock, then coloured it using Zig Clean Color Real Brush Markers using a Zig Blender Pen for all my blending instead of water.  I only recently found out that Zig makes this Blender Pen and this was my first try out with using it.  I absolutely LOVE it and it is so easy to use.

I went around the image with a Lyra Sky Blue Watercolour Pencil.  First, I scribbled the pencil onto some scrap watercolour cardstock and added some water, then picked the colour up with my #4 Round Paintbrush and smooshed it around so it is very light but takes away the stark white of the watercolour cardstock.  I went over the image with an Anko 0.05 Black Pigment Pen to darken up the black lines.  Here is a close-up:


I diecut the image using a QuicKutz Nesting Card Templates Die and my Big Shot, then diecut the next size up from Colormates Dark Racy Raspberry Cardstock.

All the designer papers are by Simple Stories - Love and Adore - which first came out in 2016 so are 10 years old.

The sentiment is by Lawn Fawn - Love Letters - and was stamped using Versafine Onyx Black Ink.  I diecut the panel using a Lifestyle Nesting Circles Die, then diecut the scalloped circle using a Spellbinders Petite Scalloped Small Circles Die.

The main image panel is popped up on scraps of white cardstock and the sentiment is popped up on the top and RHS with 1mm Self-Adhesive Doublesided Foam Pads.  The bottom LHS of the sentiment panel is glued flush to the main image panel.

I punched some tiny hearts from Dark Racy Raspberry Cardstock using my EK Success Arrows Border Punch.  The leftover punchies look like tiny hearts and are perfect for adding a little something extra to your card.  I glued three around the sentiment and two on the main image panel using Art Glitter Glue fitted with a fine nozzle.

I thought about adding a ribbon or some rhinestones but didn't really have the right colour to match so just left the card as-is; I guess I am just keeping it simple.

Once I had finished my card front, I glued it to a White Kaisercraft Card Base using Tombow Mono Multi Glue.

As a final touch, I added some Uniquely Creative Clear Sparkle Brush to the hearts and flowers as well as the tiny hearts.

Thanks for visiting my blog today!

Jocelyn


Card Recipe:

Stamps:  Penny Black Love Tail 3608J Wood-Mount (2006), Lawn Fawn Love Letters LF1292

Ink:  Versafine Onyx Black

Designer Papers:  Simple Stories Love and Adore 6" x 6" #7614 (2016)

Accessories:  Big Shot, Zig Clean Color Real Brush Markers + Blender Pen #999, #4 Round Paintbrush, Lyra Sky Blue Watercolour Pencil, Uniquely Creative Clear Sparkle Brush, 1mm Self-Adhesive Doublesided Foam Pads, Tombow Mono Multi Glue, Art Glitter Glue, Stamping Platform, Anko 0.05 Black Pigment Pen, Cardstock - Black + Scraps of White + Colormates Dark Racy Raspberry, Kaisercraft White Card Base

Dies:  All retired - QuicKutz Nesting Card Templates DC0431, Lifestyle Nesting Circles, Spellbinders Petite Scalloped Small Circles Nestabilities S4-117

Punches:  EK Success Arrows Border (retired)


Friday, January 16, 2026

Stampin' Up Wonderland Christmas Card

 
Hi everyone,

Today I am sharing my final Christmas Card that I made this Christmas season:


I pulled out one of all-time favourite Stampin' Up Sets called Wonderland which is retired but certainly one I could never part with.

To make my card, I ink-blended a piece of Bristol Smooth White Cardstock with Stampin' Up inks using Ranger Ink Blending Tools and Domed Pads.  The lighter blue is Soft Sky - sadly retired - and the other inks are Misty Moonlight and Night of Navy which are still current.  I did splatter the panel with some clean water just to add some a bit of extra-something to the sky.

I then stamped the trees using Night of Navy ink using 1st, 2nd and 3rd generation to add some depth.  I lightly went around the image using a bit more of the Night of Navy ink but not all the way around so I could leave the lighter areas.

I splattered the scene with some watered-down Schminke Opaque White  Watercolour Ink and a Fan Brush.  I glued on some Stampin' Up Loose White Snowflakes which are from late 2024 but are no longer available.  I used Helmar's 450 Quick Dry Adhesive to glue them on which is a really strong adhesive.

I then layered the panel onto Stampin' Up Misty Moonlight Cardstock and trimmed it to 1/8" using my We R Memory Keepers Perfect Layer Guides.

The sentiment was stamped using Night of Navy ink.  I used my Stamping Platform so I could get perfect placement, plus I needed to re-stamp it a few times to get a good impression.  I diecut it using a Spellbinders Labels Trio Die and my Big Shot.

To add some sparkle, I did dots of glue with my Quickie Glue Pen and sprinkled on Hero Arts Prisma Glitter.

Once I had finished my card front, I layered it onto a Kaisercraft White Card Base using Tombow Mono Multi glue.

I wish you could see the sparkle - it looks so pretty in real life. 

Thanks for visiting my blog today.

Jocelyn


Card Recipe:

Stamps:  Stampin' Up Wonderland #140365 (retired)

Inks:  Stampin' Up Soft Sky (retired), Misty Moonlight and Night of Navy

Designer Paper:  None

Accessories:  Bristol Smooth White Cardstock 250gsm, Stampin' Up Misty Moonlight Cardstock, Schminke Opaque White Watercolour Ink, Fan Brush, Ranger Ink Blending Tools and Domed Pads, WRMK Layer Guides, Stamping Platform, Kaisercraft White Card Base, Tombow Mono Multi Glue, Helmar's 450 Quick Dry Adhesive, Quickie Glue Pen, Hero Arts PG104 Prisma Glitter, Stampin' Up Loose White Snowflakes #164128 (retired) 

Dies:  Spellbinder Shapeabilities Labels Trio S3-147 (retired)


Friday, July 4, 2025

Stampin' Up Silly Goose Birthday Card

 
Hi everyone 😀

I have taken a break from making Thank You Cards to make a Birthday Card for my daughter's birthday:


Challenges:

This is also my card for the following Challenges - click on the underlined links to take you to their blog:
  • Crafty Catz Challenge #697 - Anything Goes
My daughter really loves playing "The Untitled Goose Game" which is a really fun video game that was developed in Australia.  So it really was a no-brainer to use the adorable Stampin'Up Silly Goose Set to make a card for her birthday.

I stamped the image onto Ranger Watercolour Cardstock using Versafine Onyx Black Ink.  I coloured the image with a mix of Lyra + Derwent Watercolour Pencils + Zig Clean Color Real Brush Markers.   I used my Zigs to add some blades of grass underneath the goose.  Of course, after I had done that, I noticed that there is a stamp in the set that you can use to stamp grass.  I hadn't really noticed it before for some reason!  Isn't that goose just so adorable?!

I re-stamped the image and cut out just the balloon and went around the edges with an Anko Black Pigment Brush Pen to hide the white edge - then popped up the balloon on a 0.5mm foam pad.  I went over all the black lines of the goose etc. with an Anko 0.05 Black Pigment Pen to darken then up after my colouring.

I diecut the image using a My Favorite Things Inside and Out Stitched Rectangle Stax Die - then glued it to some designer paper.  I rounded the corners using a We R Memory Keepers 1/2" Corner Chomper.

The sentiment was diecut using an old retired Spellbinders Labels Trio Die.  This is another die that I have used countless times over the years.

All the designer papers are by Echo Park - Happy Birthday - which were released in 2017.  I didn't use any cardstock for my layers - they are all designer papers.

The bottom panel was punched using a Fiskars Scallop Border Punch.  The ribbon is from my stash and was originally purchased from KMart some years ago now.

Once I had finished my card front, I glued it to a Uniquely Creative White Card Base.  Final touches were Stampin' Up Dazzling Details Glitter Glue to the balloon and the party hat and three x Aqua Couture Creations Gemstones.

Finished size is:  4-1/8" x 5-3/16" or 105mm x 148mm.

Thanks for stopping by my blog today.

Jocelyn


Card Recipe:

Stamps:  Stampin' Up Silly Goose #160734 (retired)

Ink:  Versafine Onyx Black

Designer Paper:  Echo Park Happy Birthday 6" x 6" (from 2017) (retired)

Accessories:  Big Shot, Lyra + Derwent Watercolour Pencils, Kuretake Clean Color Real Brush Markers, #4 Round Paintbrush, Ribbon (KMart), WRMK 1/2" Corner Chomper, 0.5mm Self-Adhesive Doublesided Foam Squares, Ranger Watercolour Cardstock, Stampin' Up Dazzling Details Glitter Glue, Couture Creations 3mm + 4mm Aqua Gemstones, Anko Black Pigment Brush + 0.05 Liner, Uniquely Creative White Card Base, Tombow Mono Multi Glue

Punches:  Fiskars Scallop Border (retired)

Dies:  My Favorite Things Inside and Out Stitched Rounded Rectangle STAX MFT-0848 (retired), Spellbinder Shapeabilities Labels Trio S3-147 (retired)


Wednesday, July 2, 2025

Paper Tole Rose Thank You Card

 
Hi blogging friends,

This is my third Thank You Card that I've made to thank people for their support following my Mum's passing in June:


I am finding being in my Craft Room and creating is like a healing balm for my soul.  Even though Mum's passing at age 94 wasn't unexpected, it has been difficult because she would go downhill then rally, then go downhill then rally again - but she would just become more and more frail each time.  I have taken comfort in that she passed peacefully in her sleep.  

Challenges:

I am entering my card in the following Challenges - click on the underlined link to take you to the Challenge:

Crafty Catz Weekly Challenge #697 of Anything Goes

The Paper Players - Tic Tac Toe Challenge - PP744 - choose at least 3 elements across, down or diagonally.  I chose Flowers, Diecut and Embossing.


I again decided to use a Paper Tole or Diecut Decouage image by Reddy Creative Cards but did trim the image down a little.  I used 0.5mm Self-Adhesive Doublesided Foam Squares between each layer.  

The designer papers are by Uniquely Creative - Dear Diary - which were released in June this year.  These papers are so exquisitely beautiful - I adore them!

The cardstock layers are Dusty Rose and Sage - and the dark green layer is actually some designer paper called Elation P2607 from Kaisercraft's Peace and Joy Collection which was released about 2019.  I couldn't find the right shade of dark green cardstock in my stash so this fitted the bill perfectly.

The dry embossing across the middle is my old favourite:  Cuttlebug Textile Embossing Folder.  I have used this folder so many times over the years and still love it as much as when I first bought it.

The sentiment is by Kaisercraft - Banksia Rose Collectables - which is a recent release.  It matched so perfectly like it was just "meant to be".  I diecut some Dusty Rose Cardstock using my Big Shot and Spellbinders Petite Scalloped Circle Nestabilities and glued that underneath the sentiment using Tombow Mono Multi Glue.

Both the main image panel and sentiment are popped up on scraps of white cardstock.

I diecut 5 x Dusty Rose Cardstock Hearts using an Impression Obsession die called Heart of Hearts.  This particular die cuts out a myriad of different styles and sizes of hearts which comes in very handy.  I glued four around the main image and one on the sentiment panel.  I added some Wink of Stella Clear Glitter Brush to the hearts which added some subtle sparkle.  

Lastly, I glued on some Pale Green Sparklets using Helmar's 450 Quick Dry Adhesive then attached my card front to a Kaisercraft White Card Base.

Finished size is 5-5/8" x 5-5/8" or 143mm x 143mm.

And now here is a pic of the card inside:


I again used the Uniquely Creative Dear Diary Designer Papers for the main background.  I glued on some flowers and leaves from the Uniquely Creative Dear Diary Creative Cuts but also fussy-cut some flowers and leaves from the papers.

Thanks for visiting my blog today!

Jocelyn


Card Recipe:

Stamps and Ink:  None

Designer Paper:  Uniquely Creative Dear Diary 6" x 6" + 12" x 12" + Creative Cuts, Kaisercraft Peace and Joy - Elation P2607 12" x 12"

Accessories:  Reddy Creative Cards Diecut Decoupage #83873, Kaisercraft Trimmer, Pale Green Sparklets (EBay), 0.5mm Self-Adhesive Doublesided Foam Squares, Big Shot, Cuttlebug Textile Embossing Folder, Wink of Stella Clear Glitter Brush, Tombow Mono Multi Glue, Helmar's 450 Quick Dry Adhesive, Kaisercraft White Square Card Base, Cardstock - Dusty Rose + Sage + Scraps of White

Dies:  Spellbinders Petite Scalloped Circle Nestabilities, Impression Obsession Heart of Hearts DIE052-I


Friday, June 27, 2025

Kaisercraft Magnolia Grove Thank You Rose and Lace Card

 
Hi everyone,

My Mother passed away a couple of weeks ago, aged 94, and her Memorial Service was 8 days ago - so I have been in my Craft Room making some Thank You Cards for various people who have supported our family.

When I was planning out my card, I was thinking about how much my Mother loved roses and also how much she adored her wool and haberdashery business that she ran in the 1970s, and used this as my inspiration (read on for the explanation).


The rose is Paper Tole aka Diecut Decoupage - and is by Reddy Creative Cards.  I have had this particular sheet for some years so I don't know if it is still available or who stocks it.  I bought this sheet at a Craft Show here in Australia from a vendor who specialised in these types of products but I can't remember their name.

Once I popped out the images, I layered them together using 0.5mm Doublesided Foam Squares.  It was easy to put together and I just love how beautiful the rose is.  Here is a close-up:


I layered the rose panel onto some Dusty Rose Coloured Designer Paper then onto Oive Green Coloured Designer Paper which are both from the Kaisercraft - Magnolia collection.  My borders are 1/16". 

The bottom designer paper on the card base is also by Kaisercraft - Magnolia Grove.  The collection was first released in 2012 - so long retired.  The top designer paper is by Kaisercraft - English Rose - first released around 2010 - which I thought matched the rose so beautifully.

The strip of Cotton Lace across the middle originally came from my Mum's wool and haberdashery shop and is around 50 years old.  The colour of the lace was cream but I wanted it to look more aged, so sprayed it with some watered-down Parisian Essence then left it to dry.  Parisian essence aka Browning Agent is a flavourless browning agent that is usually used to add a rich, dark brown colour to gravies, soups, puddings, baked goods etc.  It is readily available from the supermarket and very cheap.  I have used it alot over the years in all sorts of projects when I want something to look old.  Years ago, when I went to the Stitches and Craft Show here in Melbourne, one of the exhibitors was using it to age some calico and it was a real "aha" moment - so I have used it ever since.

When I gave the Eulogy at Mum's Memorial Service, I talked about Mum's shop and how I started working in it on Saturday mornings when I was 12.  It was a great learning experience for me and I gained alot of knowledge about knitting and sewing.  I still have bits and pieces from the shop like buttons, lace, ribbons, yarn, dressmaking materials and embroidery floss.  I felt it was really important to include something on my card that connected that time to now.

I threaded some Dusty Rose Satin Ribbon through the lace just to tie in the colours from the rest of the card, then glued the lace/ribbon on using Helmar's Fabric Glue.

The circular sentiment is by Kaisercraft - Banksia Rose - from their Collectables.   I was so rapt that it matched the rest of my card so perfectly. This is a much more recent release and still readily available.  I diecut the Dusty Rose Designer Paper using my Big Shot and a Spellbinders Petite Scalloped Circle Nestabilities die and glued that underneath the sentiment.

Both the main image panel and sentiment are popped up on scraps of white cardstock.

I used an Impression Obsession die - Heart of Hearts - to diecut 3 x tiny hearts from the same Dusty Rose Designer Paper.  This die cuts out many different styles and sizes of hearts so it was perfect for what I needed.  I've had this die for many years so it is probably retired.  I glued two hearts around the rose and the third on the sentiment panel, then added some Wink of Stella Clear Glitter Brush to them just to add some subtle sparkle.

I attached the three Green Sparklets on the top RHS using Helmar's Quick Dry Adhesive - then glued my card front to a Cream Card Base using Tombow Mono Multi Glue.  Finished size is 145mm x 145mm which is about 5-3/4" x 5-3/4".

I will be sending this card to the Clergy who officiated at the Memorial Service. They were a great support to our family in our time of need.

Thanks for stopping by my blog today.

Jocelyn


Card Recipe:

Stamps and Ink:  None

Designer Paper:  Kaisercraft Magnolia Grove 12" x 12" (retired), Kaisercraft English Rose 12" x 12" (retired), Kaisercraft Banksia Rose Collectables

Accessories:  Big Shot, 0.5mm Doublesided Foam Squares, Wink of Stella Clear Glitter Brush, Helmar's Quick Dry Adhesive + Fabric Glue, Tombow Mono Multi Glue, Cream Cotton Lace, Parisian Essence, Dusty Rose Satin Ribbon, Reddy Creative Diecut Decoupage #83875, Kaisercraft Trimmer, 3 x Green Sparklets (EBay Australia), Square Cream Card, Scraps of White Cardstock

Dies:  Impression Obsession DIE052-I Heart of Hearts (retired), Spellbinders Petite Scalloped Circle Nestabilities Small S4-117 (retired)


Friday, April 18, 2025

Penny Black Garden Friends Easter Card + Easter Egg Holder

 
Hi everyone 

My Craft Room has been a real hive of activity lately and I am loving being able to have more time to create.

I made this card for my daughter for Easter:


This is also my card for the following Challenges (click on the underlined link to take you to the Challenge):
  • Penny Black Saturday Challenge - PBSC April - Anything Goes with Optional Easter
  • Shopping our Stash - SOS545 - Hippity Hop - Make an Easter Card or a Card featuring a Rabbit or Chick 
  • Critter Crazy Challenges #97 - Anything Goes Featured Critter Theme
The main image is by Penny Black - Garden Friends - and was stamped with Versafine Onyx Black Ink onto Ranger Watercolour Cardstock.  I coloured the image with Watercolour Pencils then went over the black lines with a Black Copic Multi-liner to darken the lines up.

I diecut the panel using my Big Shot and Nesting Card Templates - and then things went awry!  You see the square designer paper on the base?  I measured my designer paper wrongly and cut it into a square instead of a rectangle as I was going to put the chicks onto a rectangular card.  Oh well, I thought - I will just cut another piece of that designer paper - but I had none of that particular one left in the 6" x 6" pad - and I really, REALLY wanted to use that one.  So, pivot I thought and don't waste the square of designer paper - use it instead and I did - but then couldn't figure out a good layout for my card.  I know in the end, it is a simple layout but it just frustrated me no end and I couldn't figure out whether I wanted the blue cardstock or pink - or should I go yellow?  I just kept changing my mind and couldn't settle on what I wanted so I left it on my desk until the next day.

The next day, I finally decided to go with the Blue Cardstock and then struggled with the layout again as I tried this and that and nothing seemed to look right.  It was just one of those frustrating cards that just seems to be hard work!  Eventually I settled on what other designer papers to add to my card so I had my main panel finished.  Here is a close-up of those cute little chicks:


And then couldn't make up my mind whether I should put the finished panel on a plain white card base or not.  In the end, I thought adding some dry embossing to the white card base looked better than plain so used my Crafter's Companion EF6 Embossalicious Embossing Folder and I like how it complemented the original square of the designer paper as well as the tiny flowers on the stamped image.  Of course, my frustrations continued as the embossing folder slipped the first time when I put it through my Big Shot so it embossed all crooked and I had to get another card base and redo it.  

I rounded the corners of the Kaisercraft White Card Base using my We R Memory Keepers 1/2" Corner Chomper.  All the blue cardstock layers were trimmed to 1/8" using my Perfect Layers Guides.

And then the ribbon - ohhhh, that ribbon gave me so much grief.  I struggled with what colour and type - and then eventually settled on the organza ribbon because it was so hard to match the blue colour with a solid blue coloured ribbon from my stash - I could not find the right shade.  This particular organza ribbon seemed to have a mind of its own and I gave up tying a bow because it wouldn't sit flat and looked totally weird.  Well, just knot it instead I told myself but do you think it would sit flat as well?  Nope!  It did NOT want to play nicely!  And ultimately, I used a tiny glue dot to hold the RHS of the ribbon down because it insisted on sticking up at 90 degrees.  

The sentiment is the same sentiment set I have used on my last couple of cards and I decided to cut out the sentiment and pop it up on dimensionals.  Even trying to figure out where to put the sentiment was driving me bonkers!  I added some Tiny Pink Cardstock Hearts around the main image panel by using my EK Success Arrows Border Punch (the leftover punchies look like tiny hearts).  I glued them on using a Uniquely Creative Fine Glue Pen.

Of course, I had to add glitter to the hearts and flowers using Kindyglitz Crystalina Glitter Glue.  I needed some sparkle to bring a bit of life to the card.

Ultimately, this card took 1000 times longer to make than it should have, however, I am happy with the end result.  And I like the layout and will definitely store this layout in my Card Sketches Folder as it is great for smaller, more vertical images.  

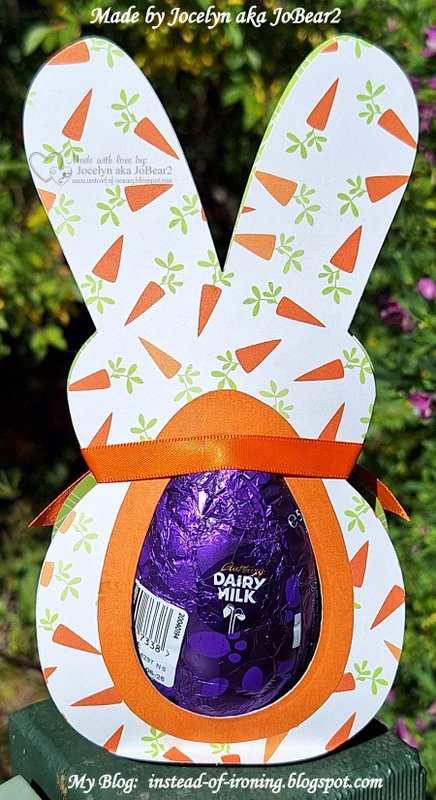
Sticking to my New Year's Resolution to try new crafty things, I decided to make an Easter Egg Holder which was certainly a challenge - but that's why I am trying new things that take me out of my comfort-zone.  Here is what I came up with:


Last year, I was doing an order with Scrapbook.Com (in the USA in case you don't know) and they always have free things you can add to your cart - and they had these really cute Nesting Bunnies which they call "Nested Peeps".  So when I received them, I was actually surprised how big the largest die was:

They retail for US$35 (although they are on special at the moment) so it really was an amazing free gift.  Scrapbook.com are the only US Company that I buy from because their postage to Australia is very reasonable - but I don't buy from them all that often because when you factor in the exchange rate between Australia and the USA, it does start to add up. 

I had this idea in my head when I was trying to get to sleep the other night that I might be able to diecut the bunny twice and have some cardstock at the bottom between the back and front to allow for the size of the egg.  Here is a side view so you know what I mean:


I then came up with the idea to diecut the bunny's tummy with one of my Spellbinders Nested Eggs Dies to accommodate the Easter Egg - holding it in place.  It took quite a bit of fiddling around and I did a prototype first to see if it would work - and then I realised that I would have to diecut the back of the bunny as well or the Easter Egg wouldn't stay in place:


I used some older papers by Echo Park - Happy Easter 12" x 12" - first released in 2015.  I diecut the Orange Cardstock using the Spellbinders Nested Eggs Nestabilities and then diecut the centre where the Easter Egg fitted it.

I used the same paper range to diecut the bunny to put on the inside just to pretty it up instead of just having the white cardstock.  You can just see the paper from the side view photo but it is actually green in real life.

I tied some Orange Ribbon around the bunny's neck to hold it all together and added Fray Stop to the cut ends to stop them from fraying.

I was really happy with how it turned out and it was great to see it all come together as I envisioned it after struggling with the card so much!

Thanks for stopping by!

Jocelyn


Card Recipe:

Stamps:  Penny Black Garden Friends 30-021 Clear Set, Impression Obsession Sentiments 1 WP16 (retired)

Ink:  Versafine Onyx Black

Designer Paper:  American Crafts Hello Spring #320548 (from 2016 - retired)

Accessories:  Big Shot, Dimensionals, Watercolour Pencils, #4 Round Paintbrush, Kindyglitz Crystalina Glitter Glue, WRMK Perfect Layers Guides, Ranger Watercolour Cardstock, Black Copic Multi-liner, American Crafts Organza Ribbon 3/8" or 9mm wide, Fray Stop, Crafter's Companion Die'Sire Embossalicious EF6 Embossing Folder, Tombow Mono Multi Glue, Uniquely Creative Fine Glue Pen, Mini Glue Dot, Cardstock - Scrap of Pink + Blue, Kaisercraft White Card Base

Dies:  Lifestyle Crafts Quickutz Nesting Card Templates DC0431

Punches:  WRMK 1/2" Corner Chomper, EK Success Arrows Border


Easter Egg Holder Recipe:

Designer Paper:  Echo Park Happy Easter 12" x 12" (from 2015 - retired)

Accessories:  Big Shot, Orange Ribbon 3/8" or 9mm wide (stash), Fray Stop, Cardstock - White + Orange

Dies:  Scrapbook.com Nesting Peeps sbc-shapes-19, Spellbinder Nested Eggs Nestabilities S4-264