Showing posts with label Halloween. Show all posts

Monday, October 27, 2025

Impression Obsession Halloween Hill Mixed Media Card


Hi everyone 😊

Today I am sharing a Halloween Card:

ETAI just learned that I made the top 3 over at Craftycatz!  Woo hoo!

I really enjoy making Halloween Cards because it gives me the perfect excuse to play with inky backgrounds to create atmosphere for that type of card.

This is also my card for the following Challenges:
  • Crafty Catz Challenge #703 - Anything Goes with Optional Twist of Halloween
  • C.R.A.F.T. Challenge #766 - Halloween/Anything Goes
I love to blend inks on Bristol Smooth White Cardstock because they just blend like a dream.  First up, I created a mask for the moon from Mylar Film by diecutting a circle from it.  Mylar Film is what some stencils are made from and I bought a pack of sheets on EBay.  You can buy different weights and the one I bought was 190 micron.  I attached it to my cardstock using Repositionable Adhesive.  The good thing about the Mylar Film is that you can wipe off the ink and reuse it.   

The Ranger Distress Inks that I used are:  Dried Marigold, Mustard Seed, Spiced Marmalade, Rusty Hinge, Seedless Preserves, Hickory Smoke and Black Soot - making sure that the RHS was lighter where the moon was.  I removed the mask and used a Tim Holtz Layering Moon Mask and Hickory Smoke Ink to add some detail on the moon - then inked over it very lightly with Mustard Seed Ink.  I used my Heat-Gun to dry off the panel.

The back diecut is an old die by Impression Obsession called Halloween Hill.  I have had this die for many years and it has always been a favourite of mine.  I used Anko Black Cardstock which I bought in a pad of neutral tones from KMart (Australia).  I inked up some scrap white cardstock with Mustard Seed and added that to the windows of the house - then used Wild Honey for the pumpkin face. 

The front diecut is by Memory Box - Graveyard Landscape which dates back to 2012.  I popped the diecut up on several layers of scrap black cardstock so that it gave the illusion of depth.

The white ghosts are another die by Memory Box - Ghastly Ghosts - from 2013.  It's a really fun die because it diecuts 5 different sized ghosts.

The sentiment is by Hero Arts - Happy Halloween - and is from 2012.  I stamped it using Versamark Watermark Ink and heat-set it using Stampin' Up White Embossing Powder.  I used a Powder Tool on the Black Cardstock before stamping so that I didn't get any stray dots of embossing powder.  I popped the sentiment up on Stampin' Up Black Dimensionals.  These black dimensionals are so handy for adding underneath dark cardstock.  I added a tiny self-adhesive Pale Orange Molossi Rhinestone either side of the sentiment but added a dot of Art Glitter Glue to the rhinestone because this pack is old and the glue dot isn't all that sticky.

To add more atmosphere to my card, I used some White Cobweb to the sky and gravestones adding tiny dots here and there with my Art Glitter Glue to stick it down.  This glue dries clear so is perfect for when you use it for something that would otherwise be glaringly obvious!  I bought the White Cobweb from my local supermarket.

I used a White Pastel Pencil to add some white highlights to the bottom of the moon and on the black diecuts.

As final touches, I added some sparkle to the pumpkin, house and moon using a Uniquely Creative Clear Sparkle Brush, adding several layers for extra-sparkle.

I layered the scene onto Colormates Dark Terracotta Cardstock then onto Anko Black Cardstock - then glued my card front onto a Kaisercraft White Card Base using Tombow Mono Multi Glue.

Finished size is 5-5/16" x 4-1/4" or 151mm x 108mm

Hope you like my card!  I had so much fun creating it 😀

Jocelyn


Card Recipe:

Stamps:  Hero Arts Happy Halloween CL353 (2012-retired)

Ink:  Versamark Watermark, Ranger Distress - Dried Marigold, Fossilized Amber, Mustard Seed, Spiced Marmalade, Rusty Hinge, Hickory Smoke, Black Soot

Accessories:  Big Shot, Tombow Mono Multi Glue, Art Glitter Glue, Repositionable Adhesive Tape, Stampin' Up Black Dimensionals, White Cobweb (Woolworths), Uniquely Creative Clear Sparkle Brush, Mylar Film - 190 micron, Blending Tools + Foam Pads, White Pastel Pencil, Molossi Pale Orange Rhinestones, Heat-Gun, Powder Tool, Stampin' Up White Embossing Powder, Cardstock - Bristol Smooth White 250gsm/110lb + Colormates Dark Terracotta + Anko Black/White, Kaisercraft White Card Base

Stencils:  Tim Holtz Stampers Anonymous Layering Moon Mask THMSK01

Dies:  Impression Obsession Halloween Hill DIE029-P (retired), Memory Box Graveyard Landscape #98375 (2012-retired), Memory Box Ghastly Ghosts #98701 (2013-retired), Lifestyle Nesting Circles (retired)


Thursday, November 2, 2023

Halloween Card using mostly Lavinia Stamps

 
Hi everyone 😃

Happy Halloween to those of you who celebrate it!   Quite a few homes around our neighbourhood have had their decorations out for quite a while now - but being in Australia, it is certainly not as big as it is in the USA.   I have never seen SO MANY Halloween decorations in the stores this year though - it was mind-boggling!  We put up decorations today as I don't have alot and certainly nothing terrifying for the little kids and had quite a few groups come trick-or-treating - but gosh, it was freezing outside and only 9 degrees Celcius with a high wind-chill factor........brrrr 😎

Today I am sharing a card that I made for my daughter and I had SO MUCH FUN making it as it took me out of my comfort zone.


This is also my card for the following Challenges - click on the underlined link to take you to the Challenge:

Splitcoaststampers - Technique Lovers Challenge TLC973 - Night Sky

Crafty Catz Challenge #656 - Anything Goes with Optional Twist of any 4 Legged Critter

To make the background, I grabbed some Ranger Watercolor Cardstock and used the smooth side.  I diecut a circle from 3M Post-It Craft Paper using a Lifestyle Nesting Circle die and my Big Shot so that I could mask off the moon.  I then wet the cardstock and sprayed various Dylusions Shimmer Sprays, Ranger Distress Oxide Sprays and Kaisercraft Kaisermist Sprays.  I dried the cardstock using my heat-gun and re-did the spraying till I was happy.  I removed the moon mask and sprayed water in just that area then sprayed some Antique Linen Distress Oxide spray and just let the colours bleed into each other then dried it with my heat-gun.  I was so pleased with how the moon looks - like it is glowing.

I watered down some Jo Sonja white acrylic paint and splattered that over the background using a fan brush and did the same with Jo Sonja pale gold acrylic paint.

I used my powder tool on the background then stamped the Lavinia Sacred Tree using Altenew Obsidian (black) pigment ink then heat embossed it using Ranger Black Super-Fine Detail Embossing Powder.  Because I wanted some sparkle, I first separated some of the black embossing powder and mixed in some Bellbird Place Diamond Glitter and it worked a treat.  I knew that I had some black sparkle embossing powder somewhere - but do you think I could find it?!  But tonight, it was in the drawer where I had been looking:  go figure!!

I then stamped the Lavinia Grass Silhouette and heat embossed that as well then sponged some of the black ink around the bottom of the cardstock and heat-set that with the same sparkly embossing powder.

I stamped the Lavinia Bat Colony over the moon and again heat-embossed it.  The owl is from a Hero Arts/Scrapbook.com Greetings collaboration set.  The spider and sentiment are from the Hero Arts - Happy Halloween CL353 set.  I drew a line from the tree branch to the spider using a Copic Black Multiliner in size 0.3.  

I WISH you could see the sparkle - it looks amazing in real life!  

I sponged some of the Obsidian ink around the edges of the card which really made a difference to the scene.

Once I had finished the panel, I glued it to some Core-dinations purple cardstock and trimmed it to 1/16" using my WRMK Tool - Layers Guide.  I glued the purple cardstock to some Kaisercraft Black Glitter cardstock and trimmed that to 1/8" - then popped the card front onto a white card base.    

Thanks for visiting my blog today!  

Jocelyn


Card Recipe:

Stamps:  Lavinia - Sacred Tree LAV437 + Grass Silhouette LAV680 + Bat Colony LAV558, Hero Arts - Happy Halloween clear set CL353 (spider and sentiment), Hero Arts/Scrapbook.com collaboration clear set Greetings (released 2019)

Ink:  Altenew Obsidian (black) Pigment

Designer Paper:  Kaisercraft Black Glitter Cardstock

Accessories:  Sponge, heat-gun, Ranger Super-Fine Detail Black Embossing Powder EPJ37392, Bellbird Place Diamond Glitter, Dylusions Shimmer Spray Inks, Kaisercraft Kaisermist Spray Inks, Ranger Distress Oxide Spray Inks, Ranger Watercolor Cardstock, WRMK Tool - Layers Guide, Big Shot, 3M Post-It Craft Paper, Other Cardstock - Core'dinations Purple + white card base, Jo Sonja Acrylic Paint - Titanium White + Pale Gold, Fan brush, Powder Tool, Copic black multiliner 0.3

Dies:  Lifestyle Nesting Circles


Friday, November 2, 2018

Happy Halloween - a new card from me


Hi everyone,

Apologies for my long absence.  Blogging has taken a backseat this year unfortunately and now, suddenly, it is November and the Christmas decorations are in the stores!  They say that time speeds up as you get older but I didn't think it would speed up this much!  I also wonder whether people still visit blogs anymore or whether they just use different social platforms like Facebook or Instagram(?).  Aside from my Gallery on Splitcoaststampers, I am part of a few Facebook Cardmaking Groups but also share the occasional card on Instagram which are quick and easy ways of doing it without doing a blog post - plus it is fun to see what others are creating with stamp sets that I have.  And we only have so much time to look at various sharing platforms.

Anyhoo, I made this Halloween card for my daughter and it was super-easy to make:  I made it in less than an hour which is probably a record for me!

This is also my card for the following Challenges.  Click on the underlined links for more details about the Challenges:

Diecuttin' Divas Weekly Challenge - Challenge 393 - Anything Goes
Always Fun Challenge 82 - Halloween


The sky was made using Ranger Distress Inks in various colours.  I wet my Ranger watercolour cardstock with water then smooshed my Distress inks onto an acrylic block and used a #8 flat paintbrush to paint strokes of each colour.  I dried it with a heat tool then repeated the process to intensify the colour and I love how vibrant it turned out.  The haunted house, tree, gravestones, pumpkin and bats are all one die by Impression Obsession - Halloween Hill and I diecut it out of black cardstock using my Big Shot - but I did cut off the far RHS of the diecut (which was a cat and 2 more gravestones) as I wanted to make a smaller card.  I diecut the ghosts from white cardstock using the Memory Box Ghastly Ghosts 98701 dies and added Wink of Stella clear glitter to them to make them sparkle - alas not captured by the camera.  I also added Wink of Stella to the windows in the house and the pumpkin face.

The greeting is by Hero Arts - Happy Halloween CL353 and was stamped using Versamark Watermark ink and heat embossed using Stampin' Up white embossing powder.  I used a powder tool first so I wouldn't have any stray embossing powder that would really show up on the black cardstock. I attached the main panel onto some more black cardstock and trimmed the edges to 1/4" using my Perfect Layers Tools, then mounted that onto a white card base with edges trimmed to 1/16".  Lastly, I used an old stiff bristled paintbrush and white acrylic paint to dry-brush highlights on the black elements on the card.

Thanks for visiting my blog today.

Jocelyn


Card Recipe:

Stamps:  Hero Arts Happy Halloween CL353 clear set

Ink:  Versamark Watermark, Ranger Distress inks

Dies:  Impression Obsession Halloween Hill, Memory Box Ghastly Ghosts 98701

Accessories:  Big Shot, Tombow Mono Multi glue, Stampin' Up white embossing powder, heat tool, white acrylic paint, #8 flat paintbrush, stiff bristle brush, Wink of Stella clear glitter brush, Perfect Layers Tools, powder tool, cardstock - Ranger watercolour, black, white, white cardstock base

Wednesday, November 1, 2017

Lawn Fawn Spooktacular Halloween Card!


Hi everyoneSmiley from Millan.Net 

Just stopping in to share the Halloween card that I gave to my daughter.  It's not often that I start and finish a card on the same day - but I knew exactly what I wanted to do and CASEd the layout and basic design from THIS card that I originally saw on someone's blog but made a few changes:


I have been recently playing around with doing Galaxy Distress Ink backgrounds and thought I would try one using Halloween colours  ie: orange, green, purple and black - so I chose Carved Pumpkin, Wilted Violet, Twisted Citron and Black Soot.  I smooshed the inks onto my craft mat and sprayed them with water then dabbed them onto my Ranger watercolour cardstock with a large round paintbrush.  I didn't want to dip the cardstock into the colours as I would normally do because I knew the colours would turn a muddy brown if they mixed too much together.  I did several layers and dried each layer off with my heat gun.  

I used my Ranger round ink blending tool and Black Soot Distress Ink and went over the whole piece then dried it off again with my heat tool.  Galaxy backgrounds always look like a hot mess before you add the stars but you just have to keep going and not be tempted to bin it!   I spritzed the cardstock with clean water and blotted it up with a paper towel then splattered the cardstock using watered-down white acrylic paint and an old toothbrush then dried the panel off again with my heat-gun. 

All the images and the sentiment are from the Lawn Fawn stamp/die set 'Spooktacular'.  I stamped the images onto Ranger watercolour cardstock using Ranger Archival Jet Black ink and coloured them with Derwent Inktense pencils and a #2 round paintbrush.  I added Clear Wink of Stella to the ghost, fangs on the bat, the eyes and mouth on the pumpkin and the moon - alas, not captured by the camera. 

The sentiment was stamped using Versamark Watermark ink and heat-set using Stampin' Up White embossing powder.  The designer paper for the side panel is by Graphic 45 - Abracadabra from their 'An Eerie Tale Collection' from 2014 and was diecut using a My Favorite Things Stitched Interactive Window Trio die and my Big Shot.  Because this die only diecuts 3 sides of the square and the 4th is just a crease line, I trimmed this line with my craft knife.  The squares are meant to be like a peek-a-boo window that you open up.  I like how the die cuts the stitching detail on the outside of the window for a bit of interest.  I rounded the corners of the panel using a 1/8" Corner Chomper.

I tied on the Darice twine then glued the green panel and the moon to my galaxy background using Tombow Mono Multi glue then glued the images inside and just tucked them into the panel as the glue was still wet which made it easy.

Lastly, I glued the finished panel to a dark purple card base. 

Thanks for stopping by!

Jocelyn


Card Recipe:

Stamps:  Lawn Fawn Spooktacular LF698

Ink:  Versamark Watermark, Ranger Archival Jet Black, Ranger Distress inks - Carved Pumpkin, Wilted Violet, Twisted Citron, Black Soot

Designer Paper:  Graphic 45 Abracadabra - An Eerie Tale Collection (2014) 12" x 12" 

Dies:  Lawn Fawn Spooktacular LFT699, My Favorite Things Stitched Interactive Window Trio MFT-741

Accessories:  Big Shot, Darice Hemp twine, Derwent Inktense pencils, paintbrushes, Tombow Mono Multi glue, heat-gun, Stampin' Up white embossing powder, embossing buddy, Couture Creations non-stick craft mat, JoSonja white acrylic paint, old toothbrush, WRMK Corner Chomper, Wink of Stella clear glitter brush, cardstock - deep purple, Ranger watercolour

Friday, October 30, 2015

Spooky Halloween Greetings card

Hi blogging friendsSmiley from Millan.Net

Today I am sharing the Halloween card that I made for my daughter.  I had so much fun making this card and enjoyed making the scene come together.

This is also my entry for the following Challenges (click on the underlined words to take you to their blogs):-

Papertake Weekly - Take your Pick - the last challenge of every month has several themes and you simply take your pick from them. There’s a sketch, a colour theme, a product theme and a technique theme to choose from. I chose the colour theme which is Halloween Hues ie:  blacks, oranges, purples, greys etc.

Little Red Wagon - Challenge #313 - Ghosts and Goblins or other Halloween creatures.

Splitcoaststampers - Ways to Use It WT555 - Use brushwork on your card - anything from painting to adding various mediums to dry-brushing.  I dry-brushed white pigment ink on the black elements on my card.

Diecutting Divas Weekly Challenge #239 - Happy Halloween - All projects must have at least one diecut on them to qualify.  I have LOTS as you can see :-)


I did a prototype using diecut white cardstock so I knew exactly where to place my diecut pieces which was a big help and saved alot of frustration - and it made the card come together alot quicker too.  I am perilously low on black cardstock so I couldn't afford to make any mistakes on the actual card itself!

First of all, I made the sky using Ranger watercolour cardstock and Distress Inks.  I diecut a circle from stamping mask paper and placed it on the cardstock so I could mask where I wanted the moon to be.  I then coloured the cardstock using my round ink blending tool with the following Distress Inks:  Dried Marigold, Scattered Straw, Spiced Marmalade, Stormy Sky and Hickory Smoke.  I removed the mask and coloured the moon a little with Dried Marigold and shaded it a little with Hickory Smoke.  I added two layers with my Wink of Stella clear glitter brush over the moon to give it some subtle sparkle.

The house, pumpkin and gravestones and bats are a die by Impression Obsession - Halloween Hill - but I cut off the tree next to the pumpkin and didn't use the far RHS of the diecut (as it didn't fit into the scene but saved it for later on).  The front hill was diecut using another Impression Obsession die - Hill Landscape Layers (which comes as a set of 3) - which I bought from an Australian online store a few days ago.  I don't know about you, but I can't handcut a curvy hill that looks nice so these dies will save me alot of angst!

The gravestones and cat are leftovers from the far RHS of the back hill plus I diecut another scene and cut off a couple of gravestones and tucked them all in behind the diecut hill.

I used a small flat brush dipped very lightly into some white pigment ink to add a bit of whiteness to the tops of all the black diecuts (except for the Orchard Tree frame) so it would look like the moon is reflecting off them and to add a bit more spookiness.  It also adds a bit of depth to the whole scene plus makes the images stand out a bit more.  Here is a close-up so you can see the detail a bit better:


The ghosts were diecut using a Memory Box - Ghastly Ghosts die set - and I added some clear Wink of Stella to them for some sparkle.

The black tree frame is also by Memory Box - Orchard Tree Frame - which I diecut 3 times and glued together using Tombow Mono Multi glue.  Originally I had thought about diecutting one and adding dimensionals behind the frame to 'pop' it up but thought that that would be way too fiddly - so gluing 3 frames together was far easier and alot quicker.  Because the Tombow glue doesn't dry immediately, you have a bit of time to move the parts of the diecut around so that they line up perfectly.  I glued the frame to the scene using the same glue.

I used some cobweb (which I bought from my local supermarket from their Halloween stock) to make some fog/mist over the moon and on the bottom diecuts.  It's awful stuff to work with as it catches on everything but I really love how it looks on my card.  I added very tiny dots of Ranger Multi Medium Matte glue here and there to attach it as this glue dries perfectly clear.

The designer paper has been in my stash forever and is called Spellbound by Making Memories.  I used the Orchard Tree Frame to diecut the paper but used the negative of the diecut.  I used a Lifestyle Nesting Card Template die (rectangle) to cut the paper negative to the size I wanted then just glued that in around the black Orchard Tree diecut frame.  It was great because it just slotted in around the black diecut tree on my black cardstock base.

The sentiment is from a Hero Arts clear set - Happy Halloween - and was stamped in Versamark Watermark ink and heat-embossed using Stampin' Up white embossing powder.  I trimmed the sentiment panel down then cut a flag end on the RHS.  I added a black rhinestone then popped the panel up on 1mm dimensionals.

Lastly, I tied on some Halloween twine. 

I am not sure how many kids will be out trick-or-treating tomorrow evening as it is the Melbourne Cup long weekend here in Victoria and alot of people go away over the four days - plus the weather forecast is looking very wet and stormy. It was great last year seeing the little kids in our street dressed up in cute little costumes and having some fun.  We never do anything really scary - it's all very low-key compared to the USA. 

Thanks for visiting my blog today and for any comments you care to leave - they are always very much appreciated!

Jocelyn


Card Recipe:

Stamps:  Hero Arts Happy Halloween clear set CL353

Ink:  Versamark Watermark, Versacolor white pigment, Ranger Distress Inks - Dried Marigold, Spiced Marmalade, Scattered Straw, Stormy Sky, Seedless Preserves, Hickory Smoke

Designer Paper:  Making Memories Spellbound 12" x 12" (2008) - retired

Dies:  Lifestyle Nesting Card Templates (rectangles) DC0431 and Nesting Circles LCC001, Impression Obsession Halloween Hill DIE029-P and Hill Landscape Layers DIE343-T, Memory Box Orchard Frame 98300 and Ghastly Ghosts 98701

Accessories:  Small flat paintbrush, Big Shot, Kuretake Wink of Stella clear glitter brush, Tombow Mono Multi glue, Ranger Multi Medium Matte glue, 1mm dimensionals, Kaisercraft rhinestone - Black SB777, Stampin' Up white embossing powder, heat-gun, embossing buddy, cobweb (Woolworths supermarket), Inkadinkado Stamping Mask Paper, Ranger round ink blending tool, Ranger watercolor cardstock, black and white cardstock, Halloween twine by Divine Twine

Friday, October 31, 2014

Happy Halloween card

Hi blogging friends From Millan.Net

Sorry for my long absence:  I have been helping out with preparing for a stall to sell loom band creations (which if you don't already know, are super-popular with kids at the moment!) at my daughter's School Fair (which was held last Sunday).  My daughter made most of the loom band creations which has taken her about 5 months!  We were running the stall to raise money for charity so attending to all the details was very time-consuming (plus I was making a few loom band creations too).  Our stall ended up raising $121 - and when you add a few donations from other people and sales to family/friends, the total ended up being $181!  Woo hoo!  The weather was perfect for the occasion - around 25 deg C (77 deg F) and sunny - which was fantastic but also very lucky because at 2 am the following morning, the storms began and it was very wild with heavy rain and flash-flooding well into the next day.  Soooo glad that we didn't have weather like that for the Fair - it would have been a disaster!

The card I am sharing today is a Halloween card which I made for my daughter and now that I have given to her, I can share it here on my blog.  This is also my entry for the Die Cuttin Divas Challenge #189 of Happy Halloween where you must have at least one diecut on your creation.


I really enjoyed making this card as it gave me an opportunity to play with Distress Inks to make a sunset on Ranger watercolour paper which I have never done before.  I had a great play as I tried different colour combinations and have plenty of leftovers to use for other cards.  But first of all, I punched out a circle from a post-it-note to use as a mask so that when it was removed after blending the inks, I had a moon.

I used a round Ranger Blending Tool which I like alot better than the rectangular one as I find that I get less lines.  I used quite a few colours of Distress Inks (which are listed in the Card Recipe below) which you wouldn't probably realise from just looking at my card.  I went from light to dark and just kept blending till I was happy.  I tried to make it a little darker on the LHS and kept it lighter on the RHS where there would be more light from the moon.  I removed the moon mask but decided to add a little watered down Squeezed Lemonade Distress Ink with a paintbrush to the moon to try and make it look more rounded and not quite as white.

The house, tree, pumpkin, tombstones, cat and bats are all from one die called Halloween Hill by Impression Obsession.  I diecut 2 layers from the black cardstock and glued them together so there was a bit more depth.  I used a small scrap of watercolour paper and coloured it yellow using Lemonade Distress ink then cut it to fit in behind the pumpkin face and the windows on the house.  I used a sponge and Hero Arts White dye ink to sponge the edges of the diecut to look like the moon was shining on the various elements then attached the diecut to the inked watercolour paper.  I added some Stampin' Up! Dazzling Diamonds glitter glue plus Kindyglitz Gold glitter glue to the pumpkin face and the windows on the house for a bit of sparkle.

The very front panel is a die by Memory Box - Graveyard Landscape and again, I diecut 2 layers and also sponged the edges with white ink.

The ghosts are also by Memory Box - Ghastly Ghosts which has 5 different ghosts in the set. 

The sentiment is from Hero Arts and was stamped using Versamark Watermark ink and heat-set using Stampin' Up white embossing powder.  I love this embossing powder because it is really white.  I attached 2 Doodlebug brads which I have had in my stash forever.

I used some Mounting Tape to attach the scene to some orange glitter cardstock then attached that to black glitter cardstock using Ranger Wonder tape which is very strong and works really well with glitter cardstock. 

Lastly, I attached some white cobweb across the sky using tiny dots of Tombow Mono Multi glue to look a bit like mist/fog.  This cobweb is from my local supermarket (Woolworths) and comes in a big bag with black spiders and looks like cushion stuffing and costs about $3.  It's really awful to work with as it catches on everything which nearly drove me bonkers - but I like how it looks on my card :-)
Happy Halloween for those of you who celebrate the occasion From Millan.Net   We had ALOT more kids/parents visiting us tonight and it was great to catch up with neighbours who were all getting into the spirit of it and just having a happy time with nothing really scary or weird.  I decorated the outside of our house and I noticed that there were alot more decorated houses around compared to previous years.  Seems to be catching on in Australia but not in a creepy way.

Thanks for visiting my blog today!  I have ALOT of blog reading to catch up on! 

Jocelyn


Card Recipe:

Stamps:  Sentiment from Hero Arts Happy Halloween CL353 clear set

Inks:  Versamark Watermark, Hero Arts white dye, Ranger Distress - Squeezed Lemonade, Spice Marmalade, Scattered Straw, Rusty Hinge, Dusty Concord, Faded Jeans, Stormy Sky, Black Soot

Designer paper:  None

Accessories:  Big Shot, Impression Obsession Halloween Hill DIE029P, Memory Box Graveyard Landscape 98375 and Ghastly Ghosts 98701, Ranger round ink blending tool, Doodlebug 1974 Halloween Assortment boutique brads (2008), heat gun, Stampin' Up white embossing powder, Stampin' Up Dazzling details glitter glue, Kindyglitz gold glitter glue, cobweb (supermarket), sponge, 1 inch circle punch + post-it note (for masking moon), Ranger watercolour paper, paintbrush, X-Press It mounting tape, Tombow Mono Multi glue, Ranger doublesided Wonder tape, cardstock - orange glitter, black glitter, white, black

Thursday, October 31, 2013

Penny Black 3 headed monster Halloween card

Hi blogging friends From Millan.Net

A special welcome to my new Followers!  Thank you for taking an interest in my craft.  If you ever have any questions, please don't hesitate to drop me an email.  My email address is in the LH sidebar of my blog - just scroll down a little till you see where you can click on a link.

Today I am sharing a Halloween card which I made for my daughter.  The image is a very recent purchase - a Penny Black one of course - which I thought was really cute.  I don't really go for all the super-scary Halloween images and neither does my daughter so I thought this one was perfect for her: 


When I was at my local Art Supply Store, I noticed that they had a small range of Tombow Watercolour pens on sale for $1 each which was a bargain!   I have ALWAYS wanted to try my hand at using Tombow pens but they are really expensive and I couldn't justify buying a pack that in Australia costs $37+ for ten colours and then finding that I don't like them.  It was really just pure luck that the colours that my local store had were all colours that I knew I would use.  And I have to say that I absolutely LOVE them and found them really easy to use and actually alot quicker than using coloured pencils.  I have coloured a couple of images with them and hope to make them into cards as soon as I get a chance.

To be honest, there wasn't really alot to colour on the image as you can see - only the eyes, the shadows on the sheets and the little bits of tail and the ground.  To make the sheets look white against the background, I chalked around the sky with blue chalk which tricks your eye into thinking that the sheets are white when in fact, they are just the same colour as the watercolour paper.  I added some Glossy Accents to the eyes to make them stand out a little more. 

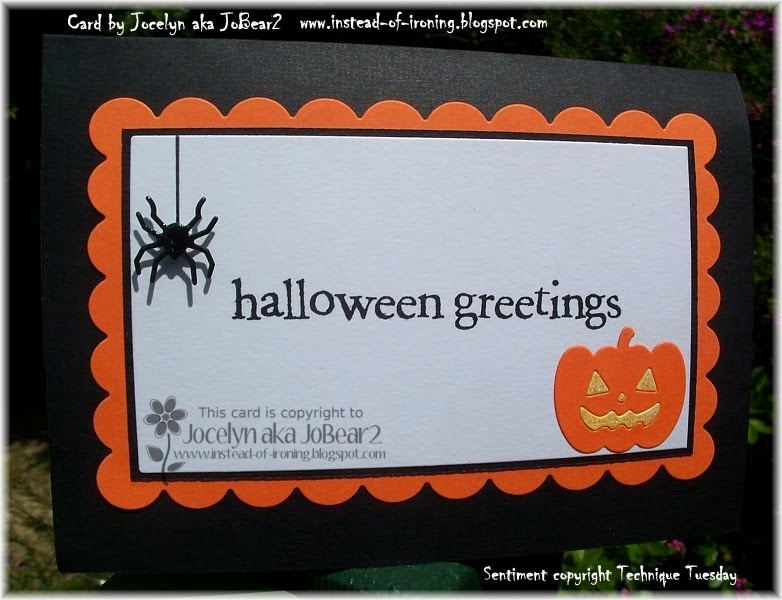
The spider web is a Memory Box die which I trimmed down by about half then popped the diecut spider on the top with a pop-dot and bent the legs down a little to give it some dimension.  I added Glossy Accents to the spider body and legs which makes him look a bit more real.  Personally, the only spiders that I like are dead ones and where I grew up on our farm, we had many, many Huntsman spiders which are massive (*shudder*) - and I mean like 6 inches (or 15cm) across.  I hated them because you would go to bed at night and when you woke up in the morning, you would look up at the ceiling directly above your bed and there would be one there!  Worst thing was that they moved very quickly and could drop suddenly - eek, I am scaring myself so I shall stop talking about them........

The sentiment is by Technique Tuesday and I ran my orange inkpad around the edge.

The designer paper has been in my stash for ages but I am sure you could substitute any of the large variety of Halloween papers that are around.  I ran it through my Big Shot using my Textile embossing folder then lightly sanded it with my sanding tool.  I also sanded the orange and black cardstock although you can't really tell from the photo.

Here is a pic of the inside where you can that I mirrored the card front as far as the layers go:


Again, the spider is a diecut which I covered with Glossy Accents and is popped up which is why there is the shadow of his legs on the photo.  I drew the line with a black pen.  Here is close-up - pretty creepy, huh!?


The sentiment is by Hero Arts from their Happy Halloween clear set.  The pumpkin is a die from a Halloween set by Impression Obsession.  I diecut the pumpkin again with yellow cardstock then popped the eyes, nose and mouth in and added Kindyglitz Crystalina glitter glue to add some sparkle.

I am entering my card in the following challenges -

Clear it Out Challenge Blog - Halloween and anything orange from your stash - I used the black and orange designer paper which is from 2008!

Simon Says Stamp Wednesday Challenge - Anything Goes

Happy Halloween to my USA fans and to those of you who celebrate the occasion.  Last year, we had one group of Trick-or-Treaters pay us a visit which was the first time in 10 years after having a little stash of lollies every year just waiting for someone to stop by.  Probably one in 50 houses in our area do some sort of outside decoration but I have noticed that our local supermarket and K-Mart/Target are selling a much greater variety of Halloween stuff than they used to.   

Thanks for stopping by!

Jocelyn


Card Recipe:

Stamps:  Penny Black 3-headed Monster 2532K wood mount, Sentiment from Technique Tuesday Halloween Seal clear set (card front), Sentiment from Hero Arts clear set Happy Halloween CL353 (card inside)

Ink:  Ranger Jet Black Archival ink, Colorbox Orange pigment

Designer paper:  Making Memories Brocade Orange Spellbound (retired)

Accessories:  Big Shot, Memory Box dies - Scary Spiders #98704 and Creepy Web #98158, Impression Obsession die set DIE114-O (pumpkin), Lifestyle Dies:  Nesting Circles, Nesting Rectangles and Nesting Scallop Rectangles, Cuttlebug Textile embossing folder, Perfect Layers Tools, pop-dots, We R Memory Keepers sanding/distressing tool, Glossy Accents, Tombow pens, Kaisercolour blue chalk, Kindyglitz Crystalina glitter glue, black pen, 140lb Watercolour paper, paint brush, cardstock - black, orange, yellow

Punches:   EK Success Arrows border

Wednesday, October 27, 2010

Eeeek, it's a spider.....or two - Halloween card


Hi and thanks for visiting my Blog :-)
I thought I would make a Halloween card just for something different after I saw the Splitcoaststampers Clean and Simple Challenge CAS89 of a Sketch inspired by kstamper's card here which I loved - so this is my take on the Sketch:
I have had this old spider and web stamp for years and years and forgot I had the stamps until today when I was looking for some inspiration among my stamps for a Halloween card.   I must admit:  I hate spiders.  I am the sort of person who would jump out of a moving car to get away from one, or abandon my car in the middle of the freeway.  One of my recurring nightmares is hundreds of spiders dropping down from a ceiling on top of me - it seems so real that I usually jump out of bed in my sleep - which then scares poor DH.....anyway, enough waffle and onto the card.......  

The black embossed background was made with a newly released Sizzix Textured Impression embossing folder called "Winter Set #3" (comes as a set of 2 folders).  The spider and web were stamped with black pigment ink and heat-embossed with clear embossing powder which makes them stand out alot more than just using dye ink.  Then I inked all the edges with the same pigment ink and added embossing powder to that too.  Can you see that little spider lurking at the RHS side ready to jump out at you (insert scream here!)?   Thought I would do that just for a bit of fun!  I stamped him on a scrap of black cardstock, heat embossed him, then cut him out and glued him under the terracotta panel.  I coloured the eyes with Cadmium Yellow Acrylic paint to make them look really bright - like they are looking right at you.

The EEK sentiment was done with an alphabet foam-mounted stamp set I bought from KMart years ago - don't know if it's still available.  I don't have any Halloween sentiments, so came up with this instead - I thought I would stamp the letters at any angle for a bit of interest - wish I had had an exclamation mark to add to it.  These letters were also heat-embossed.

Challenges:

I am entering this card into 2 Challenges - both with Halloween themes:  The first is Crazy 4 Challenges C4C60 and the 2nd is Dutch Dare Card Challenge DDCC #89 which also has the alternative colour theme of purple, black, orange and green if you didn't want to make a Halloween card).

Thanks for stopping by - it was lovely to have you come and visit :-)

Jocelyn


Card Recipe:

Stamps:  All Night Media Spider 612A and Corner Web 407B (both c1994 and most likely retired), Alphabet foam stamp set - name unknown (K-Mart)

Ink:  Versacolor black pigment

Accessories:  Cuttlebug, Sizzix Textured Impressions Winter Set #3, cadmium yellow Jo Sonja acrylic paint, clear embossing powder, Cardstock:  Colormates Deep Terracotta and Black