Showing posts with label Masculine card making ideas. Show all posts

Tuesday, July 28, 2026

Stampin' Up The Open Sea Masculine Birthday Card

 
Hi blogging friends,

I have a confession to make:  I really enjoy making Masculine Cards.  Alot of cardmakers say that is the hardest type of card to make, but due to the amount of men in my family/extended family, I have had to learn how to make them.  When you buy a card for a guy, it is really expensive, yet the cards are often just so simple - and I think that is the key - keeping it simple and not overthinking it or you might feel defeated before you even start.  

Start with a limited colour palette and choose a simple image.  You can even base your card around a sentiment - either stamped or diecut.  14 years ago, I made this card based around the sentiment for a cousin of my mother-in-law who lived in Wales and was turning 90:


I had no clue what this man's hobbies were or if he had any hobbies at all.  I had only met him once briefly when he came to Australia some years before so didn't really know him.  I opted for something simple and he loved the card so much, that he rang up to thank me personally - I mean, ringing from Wales to Australia wouldn't exactly be cheap - so I was especially chuffed.  I still think the card design works well for a masculine card and it is all based around the sentiment -  but the rest of the card elements work in harmony with each other which I think is important.  The only thing I would change now is the font on the sentiment because it is a little dated.

Some more ideas:  add some texture by using an embossing folder - or add some distressing.  Use a basic layout that you can replicate for multiple cards.  If you want to add ribbon, do a simple knot rather than a bow - or add string or twine.  I love to use grosgrain ribbon for it's texture.  If you like the layout, you don't need to reinvent the wheel - just use the same layout and your cards will all look different if you use different colours, stamps, designer papers, embossing folders etc.

I have four masculine birthdays coming up in August and here is one of the cards that I made:


Challenges

This is also my card for the following Challenges:
  • Splitcoaststampers - Free for All Friday F4A857 - What makes you happy?  Mine is spending time in my Craft Room away from the world
  • Tic Tac Toe - Challenge TTTC297 - I chose the line across the bottom: Any Shape Die, Layers, Embossing

I pulled out my all-time favourite masculine stamp set by
Stampin' Up called The Open Sea which was first released in 2011.  It stayed in the catalogue for quite a few years because it was so popular and was eventually retired in 2016.  I would never be able to part with this set as it is just perfect for masculine cards.  You can do so much with the images in this stamp set.  Do a search on Pinterest and there are hundreds and hundreds of cards and you will get lost down a rabbit-hole as I often do on Pinterest............

First of all, I stamped the Ledger (the text image behind the ship) onto Cream Cardstock (from my stash) using Crumb Cake Ink but stamped off twice before stamping so it gave a faint impression.  Next, I stamped the ship using Night of Navy Ink.  The splotchy circles are from another retired set called Gorgeous Grunge which was first released in 2013.  I also stamped them in Crumb Cake Ink but stamped off twice.

I diecut the main image using a My Favorite Things Die-namics Pierced Circle STAX die and my Big Shot, then ink-blended around the edges using Crumb Cake Ink.

I diecut a circle from Crumb Cake Cardstock using a Lifestyle Nesting Circle Die, then ink-blended around the edges with Crumb Cake Ink.  I diecut another circle using a Pierced Circle STAX die from Kaisercraft Ink Cardstock and glued this underneath.

The designer papers are by Kaisercraft - High Tide - which was released in 2016.  You can still buy the 12 x 12 inch High Tide Paper Pads from Kaisercraft but not the smaller pad which is what I used for my card.  Kaisercraft has had some fantastic sea-beach-nautical themed releases over the years.  

The dry embossing was done using Crumb Cake Cardstock and a Kaisercraft Anchors Embossing Folder.  I ink-blended over the embossing using Crumb Cake Ink to make the anchors stand out more and to also tie in with the rest of the card.

The sentiment is from the back of the same Kaisercraft Paper Pad.  I added some Inque Boutique Brads which I thought matched the card really well.  Inque Boutique are no longer in business:  I think they closed around 2010.

The card base is Kaisercraft Ink Cardstock and the next layer up, Crumb Cake Cardstock - again ink blended with the same ink.

Once I had finished my card front, I glued it to a Kaisercraft White Card Base.

So, what do you think?  I was really pleased with how it turned out - and I am working hard on a few more designs using ship or beachy images.  Often, I like to stick to one theme for a few masculine cards until I am tired of it.  

Thanks for visiting my blog today.

Jocelyn


Card Recipe:

Stamps:  Stampin' Up The Open Sea #123032 (retired) + Gorgeous Grunge #130517 (retired)

Ink:  Stampin' Up Night of Navy + Crumb Cake

Designer Paper:  Kaisercraft High Tide 6-1/2" x 6-1/2" Pad (retired)

Accessories:  Inque Boutique Brads (retired), Big Shot, Kaisercraft Anchors Embossing Folder (retired), Ink Blending Tool with Domed Pad, Tombow Mono Multi Glue, Kaisercraft White Card Base, Cardstock - Stampin' Up Crumb Cake + Kaisercraft Ink

Dies:  My Favorite Things Die-namics Pierced Circle STAX (retired), Lifestyle Nesting Circles L-CC-001 (retired)


Tuesday, September 6, 2022

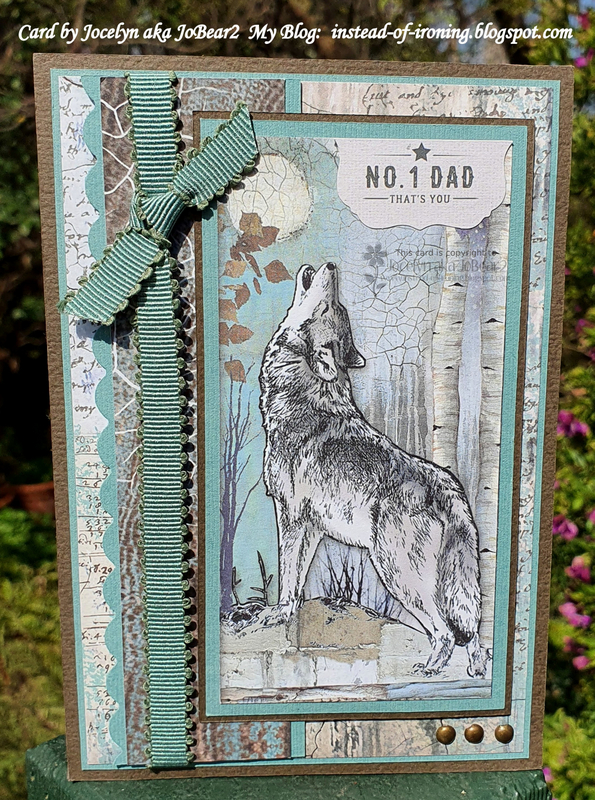
Stamperia Cosmos - Father's Day Card

 
Hi everyone 😀

We celebrate Father's Day here in Australia on the first Sunday in September - so Father's Day was last Sunday - and this is the card that I made for my husband who is a great Dad to our daughter:


This is also my entry for the following Challenge:

    Just Add Ink #619 - Masculine

As I still had the gorgeous Stamperia Cosmos papers on my desk from all the masculine birthday cards that I have made of late, I thought I would use them again.  I just adore these papers and they are so perfect for guy's cards IMHO 😀

The main image was trimmed from one of the sheets and was layered onto teal and sepia cardstock and trimmed to 1/18" and 1/16" respectively using my Perfect Layers Tools.

The side panel was punched using a Fiskars Scallop border punch.  The ribbon is from my stash.  Both the side panel and main panel were popped up on dimensionals.

The 3 small brads are by Inque Boutique.

The sentiment is by Kaisercraft - Everyday Hero - from their 6-1/2" x 6-1/2" pad and was cut in half.  The top half of the sentiment had some tools on it so didn't fit with the wolf image.  Everyday Hero is a recent release and I really love it.   Kaisercraft recently opened a store in my suburb so it's been wonderful to spend time in there.  I have no other scrapbooking stores near me so it is such a feast for the eyes to look at papers etc. in person which I haven't done for ages. 

Lastly, I added some Wink of Stella Clear Glitter brush to the moon so it sparkles but you can't tell in the photo.

Once I had finished my card front, I glued it to a Kaisercraft kraft card base.

It's a simple card - but I don't like too much fuss for my masculine cards.  I find that if I fuss too much, I overthink it and it takes me waaaaay longer to make than it should - plus I was making it on Saturday night so not alot of time!

Thanks for stopping by!

Jocelyn


Card Recipe:

Stamps and Ink:  None

Designer Paper:  Stamperia Cosmos 12" x 12" pad, Kaisercraft Everyday Hero 6-1/2" x 6-1/2" pad

Accessories:  Perfect Layers Tools, ribbon - stash, brads - Inque Boutique, paper piercer, dimensionals, Wink of Stella clear glitter brush, Tombow Mono Multi glue, cardstock - teal, sepia, Kaisercraft kraft card base

Punches:  Fiskars Scallop border


Monday, August 22, 2022

Graphic 45 - A Proper Gentleman Vintage Car Birthday Card

 
Hi everyone 😀

Today I am sharing another Masculine Birthday Card:


This is also another entry for the following Challenge:

Craftyhazelnut's Patterned Paper Challenge - August 
 
The main image was trimmed from a sheet by Graphic 45 - A Proper Gentleman.  One of the sheets is filled with Vintage cars in all different colours and styles so I have trimmed them all up ready for cards.    I layered it onto dark brown cardstock and trimmed it to 1/16" using my Perfect Layers Tools then popped it up on dimensionals.

The top background paper is really old and is called Rosemoka Chateau de sable.  The fleur de lis paper is by Graphic 45 - Le Romantique Collection - Celebration.  I layered the papers onto rust and then dark brown cardstock and trimmed them to 1/18" and 1/16" respectively using my Perfect Layers Tools.

The dark brown centre punched border was made using my Fiskars Threading Water punch.

The sentiment is by Lili of the Valley and was stamped onto kraft cardstock using Versafine Vintage Sepia ink then diecut it using my Big Shot and Lifestyle Nesting Circle dies.  I glued it to a rust diecut circle then popped it up on dimensionals.  I punched some hearts from rust cardstock using my Carl CP-8 heart duo punch then added Glossy Accents.  This sentiment is no longer available as a stamp but Lili of the Valley have it available as a digital download on their Etsy store.  The ribbon is from my stash.  

Once I had finished my card front, I glued it to a kraft card base using Tombow Mono Multi glue.

Thanks for stopping by!

Jocelyn


Card Recipe:

Stamps:  Lili of the Valley (UK) 'For You' Circular Sentiments

Ink:  Versafine Vintage Sepia

Designer Paper:  Graphic 45 - Le Romantique Collection - Celebration 12" x 12" and A Proper Gentleman 12" x 12", Rosemoka Chateau de sable AN-0204 12" x 12"

Accessories:  Ribbon - stash, Big Shot, dimensionals, Perfect Layers Tools, Glossy Accents, cardstock - dark brown, rust + kraft, kraft card base, Tombow Mono Multi glue

Punches:  Fiskars Threading Water border, Carl CP-8 heart duo

Dies:  Lifestyle Nesting Circles


Monday, August 15, 2022

Stamperia Cosmos - Another Birthday Card

 
Hi everyone 😀

I am sharing yet another masculine Birthday Card for one of my family members using the beautiful Stamperia Cosmos papers:


This is also my 2nd entry for each of the following Challenge Blogs:  

Seize the Birthday - #244 - No Stamping
Craftyhazelnut's Patterned Paper - August


The main image is also from the same Stamperia pad and was popped up on dimensionals.  Isn't that image gorgeous?!!

All the layers were trimmed to 1/16" using my Perfect Layers Tools.  I added some Inque Boutique copper brads to the other panels which I thought matched the papers really well.  The moon has some sparkle from a Wink of Stella Clear Glitter brush but you can't tell in the photo.

The sentiment is from a Kaisercraft Workshop paper pad and was popped up on dimensionals.

Once I had finished my card front, I glued it to a white card base using Tombow Mono Multi glue.

This is a larger card - 4-3/4" x 6-3/4" or 121mm x 171mm so I could accommodate the large main image.

Thanks for visiting my blog today.

Jocelyn


Card Recipe:

Stamps and Ink:  None

Designer Paper:  Stamperia Cosmos 12" x 12" pad, Kaisercraft Workshop 6-1/2" x 6-1/2"

Accessories:  Perfect Layers Tools, Inque Boutique copper brads, paper piercer, Perfect Layers Tools, cardstock - light teal and dark brown, white card base, dimensionals, Tombow Mono Multi glue, Wink of Stella Clear Glitter brush


Saturday, August 13, 2022

Stamperia Forest Birthday Card

 
Hi everyone 😀

Today I am sharing another Masculine Birthday Card that I made for my brother-in-law:


I would love to say it is my design but it isn't.  It is from a Card Kit designed by Lisa Dick from Bev Cross Crafts in Tasmania.  The kit is no longer available unfortunately so I can't link it.

I can tell you that the main image is by Stamperia from their Forest paper pad which is still readily available.  The pine cone is also from the papers and was fussy-cut.   The sentiment is by Craft Creations.  

The designer paper on the cream card base is also by Stamperia - House of Roses.

I did change quite a few things from the kit by adding the ribbon and twine to the tag as it just looked too blank to not have something in the tag hole.  I do not know the name of the tag die.   I also added the cream star stickers which I bought from our local newsagent. 

The leaf is a die but I don't know what brand - but honestly, their are tons of dies available so you would be sure to find a similar one.

Thanks for visiting my blog today.

Jocelyn


Card Recipe:

Stamps and Ink:  None

Designer Papers:  Stamperia Forest 12" x 12" pad and House of Roses 12" x 12" pad

Accessories:  Craft Creations Happy Birthday sentiments, cream star stickers, brown twine and ribbon (stash), dimensionals, Tombow Mono Multi glue, cardstock - cream and dark brown + cream card base

Dies:  Leaves and Tag (unknown brand)

Lili of the Valley Biplane Birthday Card

 
Hi everyone😀

Today I am sharing a birthday card that I made for my husband:


This is also my entry for the following Challenge:

Craftyhazelnut's Patterned Paper - August - any project that uses patterned paper.  If you click on the underlined link, it will take you to the Challenge.

The main image is by Lili of the Valley (UK) and is a pre-coloured digital image which I bought from their Etsy Store and is called:  Simply Print Biplane.  I love that when you buy one of their Simply Print images, it comes as a PDF and has several pages of different sizes so you choose what you need for your card or project.   

I layered the image onto some kraft cardstock then onto some blue designer paper from a Kaisercraft Workshop pad.  I trimmed the edges with my Perfect Layers Tools to 1/16" and 1/8" respectively then popped the image panel up on dimensionals.

The background designer paper is also from the same paper pad.  The punched kraft cardstock border is my old favourite - Fiskars Threading Water punch.  I added the small strip of designer paper above the border just to add some definition between the beige paper and the punched border as I thought it just needed something.

The sentiment is also from the same paper pad.  I added a copper brad on each side which is by Inque Boutique.  I have had these brads for years.  I don't see alot of cards with brads these days so I am guessing they are not in vogue - but I still love them and use them alot especially on masculine cards.

Once I had finished the card front, I glued it to a kraft card base.

Here is a photo of the card inside:


The sentiment is also from the Kaisercraft Workshop pad.  I added a 1/8" strip of the blue designer paper top and bottom.  

I think this card would be suitable for a variety of occasions and not just a birthday.

It's a very simple card but I like unfussy cards for guys.  Plus it is very quick and easy when you have to make a ton of cards for a gazillion birthdays all in the same month 😉

Thanks for stopping by!

Jocelyn


Card Recipe:

Stamps and Ink:  None

Designer Paper:  Kaisercraft Workshop 6-1/2" x 6-1/2" pad (2019)

Accessories:  Perfect Layers Tools, Digital Image - LOTV Simple Print Biplane, computer and printer, dimensionals, copper brads - Inque Boutique, paper piercer, Tombow Mono Multi glue, cardstock - kraft, kraft card base


Sunday, September 5, 2021

Stamperia Forest - Father's Day Card

 
Hi everyone 😊

Today I am sharing the Father's Day card that I made yesterday for my husband.  He is a fantastic Dad to our daughter and the most gentle and kindest man you could ever know.  


This is also my card for the following Challenges.  Please click on the underlined links to take you to the Challenge.

The Male Room - September - Challenge #154 - Nature's Bounty.  I thought the beautiful eagle and nature theme of the papers fitted the Challenge perfectly.


Splitcoaststampers - Ways to Use It Challenge WT830 - Brads

In the past few months, I stumbled across some Stamperia designer papers and fell in love.  They are beautiful quality and the artwork is stunning.  I bought their Forest pad with a view to making some masculine cards as the images are just perfect for them.

The main image and the papers are from the 8" x 8" pad.   I went around them with Ranger Antique Linen and Walnut Stain Distress inks using my Ranger blending tool.  It was amazing the difference that it made.

The side panel was punched using my old favourite - Fiskars Scallop Border punch.  Both the light teal and brown cardstock were trimmed to 1/16" and 1/8" respectively using my Perfect Layers Tools.  The stitched grosgrain ribbon is old and is by My Memories - from their FaLaLa range - which came in a pack of 6 trims.  Technically the pack is for Christmas to match their range of designer papers but the pack just happened to be sitting on my desk for another project and it matched perfectly.  I added Fray Stop to the cut ends to stop them from fraying.

The bottom 3 copper brads are by Inque Boutique.  Brads have gone out of fashion but I still love to use them especially for masculine cards.  Although I somewhat follow the trends for cardmaking, I just love to use what I have even if they are old and retired.  I found it harder when I was on a Design Team because I had to use products that were still readily available (which was fair enough) - but I just love the freedom of using all my old stuff and find I am more creative that way.

The sentiment panel is a diecut from the Stamperia Forest Diecuts pack.  I didn't have a Father's Day wooden sentiment so just went with a 'Best Wishes' one instead - and this is by Crafts4U - Words.  I glued on some Darice twine and the wooden stars are from my stash. 

Once I had completed my card front, I glued it to a kraft card base using Helmar 450 Quick Dry adhesive.  I buy all my kraft card bases from KMart (Australia) as they are really nice quality and very sturdy.   Finished size is 6" x 6" or 15cm x 15cm.

I think you could use this card for a birthday or to say thank you - lots of occasions.

Thank you for visiting my blog - I really appreciate it 😃 

Jocelyn


Card Recipe:

Stamps:  None

Ink:  Ranger Antique Linen and Walnut Stain Distress

Designer Paper:  Stamperia Forest 8" x 8" pad and Diecuts #DFLDC02

Accessories:  Ranger Ink Blending Tool, Crafts4U Wooden Sentiments - Words - #10226, wooden stars (stash), Fray Stop, twine - stash, My Memories - FaLaLa #30823 - brown stitched grosgrain ribbon, Perfect Layers Tools, Inque Boutique copper brads, Helmar 450 Quick Dry adhesive, Cardstock - brown, light teal, Kraft Card Base - Anko - KMart

Punches:  Fiskars Scallop Border


Friday, August 20, 2021

Decorer By the Sea Birthday Masculine Cards


Hi everyone 😊

Today I am sharing 3 Birthday Cards that I made for my brother, husband and brother-in-law.

These are also my cards for the following Challenges - please click on the underlined words to take to you the Challenge:

The Male Room - Challenge #153 - it is their 8th birthday and the challenge is to make a masculine birthday themed project.


Cute Card Thursday - Challenge #691 - Anything Goes with the optional extra of bright colours.

The main image on all the cards are from a little pack I bought from EBay called Decorer Scrapbook Paper M26 - By the Sea which come in a pack of 24 and has 3 of 8 designs.   I bought these on a whim because they looked interesting and were only $7.50 and was so pleased with them that I bought a few more packs.  I think the images are perfect for masculine cards.

The first card - which I gave to my husband - uses some scrap papers I found in my stash which I bought in a random pack of 6" x 6" papers at a Craft Show so I have no idea what brand they are.   


I really MISS going to Craft Shows and are really looking forward to when we can have them again post-pandemic here in Victoria, Australia.  We are currently in our 6th Lockdown so it will be so wonderful when I can walk through the Craft Show doors and just feast my eyes on all the crafty goodness 😀

All the cardstock layers were trimmed to 1/16" and 1/8" using my Perfect Layers Tools.  The bottom panel was punched using my Fiskars Scalloped Border punch.  The 'Best Wishes' sentiment is by Crafts4U - Wooden Embellishments - Words and was glued on using Helmars 450 Quick Dry adhesive.  I bought a whole bunch of these Crafts4U wooden embellishments from Catchy Crafts in NSW.   I have no connection to them but I highly recommend them.  I have met Doug and Dina in person many times and they are the loveliest people who always go that extra mile.  The wooden star is from my stash.  The ribbon is old and by Little Yellow Bicycle.  Haven't heard of them for a long time.  So many companies have disappeared over the years and they were one of my favourites - as was Basic Grey and Cosmo Cricket.  

Once I had finished the card panel, I adhered it to a kraft cardstock base which I bought from KMart.

This second card, I gave to my brother-in-law:


I punched the bottom panel using my Fiskars Threading Water border punch.  The main background designer paper is by Kaisercraft - from their Coastal Escape 6-1/2" x 6-1/2" pad.  The bottom panel designer paper is also by Kaisercraft - from their Sandy Toes 6-1/2" x 6-1/2" pad.

The cardstock layers were trimmed to 1/16" and 1/8" using my Perfect Layers Tools.   The anchor charm is from my stash and the ribbon again, is by Little Yellow Bicycle.  The 'Best Wishes' sentiment is by Crafts4U and was glued on using Helmars 450 Quick Dry Adhesive.  The unbranded wooden star is also from my stash.

My third card I gave to my brother for his 60th birthday.  Unfortunately we couldn't see each other due to our restrictions/lockdown.


The main image is from that same Decorer 'By the Sea' pack.  The red designer paper is by Kaisercraft - Sail Away from their 6-1/2" x 6-1/2" pad and the teal paper is also by Kaisercraft - Coastal Escape from their 6-1/2" x 6-1/2" pad.   The ribbon is by Tim Holtz Idealogy - Naturals, red/cream and I added Fray Stop to the cut ends to stop them from fraying.   The sentiment is by Crafts4U - Wooden Happy Birthday and the wooden stars are from my stash.  The bottom panel was punched using my Fiskars Threading Water border punch.  I have used this punch so much over the years for masculine cards and it never seems to date.

Thanks for visiting my blog today.

Jocelyn


CARD RECIPE:

Card #1

Designer Paper:  Scraps from stash - unknown brand

Accessories:  Image by Decorer Scrapbook Paper - By the Sea #M26, Perfect Layers Tools, anchor charm, ribbon - My Little Bicycle (retired), Fray Stop, Best Wishes - Crafts4U Wooden Embellishments Words #10226, wooden star (from stash), Helmars 450 Quick Dry adhesive, Tombow Mono Multi glue, cardstock: dark brown and light teal plus kraft card base (KMart)

Punches:  Fiskars Scalloped border

Card #2:

Designer Paper:  Kaisercraft - Coastal Escape and Sandy Toes 6-1/2" x 6-1/2" pad

Accessories:  Image by Decorer Scrapbook Paper - By the Sea #M26, Perfect Layers Tools, anchor charm, ribbon - My Little Bicycle (retired), Fray Stop, Best Wishes - Crafts4U Wooden Embellishments Words #10226, wooden star (from stash), Helmars 450 Quick Dry adhesive, Tombow Mono Multi glue, cardstock: dark brown and light teal plus kraft cards base (KMart)

Punches:  Fiskars Threading Water border

Card #3:

Designer Paper:  Kaisercraft - Sail Away and Coastal Escape 6-1/2" x 6-1/2" pad

Accessories:  Image by Decorer Scrapbook Paper - By the Sea #M26, Perfect Layers Tools,  ribbon - Tim Holtz Idealogy - Naturals red/cream #TH93104, Fray Stop, Crafts4U Wooden Happy Birthday #70074, wooden star (from stash), Helmars 450 Quick Dry adhesive, Tombow Mono Multi glue, cardstock: teal and red plus kraft card base (KMart)

Punches:  Fiskars Threading Water border


Friday, May 16, 2014

Shirt card for a Masculine Birthday or Father's Day

Hi blogging friends From Millan.Net

Sorry I haven't been around for a few weeks:  I've had some medical appointments to attend to for my loved one so that has meant multiple trips into hospital - and then had a few issues to deal with following those appointments (but all is OK) - and I have had a very sore back and neck (just an old injury playing up from a fall from a horse many years ago probably because I have been feeling a little anxious!) so crafting time has been frustratingly limited to short bursts.   Anyway, enough about me and onto what I have been playing with in my Craft Room.......

Today I am sharing a Shirt Card:
 

Have you ever come across a card by another Blogger and thought:  "Wow, I really like that - I must try it" - and then a couple of years later, you FINALLY get around to making it?  I first saw this Shirt card on Nancy Riley's blog:  iStamp in June 2010 - see Nancy's post HERE - and printed it out and kept it in my "To do" folder.   I thought it was a fabulous idea for a masculine card as you could do alot of variations on the basic card and it would be great for a birthday or Father's Day and it would be appropriate for a great range of ages!  Yep, it's only taken me 4 years to try it out LOL!

Now, I didn't follow the instructions at the link that Nancy provided - I followed instructions from another blogger:  Susan Roberts from Rainy Day Creations - who made these fantastic variations HERE - and then pinched the shirt sleeve/cuff idea from one of my favourite Bloggers:  Kerry Cox from her blog - A load of old pickle - from Kerry's shirt cards HERE.

The card is very simple and so quick to make - and I would really encourage you to try it.  The collar is popped up on dimensionals as is the shirt sleeve/cuff and I rounded the edges of the cuff with a corner punch.  I wondered if I should put a sentiment somewhere (?) but nothing looked right so left it off.  Next time I make a Shirt Card, I won't glue the tie down flat - I will pop it up on dimensionals as I think it will look better.  The buttons were glued down with Crafter's Pick Incredibly Tacky glue. The designer paper that I used on the tie is old and by Kaisercraft - at least back from 2009.

Here is a side view so you can see the dimension and also see how I trimmed off the back of the card to match the front:


So don't wait 4 years like me to try a Shirt Card - make it today!  There are many variations on this type of card including origami ones - just Google it and you'll find a ton of inspiration out there.

Thanks for stopping by!  Have a great weekend!

Jocelyn


Card Recipe:

Stamps and Ink:  none

Designer paper:   Kaisercraft Lone Ranger P128 Shotgun (retired)

Accessories:  green buttons (from stash), green sewing thread, Crafter's Pick Incredibly tacky glue, dimensionals, cardstock - pale green

Punches:  Stampin' Up corner

Monday, September 2, 2013

Masculine cards - some simple ideas

Hi blogging friends From Millan.Net

I have been a busy little bee (read:  snowed under!) in my craft room making masculine birthday cards as well as sewing a cat costume for my daughter to wear to school at an event they were holding the other day.  Most of the men in my immediate and extended family have birthdays in August.  Throw in a few girlfriend's birthdays in August as well and boy, that sure fills up the month; not to mention Father's Day here in Australia yesterday (Sunday 2nd September).  Phew:  that's a lot of cards!!

Sometimes people ask me about making masculine birthday cards and how to approach the task - and I think alot of the time, it is just far easier to keep it simple and not overthink it.  After spending a few years approaching masculine cards with the viewpoint of "they are so hard" which meant I felt like I was defeated before I had even started, I took a step back this year and decided to have a really good look at what was actually hard about them.

I have spent quite a bit of time this year looking at masculine cards in the shops and they are, for the most part, simple eg:  a picture of a yacht and a sentiment; sometimes it just a sentiment - either that or they are just plain rude or vulgar which I don't see the point of and seems to defeat the whole reason behind sending a card!   You see the same sorts of cards with a bottle of wine, a golf club, a football or a sports car - nothing fancy but pleasant to look at.  Most men spend 30 seconds looking at a card - and most of that time is reading the inside and not looking at the front.

So how do I approach my masculine cards with a view to not making the process difficult?  

I really just use simple layouts that I know work and try to pick an image that isn't too detailed to colour or use a pre-coloured topper/paper tole/decoupage image.  I think that pre-coloured toppers or decoupage/paper tole images are just fantastic and make the process easier. There are so many toppers etc. available now that are just perfect for masculine cards whether they are a sport-loving man, a dog lover or a man who likes to read books.  Even just having a fairly large sentiment as the focal point can be enough - see THIS card that I made for our cousin's 90th birthday.   If you don't have a sentiment shaped like the one that I used, have a play on your computer eg: Microsoft Word, and print one on cardstock instead.
 
And I love to use kraft cardstock - it seems to shout MASCULINE to me - and you can brighten up the card with a small amount of a brighter colour so your card isn't too dull.

The two cards I am sharing today were for my husband's birthday and my brother-in-law's birthday - and use the Docrafts Wellington Bear images which I love so much. This first card was for my husband:


As you can see, it is a very simple layout - one of my "go-to layouts".  The image is diecut decoupage (paper tole) so all I had to do was pop out the pieces and put them together with dimensionals.  The sentiment is from the same pack and this is popped up on dimensionals.

I added a blue heart button to balance the sentiment and ribbon.  I sewed some blue sewing thread through the button as I don't like naked buttons on my cards then glued the button on using Crafter's Pick Incredibly tacky glue (LOVE this glue!).

I used my Perfect Layers Tools to trim the blue cardstock layers to 1/16" and the kraft cardstock layers to 1/8".  The ribbon has had Fray Stop added to the cut ends to stop them from fraying.

The dotted designer paper is from the LOTV Country Gent pad and the striped paper is from the Wellington Bear pad.  As you can see, I added a layer of blue cardstock to brighten up the kraft cardstock a little.

Now, here is my 2nd card which I made for my brother-in-law:


As you can see, it is another very simple layout - one that I use alot and is another of my "go-to layouts".  I was actually putting the finishing touches to this card as my brother-in-law was chatting to my husband in the kitchen - talk about last minute!

The main image is a topper so no layering on this one.  I popped the sentiment up on dimensionals just to add a bit of interest. The side border was punched with my old favourite:  Fiskars Threading Water.  The 3 copper brads are by PrintBlocks.  As per the first card, I added Fray Stop to the cut ends of the ribbon.

The plaid designer paper is from the LOTV Country Gent pad and the striped paper from the Wellington Bear pad.  The layers are trimmed to 1/8" using my Perfect Layers Tools.

I hope my cards inspire you a little in your masculine card making.  You can check out my other Masculine cards HERE.  I have a couple of other masculine cards to share over the next few weeks:  watch this space!

Thanks for stopping by!  Have a great week!

Jocelyn


Card Recipes:

Card #1 -

Stamps and Ink:  None

Designer paper:  Lili of the Valley Crab Apple Lane 'Country Gent' 8" x 8" pad, Docrafts Wellington Bear 6" x 6" pad

Accessories:  Docrafts Wellington Bear decoupage (paper tole) pack (incl. sentiment), dimensionals, blue heart button - Dress It Up Icecream Soda #2779, blue sewing thread, Crafter's Pick Incredibly tacky glue, brown stitched grosgrain ribbon, Fray Stop, Perfect Layers Tools, cardstock - kraft, blue

Card #2 -

Stamps and Ink:  None

Designer paper:  Lili of the Valley Crab Apple Lane 'Country Gent' 8" x 8" pad, Docrafts Wellington Bear 6" x 6" pad

Accessories:  Docrafts Wellington Bear topper and sentiment, dimensionals, Print Blocks copper brads, Perfect Layers Tools, brown stitched grosgrain ribbon, Fray Stop, cardstock - kraft

Punches:  Stampin' Up corner punch, Fiskars Threading Water border

