Showing posts with label Watercolour pencils. Show all posts

Thursday, July 16, 2026

Colorado Craft Company Stockings Mini Card #1

 
Hi everyone,

It's Christmas in July - and it's time to start sharing my Splitcoaststampers Fan Club Design Team Projects now that my 6 month term finished in May.  You can start sharing your projects online 6 months from when they first went live on Splitcoaststampers.  This card was for the December Central Theme of Stockings by the Fireplace.

So today I am sharing a cute little Colorado Craft Company Christmas Card:


I adore the stamps that Anita Jeram designed for Colorado Craft Company - they are just so cute and very sweet.

I first masked off a square using 3M Post-It Labelling and Cover-up Tape, then ink-blended from bottom to top using Distress Oxides in the colours Tumbled Glass, Salty Ocean, Blueprint Sketch and Faded Jeans I heat-set the background to make sure it was completely dry, then used my Powder Tool before stamping the sentiment with Versamark Watermark Ink, added the Stampin' Up White Embossing Powder and heat-set.  This sentiment is also from the same stamp set.

I stamped the image using Versafine Onyx Black Ink onto Ranger Watercolour Cardstock then coloured it using various brands of Watercolour Pencils and a #2 Round Paintbrush.  I diecut the image using my Big Shot.  I went over the black lines using a Zig Millenium .005 Black Pen to darken up the lines as they always lighten up a bit from the watercolouring.

The bird on the branch is glued flush to the ink-blended square but I popped up the mouse on 1mm foam pads.

I re-attached the 3M Tape to the square panel and splattered on some White Posca Paint Pen so it looked all snowy.  Here is a close-up:


The snowflakes were punched using a Martha Stewart Snow Flurry Edge Punch but are the leftover punchies from using the punch.  I glued down just the centres so I could pop the snowflake arms up - then added a tiny Blue Molossi Rhinestone to the centres.  I added a tiny dot of Art Glitter Glue underneath the rhinestones to ensure they were stuck down really well.

Finishing touches were adding the Red and White Twine Stampin' Up Dazzling Details Glitter Glue to the two stockings.

Finished size is 4-7/8" x 4-7/8" or 124mm x 124mm.

Thanks for visiting my blog today!

Jocelyn


Card Recipe:

Stamps:  Colorado Craft Company Stockings Mini AJ597

Ink:  Versafine Onyx Black, Versamark Watermark, Ranger Distress Oxides Tumbled Glass, Salty Ocean, Blueprint Sketch + Faded Jeans

Designer Paper:  None

Accessories:  Big Shot, Watercolour Pencils, #2 Round Paintbrush, 3M Post-It Labelling and Cover-up Tape, Tombow Mono Multi, Art Glitter Glue, 1mm Doublesided Adhesive Foam Squares, Zig Millennium .005 Black Pen, Doodlebug Red and White Twine, Heat-Gun, Powder Tool, Stampin' Up White Embossing Powder, Stampin' Up Dazzling Details Glitter Glue (retired), Molossi Blue Rhinestones, Ranger Watercolour Cardstock, White Posca Paint Pen

Dies:  Colorado Craft Company Stockings Mini AJ598-D

Punches:  Martha Stewart Snow Flurry Edge


Wednesday, February 11, 2026

Penny Black Where's Dinner Masculine Card

 
Hi blogging friends,

My Craft Room has been a whirlwind of activity lately making cards for the Splitcoaststampers Dirty Dozen Design Team AND for family birthdays - but I am loving being more creative and spending LOTS of time in my Craft Room now that my husband and I are officially retired.  Woo hoo!  We both have lots of hobbies so it is great to be able to just have more time to read, relax and create and not have the constraints of doing that around a work schedule.  My husband's friends were already retired so it means they can catch up more often.

So onto the Birthday Card that I made for my brother-in-law:


This is also my card for the following Challenges - click on the underlined link to take you to the Challenge:
  • Crafty Catz Challenge #706 - Anything Goes
  • Penny Black Saturday Challenge - February - Anything Goes or Romance
  • Critter Crazy Challenge #107 - Anything Goes with a Featured Critter Real or Fantasy
Of course, if you have been around my blog for a while, you will already know that I adore Penny Black Stamps, so I couldn't wait to ink up this super-cute (but puzzled) dog.  I have had this stamp forever and it is a wood-block one and was designed in the year 2000.  I find that the Margaret Sherry critter stamps just don't seem to date and I still love them as much as when I first bought them.

I stamped the image onto Ranger Watercolour Cardstock using Versafine Onyx Black Ink, and coloured him using a mix of Watercolour Pencils and Zig Clean Color Real Brush Markers and my #2 Round Paintbrush. The sentiment is from a Penny Black Set - Make a Wish.

The image panel was diecut using my Big Shot and Lifestyle Nesting Rounded Squares Dies.  Note that I popped up the panel a little on scraps of white cardstock.

All the designer papers are old - Basic Grey - Max and Whiskers - which are from 2009.  I love Basic Grey Designer Papers and really miss them as they were really different to other brands.

The Mustard Cardstock and Dark Brown Cardstock on the card base were trimmed to 1/16" and 1/8" respectively using my WRMK Perfect Layers Guides.

The dry embossed panel across the middle was done using a Crafts Too Bone and Paw Print Embossing Folder.  I have had this folder for a long time so is no doubt retired.

I added some Uniquely Creative Clear Sparkle Pen to the candle flame and the glow around it.

The top RHS embellishments are 3 x Dark Brown Candi Dots with diecut stars glued on top.  Just having the Dark Brown Candi Dots seemed to disappear into the busy background - so I came up with the idea of adding the stars which were diecut from papers from the Max and Whiskers pad.  The stars are by Memory Box - Hearts and Stars.  The Candi Dots were popped up on 2mm Self-Adhesive Foam Pads.

I left the rest of the card unfussy - although I thought about adding a dark brown ribbon across the centre, however, I was in a rush and glued the main image down so it was too late.  I guess it looks OK without it (?).  I just love ribbons and find it hard to NOT put them on my cards!

Once I had finished my card front, I glued it to White Card Base using Tombow Mono Multi Glue.

Finished size is:  5-7/8" x 5-7/8" or 138mm x 138mm.

Thanks for stopping by!

Jocelyn


Card Recipe:

Stamps:  Penny Black Where's Dinner 1705J Wood-Mount, Sentiment - Penny Black Make a Wish 30-052 Clear Set

Ink:  Versafine Onyx Black

Designer Paper:  Basic Grey Max and Whiskers 6" x 6" (2009) - retired

Accessories:  Big Shot, Crafts Too Bone and Paw Print Embossing Folder (retired), Zig Clean Color Real Brush Markers, Lyra + Derwent Watercolour Pencils, #2 Round Paintbrush, Uniquely Creative Clear Sparkle Brush, Dark Brown Candi Dots - Choc-a-Mocha, We R Memory Keepers Perfect Layers Guides, Tombow Mono Multi Glue, Art Glitter Glue, 2mm Self-Adhesive Foam Pads, Cardstock - Mustard + Dark Brown + Scraps of White, Ranger Watercolor Cardstock

Dies:  Lifestyle Nesting Rounded Squares L-CC-002 (retired), Memory Box Hearts and Stars 98755 (2014) - retired


Friday, July 4, 2025

Stampin' Up Silly Goose Birthday Card

 
Hi everyone 😀

I have taken a break from making Thank You Cards to make a Birthday Card for my daughter's birthday:


Challenges:

This is also my card for the following Challenges - click on the underlined links to take you to their blog:
  • Crafty Catz Challenge #697 - Anything Goes
My daughter really loves playing "The Untitled Goose Game" which is a really fun video game that was developed in Australia.  So it really was a no-brainer to use the adorable Stampin'Up Silly Goose Set to make a card for her birthday.

I stamped the image onto Ranger Watercolour Cardstock using Versafine Onyx Black Ink.  I coloured the image with a mix of Lyra + Derwent Watercolour Pencils + Zig Clean Color Real Brush Markers.   I used my Zigs to add some blades of grass underneath the goose.  Of course, after I had done that, I noticed that there is a stamp in the set that you can use to stamp grass.  I hadn't really noticed it before for some reason!  Isn't that goose just so adorable?!

I re-stamped the image and cut out just the balloon and went around the edges with an Anko Black Pigment Brush Pen to hide the white edge - then popped up the balloon on a 0.5mm foam pad.  I went over all the black lines of the goose etc. with an Anko 0.05 Black Pigment Pen to darken then up after my colouring.

I diecut the image using a My Favorite Things Inside and Out Stitched Rectangle Stax Die - then glued it to some designer paper.  I rounded the corners using a We R Memory Keepers 1/2" Corner Chomper.

The sentiment was diecut using an old retired Spellbinders Labels Trio Die.  This is another die that I have used countless times over the years.

All the designer papers are by Echo Park - Happy Birthday - which were released in 2017.  I didn't use any cardstock for my layers - they are all designer papers.

The bottom panel was punched using a Fiskars Scallop Border Punch.  The ribbon is from my stash and was originally purchased from KMart some years ago now.

Once I had finished my card front, I glued it to a Uniquely Creative White Card Base.  Final touches were Stampin' Up Dazzling Details Glitter Glue to the balloon and the party hat and three x Aqua Couture Creations Gemstones.

Finished size is:  4-1/8" x 5-3/16" or 105mm x 148mm.

Thanks for stopping by my blog today.

Jocelyn


Card Recipe:

Stamps:  Stampin' Up Silly Goose #160734 (retired)

Ink:  Versafine Onyx Black

Designer Paper:  Echo Park Happy Birthday 6" x 6" (from 2017) (retired)

Accessories:  Big Shot, Lyra + Derwent Watercolour Pencils, Kuretake Clean Color Real Brush Markers, #4 Round Paintbrush, Ribbon (KMart), WRMK 1/2" Corner Chomper, 0.5mm Self-Adhesive Doublesided Foam Squares, Ranger Watercolour Cardstock, Stampin' Up Dazzling Details Glitter Glue, Couture Creations 3mm + 4mm Aqua Gemstones, Anko Black Pigment Brush + 0.05 Liner, Uniquely Creative White Card Base, Tombow Mono Multi Glue

Punches:  Fiskars Scallop Border (retired)

Dies:  My Favorite Things Inside and Out Stitched Rounded Rectangle STAX MFT-0848 (retired), Spellbinder Shapeabilities Labels Trio S3-147 (retired)


Monday, June 2, 2025

Lavinia Stamps Druid's Inn Welcome to your New Home Card

 
Hi everyone 😀

Today I am sharing a mixed media Welcome to your New Home Card that I made for my niece and her partner who have moved into a new home and were having a Housewarming Get-together to celebrate.  

This is also my card for the following Challenge:
  • Crafty Catz Challenge #694 - Anything Goes with Optional Twist of Make Us Smile.  My card did make the recipients smile so I hope this qualifies for that part of the Challenge.  Click on the underlined link to take you to the Challenge.
Anyway, into my card:  I looked in my stash for anything that I could use.   I don't think I have ever made a Housewarming Card and I was quite stumped 😐  The only house types of stamps that I had were really only suited to someone who was retiring to the country and they looked too old-fashioned for people in their 20s.  And then it hit me:  I had a Lavinia stamp called Druid's Inn which had a door on it so I decided I could make a whimsical scene instead.  I can honestly say that this is one of the HARDEST cards I have ever made because it was really taking me out of my comfort-zone and using products that I have never used before.  However, as my year is all about challenging myself with new techniques and styles of card, I was up for the challenge and was very determined to keep going despite nearly binning it at one stage. 


I have a pad of 8" x 8" Lavinia Dreamscape Papers and picked one of the sheets that was quite light as I knew I wanted to able to have a moon in the scene.

Firstly, I stamped The Druid's Inn using Versafine Clair Fallen Leaves which is a lovely brown ink.  I stamped the two hares using Versafine Clair Nocturne then left the paper to sit overnight so the images dried and didn't smear once I started adding my colouring mediums.

I have never coloured on these Dreamscape Papers before and it isn't watercolour paper so I had to be super-careful with how much water I added.  For the Druid's Inn:  I coloured it using multiple products:  Faber-Castell Watercolour Pencils in brown tones + black, an Albrecht-Durer Watercolour Pencil in the colour Indian Red, Kuretake Zig Clean Color Real Brush Markers in the colours Mid-Brown 065 + Dark Oatmeal 066 + Red Ochre 604.  I added white highlights using a White Gel Pen and Titanium White Pan Pastel.  This is my first time using Pan Pastels.

To make the moon, I diecut a circle from acetate in the size I wanted using my Big Shot and Lifestyle Nesting Circles Dies - then placed that where the moon was going to be and lightly sponged around the edge with my Ink Blending Tool using Weathered Wood Ranger Distress Ink.

I sponged underneath the hares to ground them using the Weathered Wood Ink then added some shadow behind them where they would be casting a shadow from the light of the moon.  I used a White Gel Pen to add highlights to the hares but smeared it with my finger to make it look more natural.

I used ALOT of stamps to add the foliage and mushrooms.  Some were stamped with Versafine Clair Twilight - others with Rainforest and Fallen Leaves.  Some are 1st generation - some are 2nd or 3rd generation.  I again used my White Gel Pen to add some highlights to the mushrooms smearing them to again make them look more natural.

I stamped some text on the LHS and RHS using Versafine Clair Twilight Ink in 1st and 2nd generation then went around the edges of the card with the same ink.  I darkened the edges a little more with Versafine Clair Nocturne Ink.

To brighten the moon, I added Mont Marte Lemon Yellow Pastel Pencil and Titanium White Pan Pastel.  This was also my first time using a Pastel Pencil.

I used a Sunshine Yellow Posca Paint Pen to add yellow to the window so it looked like the lights were on and casting light on the vines of the tree and on the stones below it.  I added dots here and there around the images using other Posca Pens in the colours Light Pink, Metallic Pink, Apricot and White.

I drew a red heart between the hares using a Red Fine-Point Sharpie then added Candy Cane Stickles to make it sparkle.

Of course, the card needed MORE glitter and it's amazing how much it brightens your card and makes it more special; it just seems to come alive somehow.  I added dots of glue using my Quickie Glue Pen around the moon then just added dots here and there around the scene - then sprinkled on some Bellbird PaperArts Diamond Glitter.  It's just a shame that you can't see it on my photo but it does look lovely. 

Once I had finished the scene, I ran it through my Big Shot with fresh plates and a couple of shims to flatten it which worked surprisingly well.

I added some coloured cardstock layers to the scene using Kaisercraft Ivory, Forest and Cinnamon and trimmed the ivory to 1/16" and the others to 1/8" using my WRMK Perfect Layers Guides I then glued it to a White Card Base using Tombow Mono Multi Glue.

Finished size is 5-7/8" x 5-7/8" or 149mm x 149mm.

Phew, that was a marathon!  Thanks for sticking with me if you got this far - and for visiting my blog today!

Jocelyn


Card Recipe:

Stamps:  Lavinia - Leaf Creeper LAV742, Slender Mushrooms Mini LAV151, Quirky Mushrooms LAV413, Forest Mushrooms Mini LAV564, Berry Leaves LAV577, Druid's Inn LAV572, Wild Hares Set Small LAV614, Uniquely Creative Longhand UC1832

Ink:  Versafine Clair - Fallen Leaves, Twilight, Rainforest and Nocturne + Ranger Distress Weathered Wood

Designer Paper:  Lavinia Dreamscape - Colourburst Collection 8" x 8"

Accessories:  Big Shot, Acetate, #4 Round Paintbrush, Pan Pastel - Titanium White, Mont Marte Lemon Yellow Pastel Pencil, Faber-Castell Watercolour Pencils - Brown Tones + Black, Albrecht-Durer Indian Red Watercolour Pencil, Kuretake Zig Clean Color Real Brush Markers - 065 Mid Brown + 066 Dark Oatmeal + 604 Red Ochre, Posca Paint Pens - White + Sunshine Yellow + Metallic Pink + Apricot, Red Fine-point Sharpie, Candy Cane Stickles, White Uniball Signo Gel Pen, Quickie Glue Pen, Bellbird PaperArts Diamond Glitter, Ink Blending Tool + Domed Pad, Square White Card Base, Kaisercraft Cardstock - Ivory + Forest + Cinnamon

Dies:  Lifestyle Nesting Circles (retired)


Friday, April 18, 2025

Penny Black Garden Friends Easter Card + Easter Egg Holder

 
Hi everyone 

My Craft Room has been a real hive of activity lately and I am loving being able to have more time to create.

I made this card for my daughter for Easter:


This is also my card for the following Challenges (click on the underlined link to take you to the Challenge):
  • Penny Black Saturday Challenge - PBSC April - Anything Goes with Optional Easter
  • Shopping our Stash - SOS545 - Hippity Hop - Make an Easter Card or a Card featuring a Rabbit or Chick 
  • Critter Crazy Challenges #97 - Anything Goes Featured Critter Theme
The main image is by Penny Black - Garden Friends - and was stamped with Versafine Onyx Black Ink onto Ranger Watercolour Cardstock.  I coloured the image with Watercolour Pencils then went over the black lines with a Black Copic Multi-liner to darken the lines up.

I diecut the panel using my Big Shot and Nesting Card Templates - and then things went awry!  You see the square designer paper on the base?  I measured my designer paper wrongly and cut it into a square instead of a rectangle as I was going to put the chicks onto a rectangular card.  Oh well, I thought - I will just cut another piece of that designer paper - but I had none of that particular one left in the 6" x 6" pad - and I really, REALLY wanted to use that one.  So, pivot I thought and don't waste the square of designer paper - use it instead and I did - but then couldn't figure out a good layout for my card.  I know in the end, it is a simple layout but it just frustrated me no end and I couldn't figure out whether I wanted the blue cardstock or pink - or should I go yellow?  I just kept changing my mind and couldn't settle on what I wanted so I left it on my desk until the next day.

The next day, I finally decided to go with the Blue Cardstock and then struggled with the layout again as I tried this and that and nothing seemed to look right.  It was just one of those frustrating cards that just seems to be hard work!  Eventually I settled on what other designer papers to add to my card so I had my main panel finished.  Here is a close-up of those cute little chicks:


And then couldn't make up my mind whether I should put the finished panel on a plain white card base or not.  In the end, I thought adding some dry embossing to the white card base looked better than plain so used my Crafter's Companion EF6 Embossalicious Embossing Folder and I like how it complemented the original square of the designer paper as well as the tiny flowers on the stamped image.  Of course, my frustrations continued as the embossing folder slipped the first time when I put it through my Big Shot so it embossed all crooked and I had to get another card base and redo it.  

I rounded the corners of the Kaisercraft White Card Base using my We R Memory Keepers 1/2" Corner Chomper.  All the blue cardstock layers were trimmed to 1/8" using my Perfect Layers Guides.

And then the ribbon - ohhhh, that ribbon gave me so much grief.  I struggled with what colour and type - and then eventually settled on the organza ribbon because it was so hard to match the blue colour with a solid blue coloured ribbon from my stash - I could not find the right shade.  This particular organza ribbon seemed to have a mind of its own and I gave up tying a bow because it wouldn't sit flat and looked totally weird.  Well, just knot it instead I told myself but do you think it would sit flat as well?  Nope!  It did NOT want to play nicely!  And ultimately, I used a tiny glue dot to hold the RHS of the ribbon down because it insisted on sticking up at 90 degrees.  

The sentiment is the same sentiment set I have used on my last couple of cards and I decided to cut out the sentiment and pop it up on dimensionals.  Even trying to figure out where to put the sentiment was driving me bonkers!  I added some Tiny Pink Cardstock Hearts around the main image panel by using my EK Success Arrows Border Punch (the leftover punchies look like tiny hearts).  I glued them on using a Uniquely Creative Fine Glue Pen.

Of course, I had to add glitter to the hearts and flowers using Kindyglitz Crystalina Glitter Glue.  I needed some sparkle to bring a bit of life to the card.

Ultimately, this card took 1000 times longer to make than it should have, however, I am happy with the end result.  And I like the layout and will definitely store this layout in my Card Sketches Folder as it is great for smaller, more vertical images.  

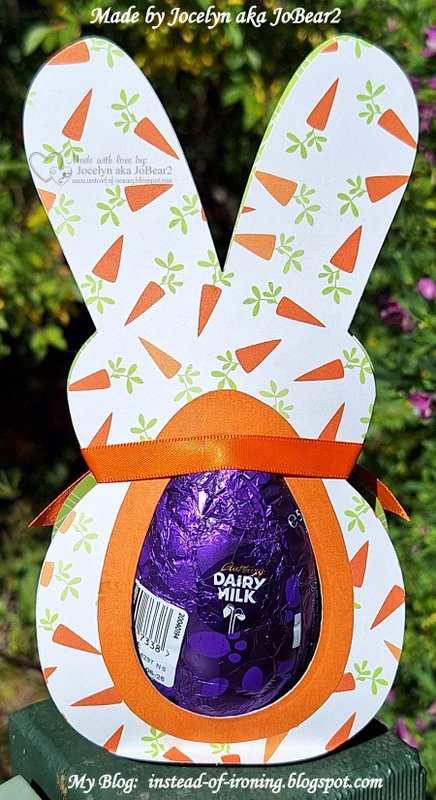
Sticking to my New Year's Resolution to try new crafty things, I decided to make an Easter Egg Holder which was certainly a challenge - but that's why I am trying new things that take me out of my comfort-zone.  Here is what I came up with:


Last year, I was doing an order with Scrapbook.Com (in the USA in case you don't know) and they always have free things you can add to your cart - and they had these really cute Nesting Bunnies which they call "Nested Peeps".  So when I received them, I was actually surprised how big the largest die was:

They retail for US$35 (although they are on special at the moment) so it really was an amazing free gift.  Scrapbook.com are the only US Company that I buy from because their postage to Australia is very reasonable - but I don't buy from them all that often because when you factor in the exchange rate between Australia and the USA, it does start to add up. 

I had this idea in my head when I was trying to get to sleep the other night that I might be able to diecut the bunny twice and have some cardstock at the bottom between the back and front to allow for the size of the egg.  Here is a side view so you know what I mean:


I then came up with the idea to diecut the bunny's tummy with one of my Spellbinders Nested Eggs Dies to accommodate the Easter Egg - holding it in place.  It took quite a bit of fiddling around and I did a prototype first to see if it would work - and then I realised that I would have to diecut the back of the bunny as well or the Easter Egg wouldn't stay in place:


I used some older papers by Echo Park - Happy Easter 12" x 12" - first released in 2015.  I diecut the Orange Cardstock using the Spellbinders Nested Eggs Nestabilities and then diecut the centre where the Easter Egg fitted it.

I used the same paper range to diecut the bunny to put on the inside just to pretty it up instead of just having the white cardstock.  You can just see the paper from the side view photo but it is actually green in real life.

I tied some Orange Ribbon around the bunny's neck to hold it all together and added Fray Stop to the cut ends to stop them from fraying.

I was really happy with how it turned out and it was great to see it all come together as I envisioned it after struggling with the card so much!

Thanks for stopping by!

Jocelyn


Card Recipe:

Stamps:  Penny Black Garden Friends 30-021 Clear Set, Impression Obsession Sentiments 1 WP16 (retired)

Ink:  Versafine Onyx Black

Designer Paper:  American Crafts Hello Spring #320548 (from 2016 - retired)

Accessories:  Big Shot, Dimensionals, Watercolour Pencils, #4 Round Paintbrush, Kindyglitz Crystalina Glitter Glue, WRMK Perfect Layers Guides, Ranger Watercolour Cardstock, Black Copic Multi-liner, American Crafts Organza Ribbon 3/8" or 9mm wide, Fray Stop, Crafter's Companion Die'Sire Embossalicious EF6 Embossing Folder, Tombow Mono Multi Glue, Uniquely Creative Fine Glue Pen, Mini Glue Dot, Cardstock - Scrap of Pink + Blue, Kaisercraft White Card Base

Dies:  Lifestyle Crafts Quickutz Nesting Card Templates DC0431

Punches:  WRMK 1/2" Corner Chomper, EK Success Arrows Border


Easter Egg Holder Recipe:

Designer Paper:  Echo Park Happy Easter 12" x 12" (from 2015 - retired)

Accessories:  Big Shot, Orange Ribbon 3/8" or 9mm wide (stash), Fray Stop, Cardstock - White + Orange

Dies:  Scrapbook.com Nesting Peeps sbc-shapes-19, Spellbinder Nested Eggs Nestabilities S4-264


Thursday, April 10, 2025

Penny Back So Loved Wedding Anniversary Card

 
Hi everyone 😃

My husband and I just celebrated our 36th Wedding Anniversary.  It hardly seems that we have been married that long - yet we have - and I am so lucky to be married to such a great guy.  We went out for our evening meal to our local RSL and had a lovely, quiet day at home otherwise.  I received 2 gorgeous bunches of pink roses and a beautiful card.  Our daughter made us the most-amazing mini scrapbook album with photos of us from the last 10 years.   We aren't ones for big celebrations and prefer to keep things low-key.  I am definitely not one for dressing up and going to a fancy restaurant because (a) I like simple foods like Roast of the Day, and (b) it's too expensive, and (c) they have white tablecloths and I am so incredibly clumsy.  I am also clumsy when I cook and are known as Messy Chef - a play on Masterchef - hee hee 😆

And now for story time:  around 24 years ago, my boss gave me an $80 voucher for Christmas to a local and very fancy restaurant.  We booked for 6.00 pm and we were the only ones there till about 7.30 pm.  And then people started arriving really, REALLY dressed up - so much so that I felt more than a little underdressed - but I wasn't wearing jeans and was actually dressed up so I thought!  I guess we were naive and honestly didn't realise that it was a fancy restaurant till we got there (pre-internet days for us) and saw the decor and then the menu and went, uh oh.  The glasses of House Wine turned out to be $25 each as we mistook the menu for meaning $25 for a bottle of House Wine because it said:  "House Wine $25" - and then realised our mistake - so that was $50 of the voucher used already!  We got the cheapest food on the menu and were still over $100 out-of-pocket.  It was just as well that we were both working at the time and it was pre-kids!  And to be honest, I really had no idea what I was eating as the description was completely lost on me - food I was completely unfamiliar with.  I am not taking anything away from the Chef of course - it's just not my scene - and having pub fare like a Garlic Bread Entree and a banging Roast of the Day makes me very happy and you are in and out within an hour.  Suits me just fine 😃

Anyway, onto the card I made for my husband:


This is also my card for the following Challenges (click on the underlined links to take you to the Challenges):
  • Crafty Catz Challenge - #691 - Anything Goes with No Optional Twist
  • Penny Black Saturday Challenge - PBSC April - Anything Goes with Optional Easter
  • Crazy Critter Challenges - Challenge #97 - Anything Goes with a Featured Critter
The main image is by Penny Black from their So Loved Set.  I stamped the cat with Versafine Onyx Black Ink onto Bellbird Paperarts 210gsm Hot Pressed Watercolour Paper and coloured it using various brands of Watercolour Pencils and a #4 Round Paintbrush.  I went over the black lines using an Anko Black 0.3 Pen to darken up the lines on the image.

I re-stamped the image onto a piece of the designer paper lining up the 'One True Love' from the paper to be the centre of the heart cushion then fussy-cut it out.  I re-stamped the image again onto Watercolour Paper and fussy-cut the paws that are holding the cushion.  I went around the edges with an Anko Black Brush Pen to hide any imperfections with my cutting.  I glued the cushion and paws on using Tombow Mono Multi Glue and it looks really cool in real life because you can see a bit of dimension.  I side-loaded a flat paintbrush with Folk Art Burgundy Acrylic Paint and went around the edge of the cushion to make it look a bit more rounded.  

Here is a close-up:


The sentiment is by Impression Obsession - Sentiments 1 - which I have had forever and is retired.  I used my Stamping Platform to ensure perfect placement and to stamp it a couple of times to darken it up.  

I used my EK Success Arrows Border Punch to punch out some Burgundy Cardstock Hearts (the leftover punchies look like tiny hearts) and glued them on using Tombow Mono Aqua Glue then added some Uniquely Creative Clear Sparkle Brush to them for a bit sparkle.

The main image was diecut using a Lifestyle Nesting Circle Die.  I diecut some Dark Teal Cardstock using a My Favorite Things Pierced Stax Circle Die then diecut Burgundy Cardstock using a Spellbinders Classic Scalloped Circle Die.

All the designer papers are by Bo Bunny - Love Letters - which are really old and are from around 2012.  I wish that I had bought more of this collection as I just adore the colour palette and have used it alot over the years.  

The bottom panel was punched using a Fiskars Scallop Border Punch.  The Dark Teal and Burgundy Cardstock layers were trimmed to 1/16" using my We R Memory Keepers Perfect Layers Guides.  I attached the Cream Ribbon in two separate elements then popped the panel up a little on scraps of white cardstock.

The Black Cardstock on the card base was trimmed to 1/8" and the Dark Teal + Burgundy Cardstock to 1/16" using my WRMK Perfect Layers Guides.

Once I had finished my card front, I glued it to a White Card Base.

And now here is a pic of the card inside:


The sentiment is by Avery Elle - Lots of Love - which was released in 2012 so long-retired.  I stamped it using Versafine Onyx Black Ink and then promptly smeared it......grrrrr!  So I re-stamped it onto a separate piece of white cardstock and heat-set it using my heat-gun before I had a chance to smear it - then diecut it using a Lifestyle Nesting Oval.  I layered that onto a Dark Teal Cardstock diecut oval.  

I punched two hearts from Burgundy Cardstock using an Anko Heart Punch.  I bought this punch in a set of 4 different punches from KMart.  These punches punch beautifully and I am really impressed with them.  I added some sparkle with my Uniquely Creative Clear Sparkle Brush.

I added the strips of designer paper just to tie everything together.

Thanks for visiting my blog today.

Jocelyn


Card Recipe - Front:

Stamps:  Penny Black So Loved 30-457 clear set, Impression Obsession Sentiments 1 WP16 clear set (retired)

Ink:  Versafine Onyx Back

Designer Paper:  Bo Bunny Love Letters #13517517 6" x 6" Pad (retired)

Accessories:  Big Shot, Perfect Layers Tools, Kaisercraft Trimmer, Stamping Platform, Bellbird Paperarts 210gsm Cotton Blend Watercolour Paper, Watercolour Pencils, #4 Round + Flat Paintbrush, Folk Art Burgundy Acrylic Paint, Anko Black Pen 0.3 + Brush, Uniquely Creative Clear Sparkle Brush, WRMK Perfect Layers Guides, Cream Ribbon 1/2" or 12.5mm wide, Cardstock - Burgundy + Dark Teal + Black + Scraps of White, Square White Card Base

Dies:  My Favorite Things Pierced Stax Die-namics, Lifestyle Nesting Circles, Spellbinder Classic Scalloped Circles Small S4-125

Punches:  EK Success Arrows Border, Fiskars Scallop Border


Card Recipe - Inside:

Stamps:  Avery Elle Lots of Love clear set (retired)

Ink:  Versafine Onyx Black

Designer Paper:  Bo Bunny Love Letters #13517517 6" x 6" Pad (retired)

Accessories:  Big Shot, WRMK Perfect Layers Guides, Heat-Gun Uniquely Creative Clear Sparkle Brush, Cardstock - White, Dark Teal, Burgundy, Black

Dies:  Lifestyle Nesting Ovals

Punches:  Anko Heart Punch #68775858


Friday, April 4, 2025

Penny Black Frolic Birthday Card!

 
Hi everyone 😃 

Today I am sharing a Birthday Card that I made for my niece:


This is also my card for the following Challenge:

Retro Rubber Challenge #251 - Anything Goes - RRCB251.  This Challenge requires you to use stamps that are over a year old and you must state how old - or roughly how old - your stamp is.  I was using this cat stamp back in 2014 so it is at least 11 years old.  The sentiment I was also using back in 2016 so is at least 9 years old.  Click on the underlined link to take you to the Challenge. 

I used the same layout as my previous card because it was easy and I really liked it.  I think this layout will be another one of my "go-to" card sketches which is especially useful when my mojo has disappeared.

The main image is by Penny Black - Frolic.  As I already stated,  I have had this wood-mounted stamp for a really long time and is one of my favourites.  You just can't help but smile at that adorable cat!  I stamped it using Versafine Onyx Black Ink onto Ranger Watercolour Cardstock and coloured it using Watercolour Pencils + Kuretake Clean Color Real Brush Markers and a #4 round paintbrush.

I went over the black lines using a Black Copic Multiliner to darken them up after my colouring.  The sentiment is by Impression Obsession Sentiments 1 which is retired.  I have used this sentiment set many times over the years because you can just add a small sentiment to an image panel when there really isn't room to add a larger one.  I diecut the main image using my Big Shot and Spellbinders Labels 1 Nestabilities.

Here is a close-up:


All the designer papers are by Cocoa Vanilla - Happiness.  The paper on the base is from their 6" x 8" pad and the Daisy paper down the centre is a 12" x 12" sheet.  The papers are a few years old and retired.

The ribbon is from my stash and was glued on using Helmar's Fabric Glue.  I added Fray Stop to the cut edges to stop them from fraying.  The Pink Enamel Dots are by Stampin' Up from their set 'It's my Party' and are retired.  

I used an EK Success Arrows Border Punch to punch tiny hearts from a scrap of pink designer paper (the leftover punchies look like tiny hearts) and glued them around the sentiment and main image using Tombow Mono Aqua Glue.   

Finishing touches were Kindyglitz Crystalina Glitter Glue to the butterflies + the tiny hearts - and Nuvo White Blizzard Glitter Drops to the flower centres.

Once I had finished the card front, I glued it to a white card base.

Here is a picture of the card inside:


The Happy Birthday is from a retired Stampin' Up set called Sweet Icecream.  I stamped it using Versafine Onyx Black then added lots of the punched tiny hearts around it plus Kindyglitz Crystalina Glitter Glue to the hearts for some sparkle.

On a personal note, my partner has been on Long Service Leave since November 2024.  It has been great to have him around more and he has been enjoying catching up on jobs around the house that he has been wanting to do for quite some years.  This has also given me more crafting time because he is doing things like going up to the shops and other running around that I normally do which is a great time-sucker.  

I have also been on a mission for over a year to sort through and set up my craft room better so I have been able to concentrate on that and are 95% there.  I used KMart, Target and Amazon storage solutions for most my storage so done it on a small budget.  I am finding that I am more creative because now everything has a place and it is so much easier to put things away and it's easier to find things.  I was lucky enough to find a 2nd-hand 4 x 4 Ikea Kallax Shelf Unit on Facebook Marketplace in the next suburb for the bargain price of $20.  It just needed a bit of a clean and it has been fantastic for rejigging my storage.  I put in some over the wardrobe storage baskets that I got from Target and it has been brilliant because I can see what I have.  If I can't see what I have because it's behind the wardrobe door, I forget it's there so I don't use it.  And so far, my room is working really well for me and I am alot happier.  

Thanks for stopping by my blog today!

Jocelyn


Card Recipe - Card Front:

Stamps:  Penny Black Frolic 3972K wood-mount, Impression Obsession Sentiments 1 WP16 clear set (retired)

Ink:  Versafine Onyx Black

Designer Paper:  Cocoa Vanilla Happiness 6" x 8" and 12" x 12" (retired)

Accessories:  Big Shot, Stampin' Up It's My Party Enamel Dots (ret), Watercolour Pencils, Kuretake Clear Color Real Brush Markers, #4 round Paintbrush, Black Copic Multiliner, Stamping Platform, Kindyglitz Crystalina Glitter Glue, Nuvo Glitter Drops - White Blizzard 758N, Ribbon - 6mm or 1/4" wide, Fray Stop, Helmar's Fabric Glue, Kaisercraft Trimmer, Cardstock - Dark Teal + Navy Blue, Ranger Watercolour Cardstock, White Card Base

Dies:  Spellbinders Labels 1 Small S4-308 and S4-161

Punches:  EK Success Arrows Border


Card Recipe - Card Inside:

Stamps:  Stampin' Up Sweet Icecream (retired)

Ink:  Versafine Onyx Black

Designer Paper:  Cocoa Vanilla Happiness 12" x 12" (retired), Scrap of Pink

Accessories:  Cardstock - Dark Teal + Navy Blue + White, Kindyglitz Crystalina Glitter Glue

Punches:  EK Success Arrows Border