skip to main |
skip to sidebar
Hi blogging friends
Thanks for your 'Get Well' wishes from my last post - I really appreciated them and they certainly cheered me up no end!
Today I am sharing a card I made for my Mum's birthday. This is also my entry for the following challenges:
Craftyhazelnut's Patterned Paper - September Challenge - where the challenge is to encourage you to use up your stash of patterned paper. The challenge is also open worldwide which is really cool!
Splitcoaststampers - Ways to Use it WT533 - Favourite Tools - mine are my Big Shot, Dies, Perfect Layers Tools, Lace Doily edge punch and embossing folders.

This was one of those times where everything for my card came together very quickly and easily: just love it when that happens :-)
Every layer on the card is patterned paper - no cardstock other than once I had finished the card front, I attached it to a white cardstock base - and all the papers are by Basic Grey - Kissing Booth - which I bought back in 2011. The image is a 3D sticker by K and Co. which I have had for quite a few years and had completely forgotten about it till I was rummaging around in my stash looking for something floral. I diecut a circle from cream designer paper and ran it through my Big Shot using my Jamara embossing folder then popped the sticker on the paper but added a bit of Tombow Mono Multi glue to the back of the sticker to make sure that it would stick really well to the embossed paper.
The pale pink paper on the bottom panel was also embossed with the Jamara folder and the dark pink paper was punched using a Martha Stewart Lace Doily edge punch.
The pale pink seam binding was attached in 2 separate elements and the bow itself was made using my Bow Easy. I added Fray Stop to the cut ends to stop them from fraying.
The sentiment is from a clear set by Impression Obsession - Sentiments 1 - and was stamped using Versafine Onyx Black ink onto some of the pink designer paper. I diecut the sentiment using a Spellbinder Labels Trio die and added some Couture Creations pink gemstones to each end.
All the layers were trimmed to 1/8" using my Perfect Layers Tools.
The K and Co. sticker came with tiny pink gemstones already added to the flowers plus both the butterfly and flowers were already glittered (not that you can see the glitter in my photo but it is there!). Here is a close-up so you can see the dimension on the image:

Thanks for visiting my blog today.
Jocelyn
Card Recipe:
Stamps: Impression Obsession Sentiments 1 WP16 clear set
Ink: Versafine Onyx Black
Designer Paper: Basic Grey Kissing Booth (2011) 12" x 12"
Dies: Spellbinder Labels Trio Shapeabilities S3-147, Lifestyle Nesting Circles L-CC-001, Lifestyle Nesting Scallop Circles L-CC-005
Accessories: Pale pink seam binding, Fray Stop, Bow Easy, Cuttlebug Jamara 5" x 7" embossing folder, Big Shot, Couture Creations self-adhesive pink gemstones, K and Co. Tim Coffey Foliage Grand Adhesions dimensional stickers, Perfect Layers Tools, dimensionals, doublesided tape, Tombow Mono Multi glue, white card base
Punches: Martha Stewart Lace Doily Edge
Hi blogging friends
I am still not very well and suffering alot of pain which is quite debilitating (hence my lack of blogging) but I did manage to make a Father's Day card for my husband who is an awesome Dad to our daughter. We celebrate Father's Day on the 1st Sunday in September here in Australia.
This is also my entry for the Papertake Weekly Challenge of Anything Goes. The Challenge also has the optional extra of recycle/upcycle (which I didn't do).
I love Wellington Bear for making masculine cards - and although this range by Docrafts has been out for quite some time, it is still readily available if you do a search online. I bought numerous Wellington Bear Decoupage Packs at the (Australian) Picture to Page Scrapbook Show late last year so I have a nice little stash ready for all the masculine cards that I need to make.
Please note that I can longer recommend suppliers other than Australian ones. I often get emails asking where to buy a particular product in the USA but as I rarely buy from the USA, I cannot be sure of a company's customer service, communication or reliability. The same goes for UK companies. Near the top of my blog, I have added a page: Where I buy my Craft Supplies which lists Australian Stores that I use frequently and love - and can therefore recommend based on personal experience.
Anyway, onto my card:

The Wellington Bear image already came diecut so it was super-easy to pop out the pieces and layer the pieces together using dimensionals. The designer paper is an old one by Kaisercraft - Reminiscing - which I picked up at my local Kaisercraft Clearance store. I used both sides of the paper.
The side panel was punched using an EK Success Open Scallop border punch and popped up on dimensionals to accommodate the Jute Ribbon which is quite thick. I bought the ribbon from KMart in their scrapbooking section and added Fray Stop to the cut ends to stop them from fraying.
I added Glossy Accents to Wellington's glasses which looks really cool in real life - but it is hard to see in the photo:

I added 3 x brown brads from my stash to the bottom right-hand side. The sentiment is also from the same decoupage pack and was popped up on dimensionals.
The chocolate brown and dark teal cardstock layers were trimmed to 1/8" using my Perfect Layers Tools; the kraft cardstock layer was trimmed to 1/16". The corners were rounded using my Stampin' Up corner punch.
Here is a photo so you can see a bit more of the dimension:

As well as the Papertake Weekly Challenge, I am entering my card into the Splitcoaststampers Free for All Friday Challenge F4A275 of Honor Thy Father from the 29th May which was for cards for Father's Day due to the USA celebrating Father's Day in June. Thankfully, there are no time limits to play SCS Challenges.
I think you could use this Wellington Bear image for many occasions for a guy - not just Father's Day. Thanks for visiting my blog today. Hopefully, I will post again soon! I know I am uber-keen to get back into my Craft Room on a regular basis as I am really missing it.
Jocelyn
Card Recipe:
Stamps and Ink: None
Designer Paper: Kaisercraft Reminiscing P203 - Hold Dear (both sides) - retired
Dies: None
Accessories: Docrafts Wellington Bear Decoupage pack, dimensionals, Jute Ribbon - Franceville (KMart), Fray Stop, Perfect Layers Tools, brown brads (stash), Glossy Accents, doublesided tape, cardstock - kraft, dark teal, chocolate brown
Punches: Stampin' Up corner, EK Success Open Scallop border
Hi blogging friends
I just read over at the Lawnscaping Challenge Blog that I received an 'Honourable Gnome' award for my card from my last post - my daughter's birthday card using Lawn Fawn stamps - so that was a lovely surprise and really cheered me up. Yay! Thanks Lawn Fawn!
I am very unwell again with the same illness - and sicker than I was a month ago - which is incredibly frustrating because I haven't been able to do much - but I count myself very lucky because I have a very supportive husband and daughter. My husband has been taking time off work to pick up my daughter from school this week which he is doing right now as I write this post. I really just have to bide my time to get better and get plenty of rest. Hopefully, I should be back on deck soon!
Jocelyn
Hi blogging friends
Sorry for my long absence: one way or another life got in the way and I've been very unwell of late but things are starting to settle down now so hopefully, I should be able to post more often and get back on-track to visit your blogs.
And today, I am sharing a birthday card that I made for my beautiful daughter to celebrate her 12th birthday using some very cute Lawn Fawn stamps.
This is also my card for the following Challenges:
Lawnscaping Challenge #109 of Sparkle and Shine - anything that sparkles or shines eg: sequins, glossy accents, glitter, Wink of Stella glitter pens, bling etc.
Crafty Catz Challenge #286 of Anything Goes
Cute Card Thursday Challenge #380 of We Love Cake - any cards or projects that include cake
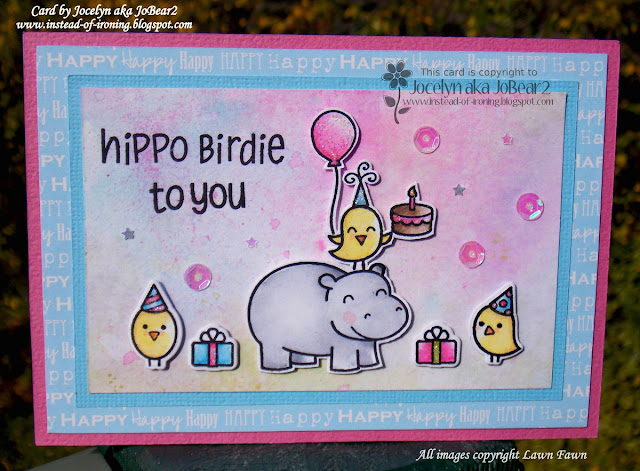
First of all, I made the background using Ranger Distress Inks. I smooshed Picked Raspberry, Tumbled Glass and Shabby Shutters Distress Inks onto my Craft Mat then sprayed them with water. I lay my piece of Ranger Distress Watercolour Cardstock into the colours and but made sure that I had the green colour along the bottom so it kind-of looked like grass where I would be placing my animals - and the blue and pink where the sky would be. I dried the cardstock off with my heat-gun then used an old toothbrush to splatter almost full-strength Picked Raspberry and Tumbled Glass over my panel. I did drip some clean water over the panel to create water spots (like Kristina Werner loves to do) but they are largely hidden by the splatters. Oh well!
The hippo, bird on his back, bird's party hat and balloon are all from the Lawn Fawn Year Four set - and the 2 birds on the ground, presents and the cake that the bird is holding are from the recently released Lawn Fawn Party Animal set. I stamped them using Ranger Archival Jet Black ink onto Ranger Distress Watercolour cardstock and coloured them using Faber-Castell watercolour pencils plus the same Distress Inks I used for my background. I fussy-cut the hippo + birdie etc. because I had layered/stamped the images together and diecut the presents and birds on the ground using the matching Party Animals dies.
All the animals are up on dimensionals and I added Stampin' Up Dazzling Details glitter glue to the balloon, pink icing and candle-flame on the cake, the party hats and the ribbons on the presents.
I must admit to being very taken with Lawn Fawn stamps: the critters are particularly adorable and I love how you can mix and match sets so easily.
Here is a close-up of those cute-as-a-button images:

I cut the sentiment from the Year Four set in half so I could have 2 lines which I think balances the card nicely. Lastly, I added blue and pink iridescent star sequins and clear iridescent round sequins here and there using Tombow Mono Multi glue. I buy most of my sequins from $2 shops here in Australia: most of them have a stand with a really good range of shapes and colours and they don't cost very much. Riot Art and Craft also stocks a good range of colours as does Spotlight but are a bit more expensive.
The Happy Birthday designer paper is an old one from my stash - the back side of the Jillibean Soup - Spotted Owl Soup. All the layers were trimmed to 1/8" using my Perfect Layers Tools.
Thanks for stopping by! Hope to see you again soon!
Jocelyn
Card Recipe:
Stamps: Lawn Fawn Party Animal and Year 4 clear sets
Dies: Lawn Fawn Party Animal
Inks: Ranger Archival Jet Black, Distress Inks - Picked Raspberry, Tumbled Glass and Shabby Shutters
Designer Paper: Happy Birthday script from Jillibean Soup - Spotted Owl Soup
Accessories: Big Shot, Stampin' Up Dazzling Details glitter glue, dimensionals, Faber-Castell watercolour pencils, #2 round paintbrush, Craft Mat, heat-gun, curved blade paper-tole scissors, old toothbrush, Tombow Mono Multi glue, Stampin' Up Fuse Fast adhesive, blue and pink star iridescent sequins, clear round iridescent sequins, cardstock - rose pink + light blue + Ranger Distress Watercolour
Hi blogging friends
Happy Easter! Here in Victoria, we are already half way through the 1st term school holidays and I am loving having my daughter at home. We have had quite a busy time with a few medical appointments but next week, we have none so we can relax a little. Yesterday, we saw the Shaun the Sheep movie which was brilliant and I highly recommend it! My husband and I will also be celebrating our 26th Wedding Anniversary in a couple of days - which reminds me that I need to make him a card!
Today I am sharing the Easter card that I made yesterday for my daughter. This is also my entry for the 4 Crafty Chicks Challenge #240 of Easter. You can find more details on the Challenge HERE.

The bunny image is from a Penny Black clear set - Garden Friends - which has alot of adorable images. I stamped the bunny onto Ranger Watercolour cardstock with Ranger Archival Jet Black ink. I coloured the image using Faber-Castell + Lyra watercolour pencils and a paintbrush. I chalked around the image using Kaisercraft blue chalk.
I added Stampin' Up Dazzling Details glitter glue to all the flowers, the butterflies and the bunny's cheeks. I used an EK Success Arrows border punch to add tiny little hearts from matching cardstock around the bunny (they are the leftover punchies that look like tiny hearts). They also got the glitter treatment :-) The circles and scalloped circles are Lifestyle dies.
The papers are from the Tatty Teddy 'Me to You' range - Spring Chic - which I picked up from a Craft Show last October. I adore the colours in this pad - so pretty.
The side panel was punched using a Martha Stewart Lace Doily edge punch. The silver-edged mauve ribbon is from my stash and I think it originally came from Spotlight a couple of years ago. As always, I added some Fray Stop to the cut ends to stop them from fraying. All the layers were trimmed using my Perfect Layers Tools.
Here is a close-up:

The sentiment panel was made up using sentiments from an Impression Obsession clear set WP-16 - Sentiments 1 - which has tons of sentiments that you can mix and match for pretty much any occasion. I have had this set for a really long time and it is still available - you can see it HERE at the Impression Obsession website. I diecut the sentiment using a Spellbinders Shapeabilities Labels Trio die then added some tiny pink rhinestones to each end.
Thanks for visiting my blog today. Hopefully, I should be back in a few days with my husband's Wedding Anniversary card. Thanks goodness he doesn't mind cute and cuddly images which makes the process alot easier and far more enjoyable :-)
Jocelyn
Card Recipe:
Stamps: Penny Black Garden Friends clear set 30-021, Impression Obsession Sentiments 1 WP16 clear set
Ink: Ranger Archival Jet Black
Designer Paper: Tatty Teddy 'Me to You' Spring Chic 6" x 6" paper pack
Dies: Spellbinder Shapeabilities Labels Trio S3-147, Lifestyle Nesting Circles + Nesting Scalloped Circles
Accessories: Big Shot, Perfect Layers Tools, silver-edged mauve ribbon, Fray Stop, Kaisercraft pink rhinestones, Ranger Distress Watercolor cardstock, Faber-Castell + Lyra Watercolour pencils, #2 round paintbrush, cardstock - light teal + mauve + magenta, Stampin' Up Fuse Fast adhesive, Stampin' Up Dazzling Details glitter glue, Kaisercraft blue chalk
Punches: Martha Stewart Lace Doily edge, EK Success Arrows border
Hi blogging friends
I have seen alot of gorgeous cards on Splitcoaststampers recently which uses the Bokeh technique - so I thought I would give the technique a try. It is super-easy and fun - and here is the result:

This is also my entry for the Cute Card Thursday Challenge #363 of Diecuts and Punches.
There is a tutorial for the Bokeh Technique on Splitcoaststampers HERE and I found another tutorial HERE on Shannon Lane's blog - I've got a Crush on Colour. If you don't know what bokeh means, it relates to photography and you can read more about it HERE on Wikipedia.
I used Ranger Distress Inks in Picked Raspberry and Salty Ocean for my background by smooshing my ink pads onto my Couture Creations non-stick Craft Mat, spraying the inks with water then lay the smooth side of my Ranger Distress watercolour cardstock on top. I let the cardstock sit in the inks for about 30 seconds then moved it around and lifted it up to check how the coverage was then kept dabbing the cardstock into the inks until I was happy with how it looked. I was too impatient to wait for my cardstock to air-dry so dried it off using my heat-gun.
I made a stencil of various sizes of circles using clear acetate and my Lifestyle Nesting Circle dies then used a finger dauber to pounce Hero Arts white dye ink circles all over my background using the stencil. At first my background looked pretty ordinary and I wondered whether it was going to look any good but the more circles that I added and the more that I overlapped, the better it started to look. I also went over some of the circles to make them brighter than others which really helped the effect look more realistic. The white circles on the blue part of my card don't show up quite as well in the photo compared to real life.
The decorative edge was made with all-time favourite edge punch: Martha Stewart Lace Doily. I attached the panel to white cardstock using Stampin' Up Fuse Fast adhesive then used my Perfect Layers Tools to trim the cardstock to 1/16".
I sponged two small pieces of Stampin' Up Dazzling Diamonds glimmer paper (which is sparkly white and as thick as cardstock) with the same Distress Inks that I used for my background then diecut them using my Big Shot and a Memory Box Pippi Butterfly die. I was a bit concerned that the colour might transfer to my butterfly die so I very carefully ran my heat-gun over the glitter paper before diecutting to make sure it was dry. I attached just the centres of the butterflies using Tombow Mono Multi glue.
The 'Hello' is a die from Mama Elephant and was diecut from the same glimmer paper and glued on using Tombow Mono Multi glue.
I rounded the corners on the bottom using the 1/8" size on my We R Memory Keepers Corner Chomper.
Lastly, I glued on some iridescent sequins using Ranger Multi Medium Matte which is a strong adhesive and dries clear. The card is a top folding card.
This card will be going to my Mum just to brighten her day. Mum's last remaining sibling passed away several weeks ago so it has been a difficult time for her.
Thanks for visiting my blog today!
Jocelyn
Card Recipe:
Stamps and Designer Paper: None
Ink: Ranger Distress - Picked Raspberry and Salty Ocean, Hero Arts White dye
Accessories: Big Shot, Couture Creations non-stick Craft Mat, Ranger Inkssentials Mister, finger dauber, sponges, Stampin' Up Dazzling Diamonds glimmer paper, white cardstock, Tombow Mono Multi glue, Ranger Multi Medium Matte, Stampin' Up Fuse Fast adhesive, iridescent sequins (from stash), acetate, heat-gun, Ranger Distress Watercolour Cardstock, Perfect Layers Tools, We R Memory Keepers Corner Chomper
Dies: Lifestyle Nesting Circles, Memory Box Pippi Butterfly #98508, Mama Elephant Hello Script Creative Cuts
Punches: Martha Stewart Lace Doily edge
Hi blogging friends
Today I am sharing two cards using the newly released Taylored Expressions Paw-some stamp and die set which I think is adorable. My brother-in-law and his wife have birthdays 4 days apart so I thought I would challenge myself to make a "His and Hers" card using the same image.
This is also my entry for the Crafting from the Heart Challenge and The Pink Elephant Challenge as well as the Splitcoaststampers CAS311 Challenge. Details and links are towards the end of my blog post.
First up is my BIL's card:

I stamped the image with onto Ranger watercolour cardstock using Ranger Archival Jet Black ink then coloured it using Faber-Castell + Lyra watercolour pencils and a paintbrush. I added the black patches myself then diecut the image using my Big Shot and popped it up on dimensionals. The sentiment is also from the same Taylored Expressions set.
I added some Glossy Accents to the dog's nose and once dry, added a dot of white acrylic paint for some highlight. I added a very fine line of Stampin' Up Dazzling Details glitter glue onto each side of the dog's hat which doesn't look too sparkly for my BIL. When I want to add an extremely fine line of glitter glue, I squirt some onto some scrap cardstock and use a pin to pick up tiny amounts and apply it to my image.
Here is a close-up:

The twine came free from Lawn Fawn with an order I received late last year (they wrapped my stamps in tissue paper and tied on the twine which I saved). I added Fray Stop to the cut ends to stop them from fraying.
Lastly, I added 2 blue brads and corner-punched the kraft cardstock using a We R Memory Keepers 1/2 inch Corner Chomper which my wonderful DH gave me for Christmas.
And now here is my SIL's card:
All the details are basically the same except that I added more Dazzling Details glitter glue to the image: gotta have more sparkle and shine on a feminine card :-) I also added tiny pink Molossi rhinestones to the dog's collar to make the collar look like one of those fancy diamante collars.
The twine came from my local Woolworths Supermarket and I added some iridescent sequins and stars which came from a $2 shop; they were glued on using Ranger Multi-Matt Medium.
Here is a close-up:

Here are the Challenge Details:
The Pink Elephant Challenge - TPE287 - Anything Goes
Splitcoaststampers Clean and Simple Challenge - CAS311 - Rainbow
Thanks so much for visiting my blog today.
Jocelyn
Card Recipe:
Stamps: Taylored Expressions Paw-some cling-mount set
Ink: Ranger Archival Jet Black
Designer Paper: None
Dies: Taylored Expressions Paw-some
Accessories: Big Shot, Faber-Castell + Lyra Watercolour pencils, #2 round paintbrush, Stampin' Up Dazzling Details glitter glue, dimensionals, JoSonja white acrylic paint, Ranger Multi-Matt Medium, twine (Woolworths and Lawn Fawn), Fray Stop, We R Memory Keepers 1/2" Corner Chomper, blue brads, Molossi tiny pink rhinestones, iridescent sequins and stars ($2 Shop), Glossy Accents, Ranger Watercolour cardstock, other cardstock - kraft and white








.jpg)


