Monday, April 10, 2023

Penny Black Don't Break It Anniversary Card

Hi everyone ðŸ˜€

It is my husband's and my 34th Wedding Anniversary and this is the card that I made for him.  My husband is easy to make cards for because he doesn't mind cute and cuddly critters so that makes life a little easier.  The Penny Black critters are so timeless and adorable - and I have been using their critters for years and years.


The main image is called 'Don't Break It!' and is wood-mounted - and still readily available.

This is also my card for the following Challenges:

Penny Black Saturday Challenge - April - Anything Goes - Optional of Something Funny

Crafty Catz Weekly Challenge - #632 - Anything Goes - Optional Twist of Something Blue

Splitcoaststampers - Ways to Use It - WT920 - Teddy Bears

I stamped the image using Versafine Onyx Black ink and coloured it with a mix of Jasart Voyager watercolour paints and Faber-Castell watercolour pencils using a #2 round paintbrush.  I added some Glossy Accents to the heart that the teddy bear is holding.   I went over the black lines of the image with a Zig Millenium .005 black pen which had lost some of their blackness from the watercolouring.  The hearts around the image and sentiment are a mix of Sizzix Drifting Hearts Thinlets and leftover punchies from using my EK Success Arrow border punch.  I cut them from some of the designer paper.

The designer papers are really old - from 2012 - and are by Bo Bunny - Love Letters from their 6" x 6" paper pad.  Although you can no longer get them, there are so many Valentine's Day releases that you could substitute.

I diecut the main image using a Lifestyle Nesting Circles die using my Big Shot.  The red circle underneath was diecut from one of the designer papers and the black circle is American Crafts black cardstock.

I added a strip of black cardstock underneath the image and it looked like it needed something so added some dry embossing using a Cuttlebug/Provocraft Love Language embossing folder.

Here is a close-up of that adorable teddy-bear:


The sentiment is by Colorado Craft Company - Lots of Love and was stamped using Versafine Onyx Black ink.  I diecut it using a retired Spellbinder Labels Trio Shapeabilities die S3-147.   I added some more tiny hearts from my EK Success Arrows border punch.  All the hearts were glittered using my Wink of Stella clear glitter brush which adds some subtle sparkle so it is isn't too tizzy for a guy 😉

Both the main panel and sentiment are up on dimensionals.  Once I had finished the card front, I attached it to a white card base.

Thanks for visiting my blog today.

Jocelyn


Card Recipe:

Stamps:  Penny Black 'Don't break it!' 3605F wood-mount, Colorado Craft Company 'Lots of Love' AJ418 clear set

Ink:  Versafine Onyx Black

Designer Paper:  Bo Bunny Love Letters 6" x 6" pad (2012) - retired

Accessories:  Big Shot, Ranger watercolour cardstock, Cuttlebug/Provocraft Love Language embossing folder (retired), dimensionals, Tombow Mono Multi glue, Wink of Stella clear glitter brush, Glossy Accents, Jasart Voyager watercolour discs, Faber-Castell watercolour pencils, #2 round paintbrush, Perfect Layers Tools, Zig Millenium .005 black pen, Stamping Platform, cardstock - American Crafts black, white card base (Anko - K-Mart Australia)

Dies:  Sizzix Drifting Hearts Thinlets #663451A, Spellbinders Labels Trio Shapeabilities S3-147 (retired), Lifestyle/Quickutz Nesting Circles L-CC-001

Punches:  EK Success Arrows border


Friday, March 31, 2023

Couture Creations Sweeping Plains Card

 
Hi everyone,

Sorry I have been missing for a while.  I was very busy since my last post with my daughter finishing Year 12 and then alot of preparations for starting Uni plus we went on holidays - and then COVID struck our household with myself getting it first and the rest of the family about 10 days later.  I am still very unwell and had a couple of days in hospital so even though it is 10 weeks since then, I can't seem to shake it off.  I have never felt more tired in my life!   However, I am being well looked after as the rest of the family weren't hit as hard as me.  Hopefully, I will be better soon!

Anyway, enough about COVID and onto my card.  This is the first card I have made since Christmas so it was nice to be creative.  I gave it to my daughter because she is my favourite person - and decided to feature a cockatoo as we have them visiting our garden every day.  

One of the cockatoos we have named Kevin (although we don't know if he is a male or female as they all look the same!) and he is very friendly and will let us pat him and eat from our hands.  My daughter is very fond of him and loves to do selfies with him, so it was a natural choice to have a cockatoo on her card.  We don't encourage other cockatoos as they can be destructive - but Kevin is different and has never chewed or destroyed anything.  I love how there has been alot of  Australian flora and fauna featured in scrapbooking and cardmaking papers and dies in the past couple of years.  


This is also my card for the following Challenge:

Splitcoaststampers - Free for All Friday - F4A631 - Free as a Bird - where you need to feature a bird or birds on your project.

The main image is from the Couture Creations - Sunburnt Country - Ephemera set.  I layered the image onto olive green and buttercream cardstock - the green was diecut using my Big Shot and Stampin' Up Deco Labels Framelits dies.  The next die down was too small for the main image so I drew around the outside of the die and handcut it from the buttercream cardstock.   

The designer papers are by Couture Creations - Sweeping Plains - from their 6" x 6" pad.  The colour palette in the Sunburnt Country and Sweeping Plains are quite similar so you can mix and match some of the elements.

The fancy border at the bottom is my all-time favourite edge punch:  Martha Stewart Doily Lace.  I added some Wink of Stella clear glitter brush to the wattle around the cockatoo which isn't visible in the photo but it does look very pretty in real life.  It's amazing how just a little bit of sparkle can lift a card!

The sentiment I found on my desk and is from a Kaisercraft 6-1/2" x 6-1/2" pad as they have sentiments in the back of those pads.  I was using a couple of different ones late last year but I don't know which one it is from.  I was pleased that I found it as it was serendipitous that the grey colour toned so well with the rest of the card.  I layered it onto buttercream cardstock using a Lifestyle Nesting Circle die.  I punched some tiny hearts from a scrap of pale pink designer paper using my EK Success Arrows border punch - which, if you are no stranger to my blog, I use all the time.  The leftover punchies look like tiny hearts to me 😉  I added some Wink of Stella Clear glitter brush to them to add a little sparkle.

All the other layers were trimmed to 1/8".

Lastly, I added some yellow enamel dots which are by Simple Stories - Good Day Sunshine which I have had for years.

I think this card could be used for many occasions.

Thanks for visiting my blog today and for any comments you care to leave.

Jocelyn


Card Recipe:

Stamps and Ink:  None

Designer Paper:  Couture Creations Sweeping Plains and Sunburnt Country 6" x 6" paper pad + Sunburnt Country Ephemera, scrap of pale pink

Accessories:  Big Shot, Tombow Mono Multi glue, Wink of Stella Clear Glitter brush, Sentiment - Kaisercraft, cardstock - olive green + buttercream, American Crafts kraft cardstock (card base), Enamel Dots - Simple Stories - Good Day Sunshine (retired), dimensionals, Perfect Layers Tools

Punches:  EK Success Arrows border, Martha Stewart Doily Lace edge

Dies:  Stampin' Up Deco Labels Framelits #130102 (retired), Lifestyle Nesting Circles

Tuesday, September 20, 2022

Tatty Teddy Sweet Shoppe Birthday Card

 
Hi everyone 😀

I have been so flat out creating masculine cards that I forgot to share the Birthday Card that I made for our daughter's 19th birthday.  Silly me!  


The main image is 3D decoupage and is by Trimcraft from their Tatty Teddy Sweet Shoppe range which I have had for quite a while.   Most of the designer papers are from the same range other than the paper with the ribbon which is from my scrap bin (don't know what brand sorry).

All the layers were trimmed to 1/18" using my Perfect Layers Tools.

The sentiment is a retired one by Elzybells and was stamped using Versafine Onyx black ink.

The satin ribbon is from my stash.

The pink and white heart embellishments around the image I picked up at a Craft Show but there is no brand name.  I thought they matched the card perfectly. 

Thanks for stopping by!

Jocelyn


Card Recipe:

Stamps:  Sentiment (retired) - Elzybells

Ink:  Versafine Onyx Black

Designer Paper:  Trimcraft Sweet Shoppe, scrap (unknown brand)

Accessories:  Pink and white heart embellishments, Trimcraft Sweet Shoppe Tatty Teddy decoupage, dimensionals, Tombow Mono Multi glue, fabric glue, Perfect Layers Tools, satin ribbon (stash), cardstock - white + white card base


Tuesday, September 6, 2022

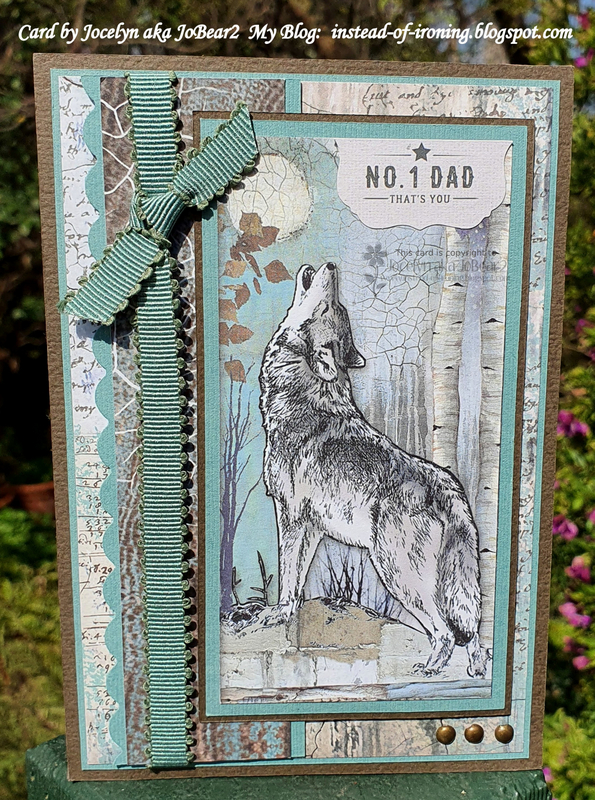
Stamperia Cosmos - Father's Day Card

 
Hi everyone 😀

We celebrate Father's Day here in Australia on the first Sunday in September - so Father's Day was last Sunday - and this is the card that I made for my husband who is a great Dad to our daughter:


This is also my entry for the following Challenge:

    Just Add Ink #619 - Masculine

As I still had the gorgeous Stamperia Cosmos papers on my desk from all the masculine birthday cards that I have made of late, I thought I would use them again.  I just adore these papers and they are so perfect for guy's cards IMHO 😀

The main image was trimmed from one of the sheets and was layered onto teal and sepia cardstock and trimmed to 1/18" and 1/16" respectively using my Perfect Layers Tools.

The side panel was punched using a Fiskars Scallop border punch.  The ribbon is from my stash.  Both the side panel and main panel were popped up on dimensionals.

The 3 small brads are by Inque Boutique.

The sentiment is by Kaisercraft - Everyday Hero - from their 6-1/2" x 6-1/2" pad and was cut in half.  The top half of the sentiment had some tools on it so didn't fit with the wolf image.  Everyday Hero is a recent release and I really love it.   Kaisercraft recently opened a store in my suburb so it's been wonderful to spend time in there.  I have no other scrapbooking stores near me so it is such a feast for the eyes to look at papers etc. in person which I haven't done for ages. 

Lastly, I added some Wink of Stella Clear Glitter brush to the moon so it sparkles but you can't tell in the photo.

Once I had finished my card front, I glued it to a Kaisercraft kraft card base.

It's a simple card - but I don't like too much fuss for my masculine cards.  I find that if I fuss too much, I overthink it and it takes me waaaaay longer to make than it should - plus I was making it on Saturday night so not alot of time!

Thanks for stopping by!

Jocelyn


Card Recipe:

Stamps and Ink:  None

Designer Paper:  Stamperia Cosmos 12" x 12" pad, Kaisercraft Everyday Hero 6-1/2" x 6-1/2" pad

Accessories:  Perfect Layers Tools, ribbon - stash, brads - Inque Boutique, paper piercer, dimensionals, Wink of Stella clear glitter brush, Tombow Mono Multi glue, cardstock - teal, sepia, Kaisercraft kraft card base

Punches:  Fiskars Scallop border


Monday, August 22, 2022

Graphic 45 - A Proper Gentleman Vintage Car Birthday Card

 
Hi everyone 😀

Today I am sharing another Masculine Birthday Card:


This is also another entry for the following Challenge:

Craftyhazelnut's Patterned Paper Challenge - August 
 
The main image was trimmed from a sheet by Graphic 45 - A Proper Gentleman.  One of the sheets is filled with Vintage cars in all different colours and styles so I have trimmed them all up ready for cards.    I layered it onto dark brown cardstock and trimmed it to 1/16" using my Perfect Layers Tools then popped it up on dimensionals.

The top background paper is really old and is called Rosemoka Chateau de sable.  The fleur de lis paper is by Graphic 45 - Le Romantique Collection - Celebration.  I layered the papers onto rust and then dark brown cardstock and trimmed them to 1/18" and 1/16" respectively using my Perfect Layers Tools.

The dark brown centre punched border was made using my Fiskars Threading Water punch.

The sentiment is by Lili of the Valley and was stamped onto kraft cardstock using Versafine Vintage Sepia ink then diecut it using my Big Shot and Lifestyle Nesting Circle dies.  I glued it to a rust diecut circle then popped it up on dimensionals.  I punched some hearts from rust cardstock using my Carl CP-8 heart duo punch then added Glossy Accents.  This sentiment is no longer available as a stamp but Lili of the Valley have it available as a digital download on their Etsy store.  The ribbon is from my stash.  

Once I had finished my card front, I glued it to a kraft card base using Tombow Mono Multi glue.

Thanks for stopping by!

Jocelyn


Card Recipe:

Stamps:  Lili of the Valley (UK) 'For You' Circular Sentiments

Ink:  Versafine Vintage Sepia

Designer Paper:  Graphic 45 - Le Romantique Collection - Celebration 12" x 12" and A Proper Gentleman 12" x 12", Rosemoka Chateau de sable AN-0204 12" x 12"

Accessories:  Ribbon - stash, Big Shot, dimensionals, Perfect Layers Tools, Glossy Accents, cardstock - dark brown, rust + kraft, kraft card base, Tombow Mono Multi glue

Punches:  Fiskars Threading Water border, Carl CP-8 heart duo

Dies:  Lifestyle Nesting Circles


Monday, August 15, 2022

Stamperia Cosmos - Another Birthday Card

 
Hi everyone 😀

I am sharing yet another masculine Birthday Card for one of my family members using the beautiful Stamperia Cosmos papers:


This is also my 2nd entry for each of the following Challenge Blogs:  

Seize the Birthday - #244 - No Stamping
Craftyhazelnut's Patterned Paper - August


The main image is also from the same Stamperia pad and was popped up on dimensionals.  Isn't that image gorgeous?!!

All the layers were trimmed to 1/16" using my Perfect Layers Tools.  I added some Inque Boutique copper brads to the other panels which I thought matched the papers really well.  The moon has some sparkle from a Wink of Stella Clear Glitter brush but you can't tell in the photo.

The sentiment is from a Kaisercraft Workshop paper pad and was popped up on dimensionals.

Once I had finished my card front, I glued it to a white card base using Tombow Mono Multi glue.

This is a larger card - 4-3/4" x 6-3/4" or 121mm x 171mm so I could accommodate the large main image.

Thanks for visiting my blog today.

Jocelyn


Card Recipe:

Stamps and Ink:  None

Designer Paper:  Stamperia Cosmos 12" x 12" pad, Kaisercraft Workshop 6-1/2" x 6-1/2"

Accessories:  Perfect Layers Tools, Inque Boutique copper brads, paper piercer, Perfect Layers Tools, cardstock - light teal and dark brown, white card base, dimensionals, Tombow Mono Multi glue, Wink of Stella Clear Glitter brush


Saturday, August 13, 2022

Stamperia Forest Birthday Card

 
Hi everyone 😀

Today I am sharing another Masculine Birthday Card that I made for my brother-in-law:


I would love to say it is my design but it isn't.  It is from a Card Kit designed by Lisa Dick from Bev Cross Crafts in Tasmania.  The kit is no longer available unfortunately so I can't link it.

I can tell you that the main image is by Stamperia from their Forest paper pad which is still readily available.  The pine cone is also from the papers and was fussy-cut.   The sentiment is by Craft Creations.  

The designer paper on the cream card base is also by Stamperia - House of Roses.

I did change quite a few things from the kit by adding the ribbon and twine to the tag as it just looked too blank to not have something in the tag hole.  I do not know the name of the tag die.   I also added the cream star stickers which I bought from our local newsagent. 

The leaf is a die but I don't know what brand - but honestly, their are tons of dies available so you would be sure to find a similar one.

Thanks for visiting my blog today.

Jocelyn


Card Recipe:

Stamps and Ink:  None

Designer Papers:  Stamperia Forest 12" x 12" pad and House of Roses 12" x 12" pad

Accessories:  Craft Creations Happy Birthday sentiments, cream star stickers, brown twine and ribbon (stash), dimensionals, Tombow Mono Multi glue, cardstock - cream and dark brown + cream card base

Dies:  Leaves and Tag (unknown brand)