I followed the card sample in the kit for the most part but added the stars and a few other elements and left the ribbon off. Some of the elements were trimmed from the papers in the paper pad and the rest are from the Creative Cuts pack. I roughed up most of the edges with a pair of scissors.
Thursday, August 24, 2023
Uniquely Creative Drive and Fly Birthday Card
Hi everyone 😀
Today I am sharing a Birthday Card that I made for my brother-in-law using a card kit by Uniquely Creative (Australia) called Drive and Fly which was released August 2021:
I followed the card sample in the kit for the most part but added the stars and a few other elements and left the ribbon off. Some of the elements were trimmed from the papers in the paper pad and the rest are from the Creative Cuts pack. I roughed up most of the edges with a pair of scissors.
I do love the Uniquely Creative Card Kits as they are so well thought out and easy to follow. I also love that you can buy what is in the kits separately. No connection to them - just a happy customer. You can subscribe to their monthly card kits but I prefer to just choose what I want when they come out instead of being committed to automatically paying for one every month.
Other than that, there is not much to say. My brother-in-law loved his card which is always lovely to hear 😃
I made another card with this kit and posted it to my brother but forgot to take a photo. Oh well!
Thanks for visiting my blog today.
Jocelyn
Card Recipe:
Stamps and Ink: None
Designer Paper: Uniquely Creative Drive and Fly 6" x 6" pad + Creative Cuts
Accessories: Dimensionals, Tombow Mono Multi glue, white card base
Wednesday, August 16, 2023
Mintay Garage Birthday Card No. 2
Hi everyone 😀
As I mentioned on my previous post, we have four masculine birthdays in August so I my Craft Room has been a whirlwind of activity. Here is another Birthday Card using the awesome Mintay Garage Collection:
This is also my card for the following Challenges:
The Male Room - Challenge #177 - Dots and/or Stripes - my dots are the holes in the punched border, the Candi dots and the dots on the stars - and the stripes are the tartan designer paper. This is my 2nd entry for their Challenge.
Ellibelle's Crafty Wednesday Challenge - August - Anything Goes
The main image was trimmed from one of the Mintay 12" x 12" papers which has 12 images on it so it makes life easy when you don't need to stamp and colour an image. I chose this particular image as my husband plays electric guitar in two bands so having the guitar and amplifier was just a match made in heaven. I fussy cut the stars from the Mintay Garage 6" x 8" Add-on Paper Pack and popped them up on dimensionals. I did add some Wink of Stella Clear Glitter brush to the stars but you can't tell in the photo.
The tartan designer paper is from the Mintay Garage 12" x 12" Paper Pack and the distressed brown designer paper is from the Mintay Garage 6" x 8" Add-on Paper Pack All the layers were trimmed to 1/8" using my Perfect Layers Tools. The cardstock is by Kaisercraft.
The sentiment is by Uniquely Creative from their Essential Birthday Sentiments Mini Cut-a-part Sheet and was popped up on dimensionals.
The beige cardstock border on the bottom was punched using my Fiskars Threading Water border punch which I use alot for masculine cards. I added a score line next to it using my Martha Stewart Score Board. The ribbon is from my stash and was added in 2 separate elements which I find easier and neater.
I added some Candi Dots on the top RHS with dimensionals. I have had these Candi Dots in my stash for years. They are like faux brads and so easy to pop onto your card.
Once I had finished the card front, I glued it to an Anko Kraft card base using my Tombow Mono Multi glue.
Finished size is 5-1/2" x 5-1/2" or 140mm x 140mm.
Thanks for visiting my Blog today!
Jocelyn
Card Recipe:
Stamps and Ink: None
Designer Papers: Mintay Garage 12" x 12" Paper Pack + 6" x 8" Add-on Paper Pack
Accessories: Candi Dots - Craftwork Cards (retired), dimensionals, Perfect Layers Tools, Ribbon - stash, Uniquely Creative Essential Birthday Sentiments Mini Cut-a-part Sheet, Wink of Stella Clear Glitter Brush, Martha Stewart Score Board, Tombow Mono Multi glue, Anko Kraft Card Base (K-Mart Australia), Other Cardstock - Kaisercraft
Punches: Fiskars Threading Water border
Labels:
Birthday,
Masculine,
Mintay,
Uniquely Creative
Saturday, August 12, 2023
Mintay Garage Birthday Card No. 1
Hi everyone 😀
Today I am sharing a Birthday Card that I made for my brother-in-law's birthday using the awesome Mintay Garage Collection. Our family has 4 masculine birthdays in August so I have been busy, busy, busy!
The Male Room - Challenge #177 - Dots and/or Stripes - my dots are the holes in the punched border, the Candi dots and the stripes are the tartan designer paper
Ellibelle's Crafty Wednesday Challenge - August - Anything Goes
Splitcoaststampers - Free for All Friday - F4A155 - Blues and Browns
The main image was trimmed from one of the Mintay 12" x 12" papers which has 12 images on it so it makes life easy when you don't need to stamp and colour an image. My brother-in-law spends alot of his time working in his tool shed and is always fixing things and very talented with his woodwork - so I thought this image was absolutely perfect for him.
I added another toolbox image on top with dimensionals which is from the accompanying Mintay Paper Diecuts collection. You can see a closeup of the dimension here:
The tartan and grid plate designer papers are from the Mintay Garage 12" x 12" paper pack. All the layers were trimmed to 1/8" using my Perfect Layers Tools. The cardstock is by Kaisercraft.
The sentiment is by Uniquely Creative from their Essential Birthday Sentiments Mini Cut-a-part Sheet and was popped up on dimensionals.
The beige cardstock border on the LHS was punched using my Fiskars Threading Water border punch which I use alot for masculine cards. I added a score line next to it using my Martha Stewart Score Board. The ribbon is from my stash and was added in 2 separate elements which I find easier and neater.
I added some Candi Dots on the top RHS with dimensionals. I thought the colour matched the cover on the tape measure so perfectly. I have had these Candi Dots in my stash for years. They are like faux brads and so easy to pop on your card.
Once I had finished the card front, I glued it to an Anko Kraft card base using my Tombow Mono Multi glue.
Finished size is 5-1/2" x 5-1/2" or 140mm x 140mm.
Thanks for visiting my Blog today!
Jocelyn
Card Recipe:
Stamps and Ink: None
Designer Papers: Mintay Garage 12" x 12" paper pack + Paper Diecuts MT-GAG-LSC
Accessories: Candi Dots - Craftwork Cards (retired), dimensionals, Perfect Layers Tools, Ribbon - stash, Uniquely Creative Essential Birthday Sentiments Mini Cut-a-part Sheet, Martha Stewart Score Board, Tombow Mono Multi glue, Anko Kraft Card Base (K-Mart Australia), Other Cardstock - Kaisercraft
Punches: Fiskars Threading Water border
Labels:
Birthday,
Masculine,
Mintay,
Uniquely Creative
Friday, July 21, 2023
Docraft Forever Friends Kraft Notes Baby Girl Card
Hi everyone 😊
Today I am sharing a Baby Card that I made for my niece and partner who just had their first baby - a beautiful little girl. So I am a Great-Aunt again for the 11th time! Wow, I feel so OLD!
This is also my card for the following Challenges:
Ellibelle's Corner - Craft Wednesday Challenge for July - Anything Goes
Splitcoaststampers - Free for All Friday F4A693 - Oh Baby Baby! - Share your Baby Creations
Shopping our Stash - SOS501 - No Stamping Allowed - where they don't want you to use your stamps but instead use patterned paper, stickers, die cuts, stencils, pictures etc.
Please click on the underlined link to go to their respective Challenge.
The main image is diecut decoupage by Docrafts from their Forever Friends Kraft Notes collection. There aren't many layers so it was super-easy to put together with 0.5mm dimensionals. You can see the dimension in this photo:
The bottom daisy designer paper is also from the Docrafts Kraft Notes Design Stax 6" x 6" paper. The top pink designer paper is from the 12" x 12" pad and was dry-embossed using my Big Shot and Crafter's Companion Die'sire Embossalicious EF-6 embossing folder which added some lovely texture to my card. I have had this folder for many years and is long-retired.
I diecut some small hearts from pink glitter cardstock using an Impression Obsession die - Mini Hearts Row - and glued them on using Tombow Mono Aqua glue around the main image panel. The 3 larger hearts at the bottom RHS were punched from pink glitter cardstock using a Carl CP-8 Heart Duo punch. I added a strip of pink glitter cardstock across the centre which tied everything together.
Everything is layered onto an Anko white card base using my favourite glue - Tombow Mono Multi.
Finished size is 5-1/4" x 5-1/4" or 134mm x 134mm.
Thanks for visiting my blog today.
Jocelyn
Card Recipe:
Stamps and Ink: None
Designer Paper: Docrafts Forever Friends Kraft Notes 6" x 6" Design Stax + 12" x 12" pad (retired)
Accessories: Docrafts Forever Friends Kraft Notes Diecut Decoupage (retired), Big Shot, Crafter's Companion Die'sire Embossalicious EF-6 embossing folder (retired), 0.5mm dimensionals, Tombow Mono Multi + Aqua glue, pink glitter cardstock, white card base - Anko - KMart Australia
Dies: Impression Obsession Mini Hearts Row DIE134-D
Punches: Carl CP-8 Heart Duo
Labels:
Baby,
Big Shot,
Crafter's Companion,
Docrafts,
Embossalicious embossing folders,
Forever Friends,
Impression Obsession
Saturday, July 15, 2023
Couture Creations Sunburnt Country Decoupage Birthday Card
Hi everyone 😀
I have been wanting to post this card for 2 weeks but it has been far too windy to take a photo (I take my photos outside) or it has been raining or the light has been incredibly dreary. Ah, that's Winter for you!
I made this card for my daughter's 20th birthday and specifically chose Corellas for the main image as she really loves them and enjoys their visits to our garden. We are so lucky to live on the edge of the country surrounded by native flora and have all manner of native birds visit us which we really love.
The main image is diecut decoupage called 'Cockatoo' by Couture Creations from their Sunburnt Country range. This sheet has other Australian native birds on them - Sulphur-crested Cockatoo and Major Mitchell Cockatoo. I layered the Corellas up using 0.5mm dimensionals then glued them onto dusky rose cardstock then navy blue. These were diecut using my Big Shot and Lifestyle Nesting Circle and Nesting Scallop Circle dies. You can see a close-up of the image layers here:
The dusky rose cardstock dry embossed central panel is a small embossing folder by Hobby Central which I have had for ages and its exact name is unknown I tried an internet seach and came up with nothing. The folder is about 1 inch in width with just a single row of flowers and dots. If you know what it is, please leave me a comment below.
The top and bottom designer papers came from KMart (Australia) and are by Anko - Flora and Fauna Mini Paper Stack and are part of their current range instore. I love KMart papers as they are really good quality and very affordable. I buy alot of cardmaking items from KMart especially since Riot Art and Craft shut down all their stores and went online. Probably my only complaint about KMart craft and cardmaking items is that I wish they had a bigger range!
The sentiment is also by Couture Creations from the Sweeping Plains Ephemera Set and was popped up on 1mm dimensionals.
I punched a heart from pink glitter cardstock using a Carl CP8 heart duo punch (I used the smallest heart) and glued them to each corner of the card using Tombow Mono Aqua glue.
The bottom dusky rose and navy blue cardstock layers were trimmed to 1/16" and 1/8" respectively using my Perfect Layers Tools.
Once my card front was finished, I glued it to a white card base using Tombow Mono Multi glue. Finished size is 146mm x 146mm or 5-3/4" x 5-3/4".
Thanks for visiting my blog today!
Jocelyn
Card Recipe:
Stamps and Ink: None
Designer Papers: Anko Flora and Fauna 6" x 6" Mini Paper Stack 43-247-448 (KMart)
Accessories: Hobby Central small embossing folder (unknown name), sentiment - Couture Creations Sweeping Plains Ephemera set C0727980 + Sunburnt Country Cockatoo C0727192 diecut decoupage, 0.5mm and 1mm dimensionals, Tombow Mono Multi + Mono Aqua glue, Perfect Layers Tools, Big Shot, cardstock - dusky rose + navy blue + pink glitter, white card base - KMart
Dies: Lifestyle Nesting Circles + Nesting Scallop Circles
Punches: Carl CP-8 Heart Duo
Labels:
Big Shot,
Birds,
Birthday,
Couture Creations,
Decoupage,
Feminine,
Lifestyle Dies,
Paper Tole
Saturday, April 29, 2023
Stampin' Up Beautiful You 21st Birthday Card and Gift Box
Hi everyone 😊
Today I am sharing a card and gift box that I made for my niece's 21st birthday. My niece had a party in a restaurant which I thought was a great idea when there are alot of people invited. Much easier to cater for and you don't have to clean up afterwards LOL! My husband and daughter went along but I didn't due to my never-ending fatigue from long-COVID and I didn't want to be a wet blanket and ask to go home after just an hour of being there. I was disappointed that I couldn't go but at least people are understanding of how debilitating long-COVID can be.
The main image and sentiment are from a retired set by Stampin' Up called Beautiful You. I adore this stamp set and one that I will never part with. I stamped the image using Versafine Onyx Black ink onto Ranger watercolour cardstock and coloured it with Lyra watercolour pencils and a #2 round paintbrush. I think it took me about 3 minutes to colour it! I diecut the image using my Big Shot and a Lifestyle Nesting Circle die and layered it onto the peach designer paper then diecut a scalloped circle from the darker blue designer paper.
All the papers are my Mintay - Harmony. Aren't the colours gorgeous?!
For the LHS panel, I dry embossed the peach designer paper with a retired Cuttlebug Textile embossing folder. I have really been enjoying using my embossing folders again. They kind-of fell out-of-favour for quite a few years but with all the amazing 3D embossing folders now available, they are back on-trend. The blue designer paper was punched using a Martha Stewart Lace Doily edge punch. I tied on some peach organza ribbon then threaded some peach/gold twine through a gold heart charm and glued that underneath the organza ribbon using fabric glue. The twine came in a pack of 6 from KMart.
The sentiment panel was diecut using a retired Spellbinders Shapeabilities Labels Trio die and popped up on dimensionals.
The peach diamantes on the top RHS I bought on EBay ages ago. It was a bulk lot of all sorts of colours. I glued them on using Helmar 450 glue.
Once I had finished the card front, I glued it onto a white card base using Tombow Mono Multi glue.
I decorated the card inside too. Please excuse the quality of the image but I took it very late in the afternoon and the light was dreary and no amount of editing seemed to improve it much. Oh well!
The sentiment is also from the Beautiful You stamp set. I added a strip of leftover designer paper then added the stickers on the LHS from the Mintay Harmony Cardboard Sticker sheet.
Here is the gift box:
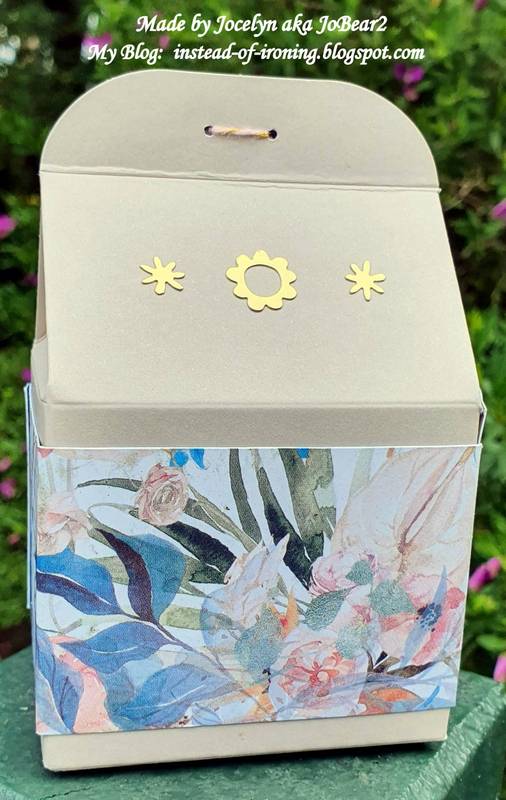
This was a last-minute make so by the time I finished it to photograph it, the light was terrible for photographing. The box is by Stampin' Up and has been in my stash forever and retired. I wrapped some designer paper around the box then punched two tiny holes using a retired Stampin' Up 1/16" Hole Punch. I bought this punch on clearance and it is very handy when you only want a tiny hole in something. I threaded the peach/gold twine through the holes. The sentiment is also from the Beautiful You stamp set. I diecut the sentiment using a Spellbinders Oval Nestabilities die and popped it up on dimensionals. I ended up stamping the sentiment 3 times after smearing it when I diecut it because I was too impatient to let it dry! Amazing how you just don't think when you are under time-pressure! The gold stickers are also from Stampin' Up but long retired.
Here is another photo of the box from the side:
And a photo of the back:
I popped a pair of earrings in a small organza bag into the box and nestled them in some gold tissue paper. I bought the earrings from my local Pharmacy which has some beautiful giftware but they didn't come in a box so I had to put my thinking cap on for how to wrap them and to make them look elegant. I was really pleased with how the box turned out and I love how the box matches the card.
Thanks for stopping by!
Jocelyn
Card Recipe:
Stamps: Stampin' Up Beautiful You (retired)
Ink: Versafine Onyx Black
Designer Paper: Mintay Harmony 6" x 6" paper pad + 12" x 12" papers + Sticker Sheet
Accessories: Big Shot, Cuttlebug Textile embossing folder (retired), gold heart charm (stash), 1" wide peach organza ribbon (stash), peach/gold twine - KMart, Lyra watercolour pencils, #2 round paintbrush, dimensionals, Helmar 450 glue, Tombow Mono Multi glue, fabric glue, peach diamantes, Wink of Stella clear glitter brush, white card base, Ranger watercolour cardstock
Dies: Spellbinder Shapeabilities S3-147 Labels Trio (retired), Lifestyle Nesting Circles + Scalloped Circles
Punches: Martha Stewart Doily Lace Edge
Gift Box Recipe:
Stamps: Stampin' Up Beautiful You (retired)
Ink: Versafine Onyx Black
Designer Paper: Mintay Harmony 6" x 6" paper pad
Accessories: Stampin' Up Kraft Gift Box (retired), Stampin' Up gold stickers (retired), Stampin' Up 1/16" hole punch (retired), Big Shot, doublesided tape, dimensionals, peach/gold twine - KMart, white cardstock scrap
Dies: Spellbinder Scalloped Oval Nestabilities
Labels:
21st Birthday,
Big Shot,
Birthday,
Cuttlebug,
Cuttlebug Embossing Folders,
Feminine,
Gift Boxes,
Lifestyle Dies,
Mintay,
Nestabilities,
Spellbinder,
Stampin' Up,
Watercolour pencils,
Watercolouring
Thursday, April 13, 2023
Penny Black Dancing Chick Easter Card
Hi everyone 😀
My Craft Room has been a whirl of activity - partly from revamping my room after the purchase of some second-hand Ikea units off Facebook Marketplace for only $20 - and from making a couple of cards in amongst the total chaos of it all. I started revamping my room in December but then COVID struck and I have been very tired ever since. Little by little, I am getting things sorted out but can't do too much so it's been more than a little frustrating! 😒
The card I am sharing today is an Easter card that I made for my daughter. This is also my card for the following Challenges:
Penny Black Saturday Challenge - April - Anything Goes with option of Something Funny
Creative Knockouts - #491 - 2 or more Patterned Papers
Splitcoaststampers - Free for All Friday F4A684 - Easter
The main image is a retired Penny Black wood-mounted stamp called 'Dancing Chick'. I have had this stamp for many years and I just love how joyful that little chick is. I stamped the chick using Versafine Onyx Black ink onto Ranger watercolour cardstock and coloured it with a mix of Jasart Voyager watercolour discs and Faber-Castell watercolour pencils using a #2 round paintbrush. I diecut the image panel using Lifestyle/Quickutz Nesting Card Templates dies and my Big Shot.
The larger hearts around the chick are a die from Impression Obsession - Mini Heart Row - and the tiny hearts are the leftover punchies from my EK Success Arrows border punch. I glued them on using Tombow Mono Aqua glue.
The designer papers are by American Crafts - Hello Spring - from 2016 so long-retired. Just love the bright colours in this paper pad! All the layers on my card are designer paper.
The sentiment is by Memory Box - Springtime Bunnies - another older set - and was stamped using the same black ink. I diecut it using a Spellbinder Shapeabilities Labels Trio die then added 2 x 4mm aqua Crafter's Choice Bling.
Both the sentiment and main image panel are up on dimensionals.
I added some Stampin' Up! Dazzling Details glitter glue to the hearts, flowers and the bunny's cheeks.
Once I had finished the card front, I attached it to an Anko white card base using Tombow Mono Multi glue. I buy all my card bases from KMart as they are a great value for money.
We had a quiet Easter break and just enjoyed our time together and having a break from working. It was really cold and wet so we lit the slow-combustion fire and hunkered down inside. I pity anyone who went camping as it would have been miserable!
Thanks for stopping by!
Jocelyn
Card Recipe:
Stamps: Penny Black 'Dancing Chick' 2564F wood-mount, Sentiment - Memory Box Springtime Bunnies CL5169 clear
Ink: Versafine Onyx Black
Designer Paper: American Crafts - Hello Spring 6" x 6" pad (retired) - from 2016
Accessories: Stamping Platform, Big Shot, Tombow Mono Multi and Mono Aqua glue, dimensionals, Crafter's Choice Bling VE077, Jasart Voyager watercolour discs, Faber-Castell watercolour pencils, #2 round paintbrush, Stampin' Up! Dazzling Details glitter glue, Ranger watercolour cardstock, Anko white card base (KMart)
Dies: Spellbinders Shapeabilities Labels Trio S3-147 (retired), Liftstyle/Quickutz Nesting Card Templates DCO431, Impression Obsession Mini Hearts Row DIE134-D
Punches: EK Success Arrows border
Labels:
Big Shot,
Easter,
Impression Obsession,
Lifestyle Dies,
Memory Box stamps,
Penny Black,
Spellbinder,
Watercolour pencils,
Watercolouring
Subscribe to:
Posts (Atom)


.jpg)